The Corned Beast Hash Stack


Ever have an idea that you can’t shake? I had all the ingredients. I wanted to make them into a sandwich. I didn’t want to fry the components in separate pans & use the oven… so I did it all on a big baking sheet.

It worked. Mostly.

A layered sandwich featuring hash brown patties, melted cheese, scrambled eggs, & corned beef hash served on a white plate.

The hashbrown patties came in the shape that I wanted to mimic, so I wasn’t interested in a muffin tin for the eggs or the corned beef hash. I may just used canned corned beef next time & not the hash… and I may end up cooking the eggs separately. Maybe.

This is how I did it this time. I made 4 of them.

Ingredients:

  • 8 frozen hash brown patties
  • 1 can of corned beef hash
  • 4 eggs
  • Milk (optional)
  • Salt, Pepper, Onion Powder to taste
  • 4 slices of American cheese singles
  • Spray oil
  • Heavy duty aluminum foil.

How I did it…

  1. Preheat the oven to 425° on the air fryer setting.
  2. Make 4 foil rings the size of your hash brown patties and set them aside.
  3. Sprayed the (large) backing sheet with the cooking oil.
  4. Pop those hash brown patties on like a checkerboard.
  5. Put it in the oven for 5 minutes.
  6. Take it out, flip the patties, and spoon the corned beef hash into some of the empty spots. (Think if each row or column like 1 sandwich.)
  7. Pop it back in & crank it down to 400° on air fry for another 10 minutes.
  8. While that is going mix your egg, milk. & spices.
  9. Pull the chaos triple checkerboard out and flip the corned beef.
  10. Put the foil rings in place in the empty spots, pour the eggs in there, and put it back in the oven for 5 minutes.
  11. Pull it out, remove the foil rings that barely worked, toss on the cheese slices, and pop it in for 2 minutes.
  12. Take it out, let it cool for 3½, and stack it on a plate! (I added ketchup here too – should have also used some Red Hot or something similar.)
    • That’s…
      • -Hashbrown Patty-
      • —— Cheese —–
      • ——– Egg ——-
      • Corned Beef Hash
      • -Hashbrown Patty-
  13. Eat it!

It’s a work in progress, but it was delicious. What do you think? How would you do it? Our oven has a convection setting and an air fry setting. I could see this working with either, or just by baking it… adjusting the time & temp. I didn’t want to stack it like a casserole, but I certainly could have… and frozen hash browns or tater tots may have worked…. The egg would probably have to be used as a binder for that and/or the corned beef… but then were in casserole land again, not a stacked sandwich.

Biscuit Dough Pretzel …Blobs?


The algorithm wanted me to try the canned biscuit dough pretzel bites. It kept coming up. I kept clicking. I posted about it on social media asking questions. I looked at recipes online. They all had different methods! Are these people even trying their own recipes? They’re wildly different.

As far as my pretzel tastes: I like Auntie Anne’s the best, SuperPretzel is the gold standard, and Philly Pretzel Factory is passable.

A table laying out the different methods of prepping pretzel bites with egg wash, butter, boiling in baking soda, or just a baking soda bath.
Crazy Biscuit Dough Pretzel Blob Table

I decided to try some different methods, & bounce it off of AI to get a cooking time/temp. I put the following into Gemini, ChatGPT, & Perplexity:

Here’s what they said:

Here's a breakdown of how to make delicious pretzel bites from biscuit dough: 1. Baking Soda Solution: Water: 8 cups Baking Soda: 1/2 cup 2. Boiling vs. Coating: Boiling: Bring the baking soda solution to a rolling boil in a large pot. Carefully drop in a few pretzel bites at a time for 30 seconds. Use a slotted spoon to remove them and place them on a baking sheet lined with parchment paper. Coating: In a shallow dish, combine the baking soda and water. Dip each pretzel bite into the solution to coat completely. Let excess drip off before placing them on the prepared baking sheet. 3. Egg Wash vs. Butter Wash: Egg Wash: Whisk together 1 large egg with 1 tablespoon of water. Brush generously over the pretzel bites. Butter Wash: Melt 2 tablespoons of butter. Brush evenly over the pretzel bites. 4. Baking: Oven Setting: Convection Bake is generally recommended for even cooking. Temperature: 400°F (200°C) Time: 10-12 minutes, or until golden brown. 5. Your 4-Quadrant Experiment: Your idea of baking four batches with different combinations is a fantastic way to compare and find your favorite! Here's a summary: Quadrant 1: Boiled in baking soda water + Egg wash Quadrant 2: Boiled in baking soda water + Melted butter Quadrant 3: Coated in baking soda water + Egg wash Quadrant 4: Coated in baking soda water + Melted butter Tips & Considerations: Biscuit Dough: Use your favorite brand or make your own! Shape: You can shape the biscuit dough into balls, twists, or any other desired shape. Salt: Sprinkle with coarse salt immediately after brushing with the egg or butter wash. Cooling: Let the pretzel bites cool on a wire rack before serving. Enjoy your homemade pretzel bites! I hope this comprehensive guide helps you create the perfect batch. Let me know if you have any other questions.
Gemini’s Answer
You’ve got a great experiment in mind! Let’s break this down and get you set up for pretzel bite perfection. Here's a streamlined approach to your method and testing: Baking Instructions Preheat oven: Convection setting: 400°F (best for even browning and crispiness). Traditional oven: 425°F (slightly higher temp compensates for lack of air circulation). Baking time: 8–12 minutes. Start checking at 8 minutes. Pretzel bites should be golden brown and puffed. Baking Soda Water Solution Ratio: 4 cups water to 1/4 cup baking soda. This concentration gives the pretzel flavor and helps create a chewy, golden crust. Method: Boiling: Bring the solution to a boil. Boil the dough pieces for 20–30 seconds per batch, flipping halfway. Drain on a wire rack before coating. Coating: Dip the dough pieces in the baking soda solution for about 15–20 seconds, then place them directly on the baking sheet. Washes Egg wash: Use one whole egg, whisked with 1 teaspoon of water for a shiny and slightly firmer crust. (Egg whites alone will give more shine but less flavor; yolks alone will create a deeper color but softer finish.) Melted butter: Brush after baking for a rich, soft finish. Optionally, sprinkle with coarse salt immediately after brushing. Your Experiment: Quadrant Plan Here’s how to organize the quadrants: Pretreatment Wash Notes Boiled Egg wash Classic shiny pretzel crust. Boiled Butter Rich, soft crust with chew. Coated Egg wash Less chewy but still glossy. Coated Butter Softest, richest option. Steps for Your Test Divide the biscuit dough into even pieces (about 1 inch each). Prepare the baking soda solution. Treat the dough using your boiling and coating methods. Place the treated dough pieces on a parchment-lined baking sheet. Apply your chosen washes to the corresponding groups. Bake on convection at 400°F for 8–12 minutes. Post-Bake Notes Once baked, taste-test the results. The differences in texture, shine, and flavor between the methods should help you decide your favorite! Let me know how the experiment goes—I’d love to hear about your results!
GhatGPT’s Answer
Answer I'll help you navigate the best method for making biscuit pretzel bites based on the search results. Recommended Baking Method Temperature: 425°F Setting: Traditional oven setting Baking Time: 8-15 minutes (until deep golden brown) Baking Soda Solution The most consistent recommendation is to fully boil the biscuit pieces in a baking soda bath, not just coat them. The recommended ratio is: 4 cups water 1/4 to 1/2 cup baking soda Boiling Process Bring water to a boil Dissolve baking soda completely Boil biscuit pieces for 15-20 seconds Use a slotted spoon to remove pieces Coating Options For the best results, I recommend using an egg wash. Here's why: Egg wash provides a more golden, glossy finish You can use the whole beaten egg Alternatively, you can use melted butter Experimental Approach Your idea of baking four quadrants with different methods is excellent. This will help you determine the best technique. Here's a structured approach: Quadrant Baking Soda Treatment Coating Expected Result 1 Boiled Egg wash Likely best traditional pretzel texture 2 Boiled Melted butter Softer, more buttery finish 3 Coated Egg wash Less authentic pretzel texture 4 Coated Melted butter Least pretzel-like Pro Tips Cut each biscuit into 4-9 pieces Sprinkle with coarse salt immediately after coating Serve immediately for best taste and texture
Perplexity’s Answer

I’ll try to link to the full answers here too, as I did keep all 3 conversations going for a bit with different queries.

They looked OK for the most part. I had two cans of pre-made biscuit dough, both were Pillsbury Grands Southern Homestyle. One was Butter Tastin’, one was Buttermilk. Butter Tastin’ was tray 1, Buttermilk was tray 2. I tried all the things. Baked at 425° for 8 minutes. The boiled ones puffed up a bit, I only let them go for 15 seconds using Alexa as my timer, as I read that boiling too long in the baking soda can give you a metallic taste. The baking soda bath was in warm water… I only left them in for as long as it took me to boil the other ones. I did forget to put salt on until halfway through cooking. I used the coarse salt grinder.

A photo of 64 pretzel bites made form pre-made biscuit dough across two trays (& parchment paper) & a few cooking methods.
Pre-Made Biscuit Dough Pretzel Blobs by AiXeLsyD13

I broke each quadrant down & gave it a letter, & a really short summary…

8 pretzel bites on a plate, labeled A through H.
Absolute 🥨 Shenanigans

So, that was a thing. Definitely going boiled, & egg wash next time. May seek out some coarse salt or pretzel salt. I may try it at 400° on the convection setting for 8 minutes, or a little longer on the regular setting at 425°. Also, may try cooking on a baking rack & cooling on a cooling rack. I may go got more traditional biscuit dough too, instead of what I had. At the end of the day, these all tasted great dipped in some Herlocher’s. I just wish I had some beer left, but I used my last can of Straub Amber making BBQ pulled pork sandwiches (and rocking out) today. Also, gotta try some with cheese in the middle, right?

Also, I know they’re not perfect yet, but these AI chat bots can REALLY help consolidate / create recipes pulled from so many online sources. It seems like you can search for 5 recipes, & get 7 different cooking times & temperatures at the very least. Then, like my stuff, if there’s no “Jump to Recipe” button, you gotta use Cooked.Wiki, JustTheRecipe.com, or Just The Recipe. As of now, the AI bots are not riddled with advertising and paid ad placement/rankings. They all have their strengths & weaknesses.

Here’s where you hit me up in the comments and/or on social media with your tried-and-true pretzel & pretzel bite methods. I’m not really all that super interested in making dough, so that’s why the canned dough piqued my interest. And, have you used AI prompts for cooking or anything else interesting lately?

Stuffed Cabbage Recipe


So, recently I was hungry for stuffed cabbage. I had never made it before, so after Googling a few recipes and soliciting advice from a Facebook food group and Nextdoor, I came up with my own. You can put this URL into Just The Recipe or do the Cooked Wiki “hack” to skip all my bullshit up here.

I’m not a huge fan of rice in meatballs like you typically see with stuffed peppers or stuffed cabbage, so I was googling recipes without it and kept finding stuffed tagged as “keto,” or with other grains substituted in. I think it’s a texture thing for me, so I opted to go my own route. Also, get out of here with your sweet/hot sausage, I’ll add my own spices. Keep your veal/beef/pork mixes. Maybe ground turkey would be cool. Keep the lamb away.

It seems that many are tied to their family’s traditional way of making it, and that’s pretty cool. I always thought of it as an Eastern European type dish, but lots of cultures have their own spin & own words for it according to Wikipedia. The thought of omitting rice, or using condensed tomato soup instead of a tomato sauce or V8 sent some people into a tizzy. I even learned that lots of people include sauerkraut, and some people like it served with sour cream. Some people make it like a casserole. We always had the tomato soup version growing up, so that’s what I like/expected. Who knew? I’ll probably make it different next time… but both kids & the wife liked it, so I won’t experiment too much.

I used glass baking dishes covered with foil, but got advice that a roasting pan, an electric roaster, the crock pot, a Dutch oven, a soup pot on the stove, or a pressure cooker all work well, too.

Although, I would like to wrap a piece of bacon around the rolls and throw them on the smoker…

At any rate, check out the recipe, and give me your recipes. tips, tricks, advice, and heavily guarded family recipe secrets in the comments.

Also – What do you call them?

Here’s what I did. 🤷

Get It:

  • 1 head of cabbage.
  • 4-ish lbs. of ground beef. (I used 3 lbs of 8/20 & 1 lb. of 90/10)
  • 2 eggs
  • ½ Yellow Bell Pepper
  • ½ Spanish Onion
  • 1 cup shredded carrots (I bought a bag and I’ll use it for other stuff too.)
  • 1 beef bullion cube
  • 1 stick of butter
  • 3 23.2 oz. cans condensed Tomato Soup
  • Bread crumbs (Do I look like I measure stuff? Probably a cup and a half?)
  • Shredded Parmesan Cheese (in the ‘lil fancy container by the expensive cheese)
  • Minced Garlic (just have the jar ready I’m lazy and don’t crush/mince my own)
  • Spices. I used salt, black pepper, white pepper, onion powder, garlic powder, Season All, & Table Blend. (I just throw it on at every step indiscriminately with complete abandon and total anarchy.)

Do it:

  1. Preheat Your oven to 400°.
  2. Get a stock pot, fill it enough to cover your cabbage. Drop in the bullion cube, and salt, minced garlic, and whatever seasoning your heart desires, and crank it to high with the lid on.
  3. Chop your onion in half. Toss half in the boiling water, but take the lid off first & then put it back on.
  4. Mince the rest of the onion.
  5. Cut up the yellow pepper. Feed half to your kids, the dog, or your significant other. Or just eat it. That’s the perk of being the cook. Mince the other half.
  6. Pull out a handful of the minced carrots, a big knife, and what them up until they are tiny pieces of shredded carrots. Our dog loves carrots, so I sprinkled some on her food bowl.
  7. I greased 3 glass baking dishes with the stick of butter. I used a 9″x13″, an 8″x9″, & a 9″x9″ because that’s what I had. I swear we broke like 3 glass dishes last summer.
  8. Melt what can surely be described as an obscene amount of butter in a skillet and sauté the onion, then the pepper & carrots on medium heat. I was sure to hit them with onion powder, garlic powder, salt, & pepper. I like to cook onions slow & low.
  9. Drop the head of cabbage in your now boiling water while you’re doing all that. Yes, remove but do not replace the lid.
  10. Put the sautéed veggies aside and let them cool a bit while you get the meat mixture ready.
  11. Set up a colander or strainer over a large bowl, & get your tongs ready.
  12. Beat your eggs, & add spices.
  13. Mix the meat, eggs, breadcrumbs, some cheese, sautéed veggies, some minced garlic, and lots of spices. I do it by hand. I wash my hands very well before & after, so you probably should too. But hey, you do you.
  14. By this time, hopefully your cabbage has been boiling 10-ish minutes. Use tongs to gently peel one leaf at a time and place it lovingly in your colander. Don’t go too quick with it and splash/burn yourself, because I would definitely never ever do that.
  15. Open the cans of tomato soup and cover the bottom of your baking dishes.
  16. Get the leaf, cut out the bottom tough part of the leaf rib if so inclined, slap in your meat mixture, and wrap it like a burrito – folding in the ends part way through. I didn’t measure, I eyeballed the meat to leaf ratio.
  17. Fill the baking dish(es), pour on & season the rest of the condensed tomato soup, sprinkle on some more parmesan cheese, cover in foil, and bake for an hour.

Tips/Lessons Learned/Parting Thoughts:

  • I was going to bake it at 375° and I probably should have, taking the foil off for the last 15 min. They were well over the recommended 160° internal temp for ground beef. Maybe some browning/caramelizing would not be a bad thing?
  • I saw a lot of tips for freezing the cabbage instead of boiling it, but I also read just as many responses saying that it can drastically affect the texture and not in a good way.
  • I may put in back next time. Maybe inside? Maybe wrapped outside?
  • Hear me out… Reuben cabbage rolls. Corned beef? Sauerkraut? Thousand Island or Russian dressing? Rye breadcrumbs? (We make non-traditional stuffed peppers sometimes, too.)
  • If you like rice, by all means include it. Or barley, or any other grain. I considered those tiny lil’ pasta balls… but maybe I just like to say Acini de Pepe way too much. Some people recommended cauliflower rice, also.
  • Check out all my other recipes and let me know what you think!
  • I got some thoughts from more tips & feedback when I posted photos on the FB food group & Nextdoor, too.
  • Are you still reading? Check out the recipe, and give me your recipes. tips, tricks, advice, and heavily guarded family recipe secrets in the comments.

Thanksgiving Dinner! – The Recipes.


I love to put together a holiday meal, especially thanksgiving. I have it down pretty good to corral the chaos.

First prepping the turkey & stuffing…

I do the bird in the electric roaster, stuffed, for 15-ish minutes per lb. @ 325° Farenheit. I roasted in the preheated pan on full for about 45 minutes at the start before turning it down. I inject the turkey in a few sports with a mixture of melted beer, butter, & spices. I usually rub some softened butter on top and toss on lots of seasoning there too. I usually pour a bottle of beer and a box of turkey broth in the bottom, & include some carrots, celery, & an onion.

Don’t worry about samonella with a stuffed bird. Take it to 165°. Always use a food thermometer. Some of the dark meat of the turkey will be overcooked but it will still be juicy & delicious. I haven’t killed anyone with my turkey yet.

The extra stuffing can be made into stuffing balls, but I put it in the crock pot. You just have to stir it, & maybe add extra turkey or chicken broth if needed or it will stick to the sides a lil’ burnt.

Do the math, & time it so you’re pulling the turkey out about a half an hour before you want to serve it.

Then I make the sides. Check out my recipes!

I cut up the butternut squash first, & put it in the fridge for when I needed it.

I peeled & quartered the potatoes, let them sit in cold water (& turkey broth).

Cut up & prep the brussels sprouts & carrots, you want to pop them in about 45 min before you plan to eat.

Prep the squash & put it in right after the brussels sprouts.

Turn on the potatoes, by the time they cook & you do your thing… it the other stuff should be ready to go.

Others brought even more sides… cranberry sauce, green bean casserole, sweet potatoes, deviled eggs, & rolls!

If I make green bean casserole, I pretty much use the Campbell’s recipe or French’s Fried Onions recipe… sometimes with an added can of mushrooms, fresh green beans, & maybe even some bacon pieces or ham.

If I cook with beer it’s either Yuengling Traditional Lager or Straub Amber.

For the gravy, I just use pan drippings broth from the turkey, and eyeball together a slurry of corn starch, add it, & some more spices if needed.

Someday I am going to brine a turkey with a buttermilk brine & cook it on the smoker, but… not for Thanksgiving. Well, not the first time anyway.

I like to keep the oven open for sides, & any brought sides or pies that may need warmed up.

Thanksgiving Sides!  Brussels Sprouts & Rainbow Carrots, Butternut Squash, Mashed Yukon Gold Potatoes, & Stuffing!
Thanksgiving Sides! Brussels Sprouts & Rainbow Carrots, Butternut Squash, Mashed Yukon Gold Potatoes, & Stuffing!

What are your Thanksgiving or other holiday meal prep tips, go-to’s, methods, or favorite recipes?

🦃 Don’t forget these free Thanksgiving Mazes! 🦃

Roasted Butternut Squash


I love squash, it’s a toss-up between acorn & butternut as my favorite. This is a nice sweet & simple holiday go-to.

Oven Roasted Butternut Squash

Ingredients:

  • 2 whole butternut squash
  • Extra virgin olive oil
  • Paprika
  • Brown sugar
  • Salt

Do it!

  1. Pre-heat the oven to 400° Fahrenheit.
  2. Cube the butternut squash, get rid of that skin.
  3. Toss the cubes in the EVOO & spices to taste. I go easy on all of em.
  4. Put it in the oven in a single layer on a baking sheet or glass baking dish for about 30 minutes.
  5. That’s it!

You could also…

  • Just buy it already cubed. It really probably is worth it if you’re going to cook it soon.
  • I destroyed a vegetable peeler trying to peel it once. Just use a knife to cut off the skin.
  • Add as many spices as you want, skip the sugar, use maple syrup, or whatever sounds good to you. You know what you like!

Any advice? Do you do it another way? Do you halve it & roast it like acorn squash? What’s your favorite squash? Share your secrets!

Roasted Brussels Sprouts w/ Rainbow Carrots


Another one of my holiday go-to’s, this one takes a bit of labor but it’s worth it.

Roasted Brussels Sprouts with Rainbow Carrots & Bacon pieces.
Brussels Sprouts! With some goodies…

Getchya mise en place:

  • One 32 oz. “family size” bag of Brussels Sprouts (or 2 lb. of bulk fresh)
  • One 16 oz. bag of baby cut rainbow carrots
  • One 2.8 oz bag of bacon pieces
  • Extra Virgin Olive Oil
  • Salt, pepper, garlic powder, whatever spices you want.

Do it:

  1. Pre-heat the oven to 400° Fahrenheit.
  2. I quarter the baby carrots – one cut long ways, one cut through the middle.
  3. I cut the bottom off of the sprouts, remove the outer leaves if they’re not great looking, halve them, and if they’re large, score the middle. (Look close at the photo.)
  4. Mix the sprouts, carrots, & bacon pieces in a bowl, add the spices, eyeball in some EVOO & toss to coat it all evenly.
  5. Spread evenly on a baking sheet or in a glass dish.
  6. Slap them in that oven for 40-ish minutes.

Tips n’ tricks:

  • Of course, use whatever spices fit your fancy.
  • If you can’t find rainbow carrots, regular ones or parsnips or both are an absolutely awesome addition also.
  • Roasting caramelizes the sometimes bitter brussels sprouts. You may find that you prefer them “more” done or “less” done.
  • Scoring the middle helps them roast fully or more evenly.
  • You can skip the bowl if you can stir it all up and not make a mess like I do.

So, what do you think? Do you like Brussels Sprouts? Do you prepare them a similar or wholly different way?

Cooking Stuff From the Garden 🌶🥒


So, today I felt like cooking. We recently came back from a weekend at a cabin and a week at camp. We had a bunch of new stuff ready in the garden, and some stuff past ready.

Here are three quick recipes that I posted on Instagram. The Poblano peppers, banana peppers, straightneck squash, and snap beans were grown in our garden.

🥓🧀🌶🍄🍝🥒🌱

Bacon-Wrapped Poblano Peppers

Well, that turned out well. Got some poblano from the garden this week. I mixed some bacon bits, minced garlic, shredded cheddar cheese, and steak seasoning into some cream cheese, cut the peppers in half, stuffed with the peppers with the mixture, sprinkled more cheddar on top, wrapped with bacon, & baked on a sheet pan at 375° for 40 min.

Turned out pretty good if I do say so myself!

Snap Beans with Mushrooms & French Fried Onions

Some fresh snap beans from the garden. Steamed, then tossed in with some sautéed mushrooms, French fried onions, minced garlic, a pinch or 2 of flour & fresh cooked bacon pieces. (Used the leftovers from the peppers.)

Straightneck Squash Parmesan

Had some straightneck squash that grew a bit too big while we were at camp. I had it in my head to prepare it sort of like eggplant parmesean & fried zucchini. I didn’t want the stacked lasagna version, I wanted something with a bit of crunch.

I sliced then up, dredged in flour/cornstarch, egg/buttermilk. & coated in regular & panko breadcrumbs with a bit of parmesan “shake cheese” mixed in. I seasoned each step with Italian seasoning, garlic powder, & black pepper.

I baked them for about 25 or 30 min. on 400°, then topped with provolone & mozzarella slices & a bit more parmesan. They went back in for 10 min.

Served with bowtie pasta & covered in our favorite slightly doctored sauce.

Added the needed flavor to the overgrown squash and I actually preferred the consistency to eggplant.

🥒🧀🌶🥓🧄🍄🌱🍝

All in all, I was really pleased with the results, and I think the family was too.

Do you have some good recipes, tips, & tricks for these garden ingredients?

What do you like to grow and cook?

Meatballs and Lasagna.


First, the recipe.  Then, the story.  ‘Cause the other way around is a thing that everyone hates now.

Lasagna & Meatballs

Lasagna & Meatballs

I don’t measure much.  I had stuff from Aldi, Shop ‘n Save, & Giant  Eagle by the time I was done.  The kids helped.  They have been into helping to cook lately.  We like meatballs on the side, not meat sauce in the lasagna.  Get out of here with your sausage or pork or pepperoni too, this is BEEF territory.

We eventually decided on…

Ingredients:

  • A box of no-bake lasagna noodles from Aldi.
  • A 2½ lb. package of ground beef from Aldi.
  • Fresh spinach from Shop ‘n Save.
  • Fresh parsley from Giant Eagle (could’t order it from Aldi or Shop ‘n Save via Instacart.)
  • A tiny tub of Ricotta from Aldi.  (Instacart size fail.)
  • A giant tub of Ricotta from Giant Eagle.
  • 2 Aldi zucchini.
  • A 2-cup bag of “Italian Blend” cheese from Aldi.
  • A 1½ cup bag of shredded parmesan & romano cheese from Giant Eagle.
  • A 1½ cup bag of shredded mozarella cheese from Gaint Eagle.
  • 2 eggs
  • “Shake cheese” – Used both Parmesan & a Parmesan Romano blend.
  • A bag of “Italian Seasoning” croutons from Aldi.
  • Kraft Roasted Red Pepper Italian dressing.
  • 3 jars of the cheap Aldi marinara sauce.  (It is way better than the supposedly more delicious and expensive ones.)
  • Condensed Tomato Soup
  • Brown Sugar
  • Various spices no, I didn’t measure:
    • “Italian Seasoning” {Whatever that is.)
    • Dried spice-rack Parsely
    • Garlic Powder
    • Onion Powder
    • White Pepper
    • Coarse Ground Black Pepper
    • Sea Salt
    • Whatever Aldi “Seasoned Salt” that looks like the Lawry’s Seasoned Salt bottle or McCormick Season All is.

🌡️ Cook temp:  400° F

⏱ Prep time:  This isn’t Food Network, All Recipes, or Martha Stewart & Snoop Dogg.  How do I know?  I had a 6 year old and a 4 year old helping.  So, it was slow.

⏲ Cook time: 20 to 25 min. for the meatballs.  (Cook to a temperature, not a time.  The USDA says ground beef needs to be 160° F so you don’t die or something.  Get a food thermometer.)  45 min. covered in foil for the lasagna, 15 min. uncovered.

Method:

  1. Get out all your pots, pans, utensils, cutting boards, and stuff before you cook.  If you have children helping, get paper towels.  Get the ingredients out.  Wash your hands.  Wash the eggs.  We used 2 large mixing bowls, and an inordinate amount of oddly shaped glass baking dishes.
  2. Chop the parsley & spinach like a madman (or mad woman, or mad person of a non-specific gender).  Have the kids help.  They love sharp knives.  It’s important that they respect them and that you watch closely.  Very closely.  We sometimes use one of those still sharp plastic lettuce knives for stuff like this.  I didn’t measure.  We used about the whole bunch of parsley & a handful and a half of spinach.
  3. Slice up that zucchini as thinly as possible.  I don’t have a mandolin, so I did that instead of the kids.  Actually, I would still do that if we had a mandolin.
  4. We divided the parsley & spinach about equally into the 2 mixing bowls.  I talked about that thing where you add the same flavors across different dishes to tie them together, but I have no idea what the word for that is.
  5. In the meatball bowl, we tossed in the ground beef & the croutons.  We smashed the croutons first.  Oh, that was fun.  It probably got out of hand, but the bag didn’t pop.
  6. We also poured in some Kraft Roasted Red Pepper Italian dressing in the meatballs.  Amount?  Yes.  Until it looked good.  This is one thing I won’t bend on.  It is far more superior that any other Italian dressing.
  7. The we dropped in some Italian Blend shredded cheese & some shake cheese.  Measuring is for the timid.  Eyeball it.  Use the force, let it guide you.
  8. Mix it with your hands, roll into balls, and pop in into a glass baking dish, or 3 odd little ones.  We spaced them out.  I mean, you could use a baking sheet, and I used to prefer them in the electric skillet, but this is so easy.  We put all of the above spices in there too.  And sprinkled a bit on the outside once formed.
  9. We washed out hands again, and I set that in the oven & set the timer for 23 minutes because I couldn’t decide between 20 or 25.
  10. We poured the marinara & tomato soup in a pot, added some brown sugar (just a bit), shake cheese, parsley & italian seasnonings, & garlic.
  11. The kids stirred that.  And stirred that.  And stirred that.
  12. We put the ricotta in the 2nd mixing bowl already containing spinach & parsley.
  13. Add eggs, the rest of the “Italian Blend” cheese bag, some shake cheese, and some minced garlic… and whatever spices you want.  I told the kids here about depth of flavor in using the dried parsley vs. the fresh parsley and minced garlic vs the garlic powder… but I don’t know if they were paying attention.  They had just cracked eggs and we were about to mess with a giant gooey bowl of cheese.
  14. Go easy on that white pepper if you have it.  It goes a loooong way.
  15. Spread the sauce on the bottom of your biggest glass baking dish.
  16. We layed out the no-boil noodles.  It was my first time using them.  I think it went pretty well.  They fit 4 across and 1 at the end in our pan.
  17. On top of the noodles we did half of the ricotta mixture, the Parmesan/Romano shredded cheese, the zucchini, sauce, more noodles, the rest of the ricotta mixture, the shredded Mozzarella cheese, sauce, noodles, more sauce, and a mix of the Parmesan/Romano & Mozzarella cheeses.
  18. We like cheese.  The kids tasted the different shred varieties as we layered.  Ian liked the Parmesan/Romano & Molly liked the Mozzarella.
  19. I covered that in foil & put it in the oven for 45 minutes.  Then I uncovered it & let it go for 15 minutes.
  20. The extra sauce goes on the meatballs.

Ooh.  I snuck the story in on you didn’t I?  Wow.  Would you like to speak to the manager?  You might like my other blogs about meatballs or meatloaf or wedding soup… or any of my food stuff.  The kids went absolutely primate-poop over the meatballs.  The no-boil noodles were fine.  I liked that they were al dente.  There was enough liquid that I didn’t add any like the box suggested.  Be a rebel!  (OK, I asked for opinions on FB for that first on my page & in an Aldi recipe group.)

Oh yeah, completely unrelated, I made these this morning too:

Found the recipe here via Google: https://tasty.co/recipe/potato-flower-breakfast-cups


How do you make your meatloaf?


I posted the text below in two different Aldi fan boards on Facebook. I thought I’d also share here.  Text slightly altered, spelling mistakes corrected.  I feel like I make meatloaf different every time. How do you do yours?


🛒🍴🥩


Full disclosure, most of this was not from Aldi, but it all could have been. It all was cooked in the oven at 400°.

Meatloaf, Baked Potatoes, Brussels Sprouts, Carrots

The meatloaf went in first, for an hour and a half. The potatoes went right on the rack at the one hour and 15 minute mark, and the brussels sprouts and carrots went in at the hour mark. Maybe 55 min.? I did crank it to 425° at that point but in hindshight didn’t need to. I flipped the potatoes when the veggies went in, and at the 15 min. mark I put sauce on top of the meatloaves and stirred the sprouts n’ carrots.

The potatoes were just washed, poked, rubbed in EVOO & spices.

The sprouts & carrots where just cut up, drizzled with EVOO, salt, pepper, & bacon crumbles.

The meatloaf was 3 lbs. of 85/15, an egg, french fried onions, club crackers, spices, ketchup, A-1 (the Aldi stuff works too, I have used it in the past), a squeeze of spicy brown mustard, minced garlic, spices (I just grab stuff off the rack & go), shredded cheese, and bacon crumbles.

I broke it into two loaves, cooked in a glass dish on top of two slices of bread each. It absorbs the grease & prevents burning on the bottom.

The sauce/glaze was mostly ketchup, some A-1, a dash of mustard, plus some cheese and bacon crumbles.

Probably not a meal for the health-conscious.😁

I think I do meatloaf slightly different every time. I have used marinara and Parmesan, put hard boiled eggs whole in the middle, wrapped in a bacon weave, added mushrooms & onions, used ranch or french onion soup packets, chunks of bread, added milk, & more.

I know it’s one both kids will eat unless I get too crazy.

How do you do your meatloaf?


#MeatballSub #Recipe


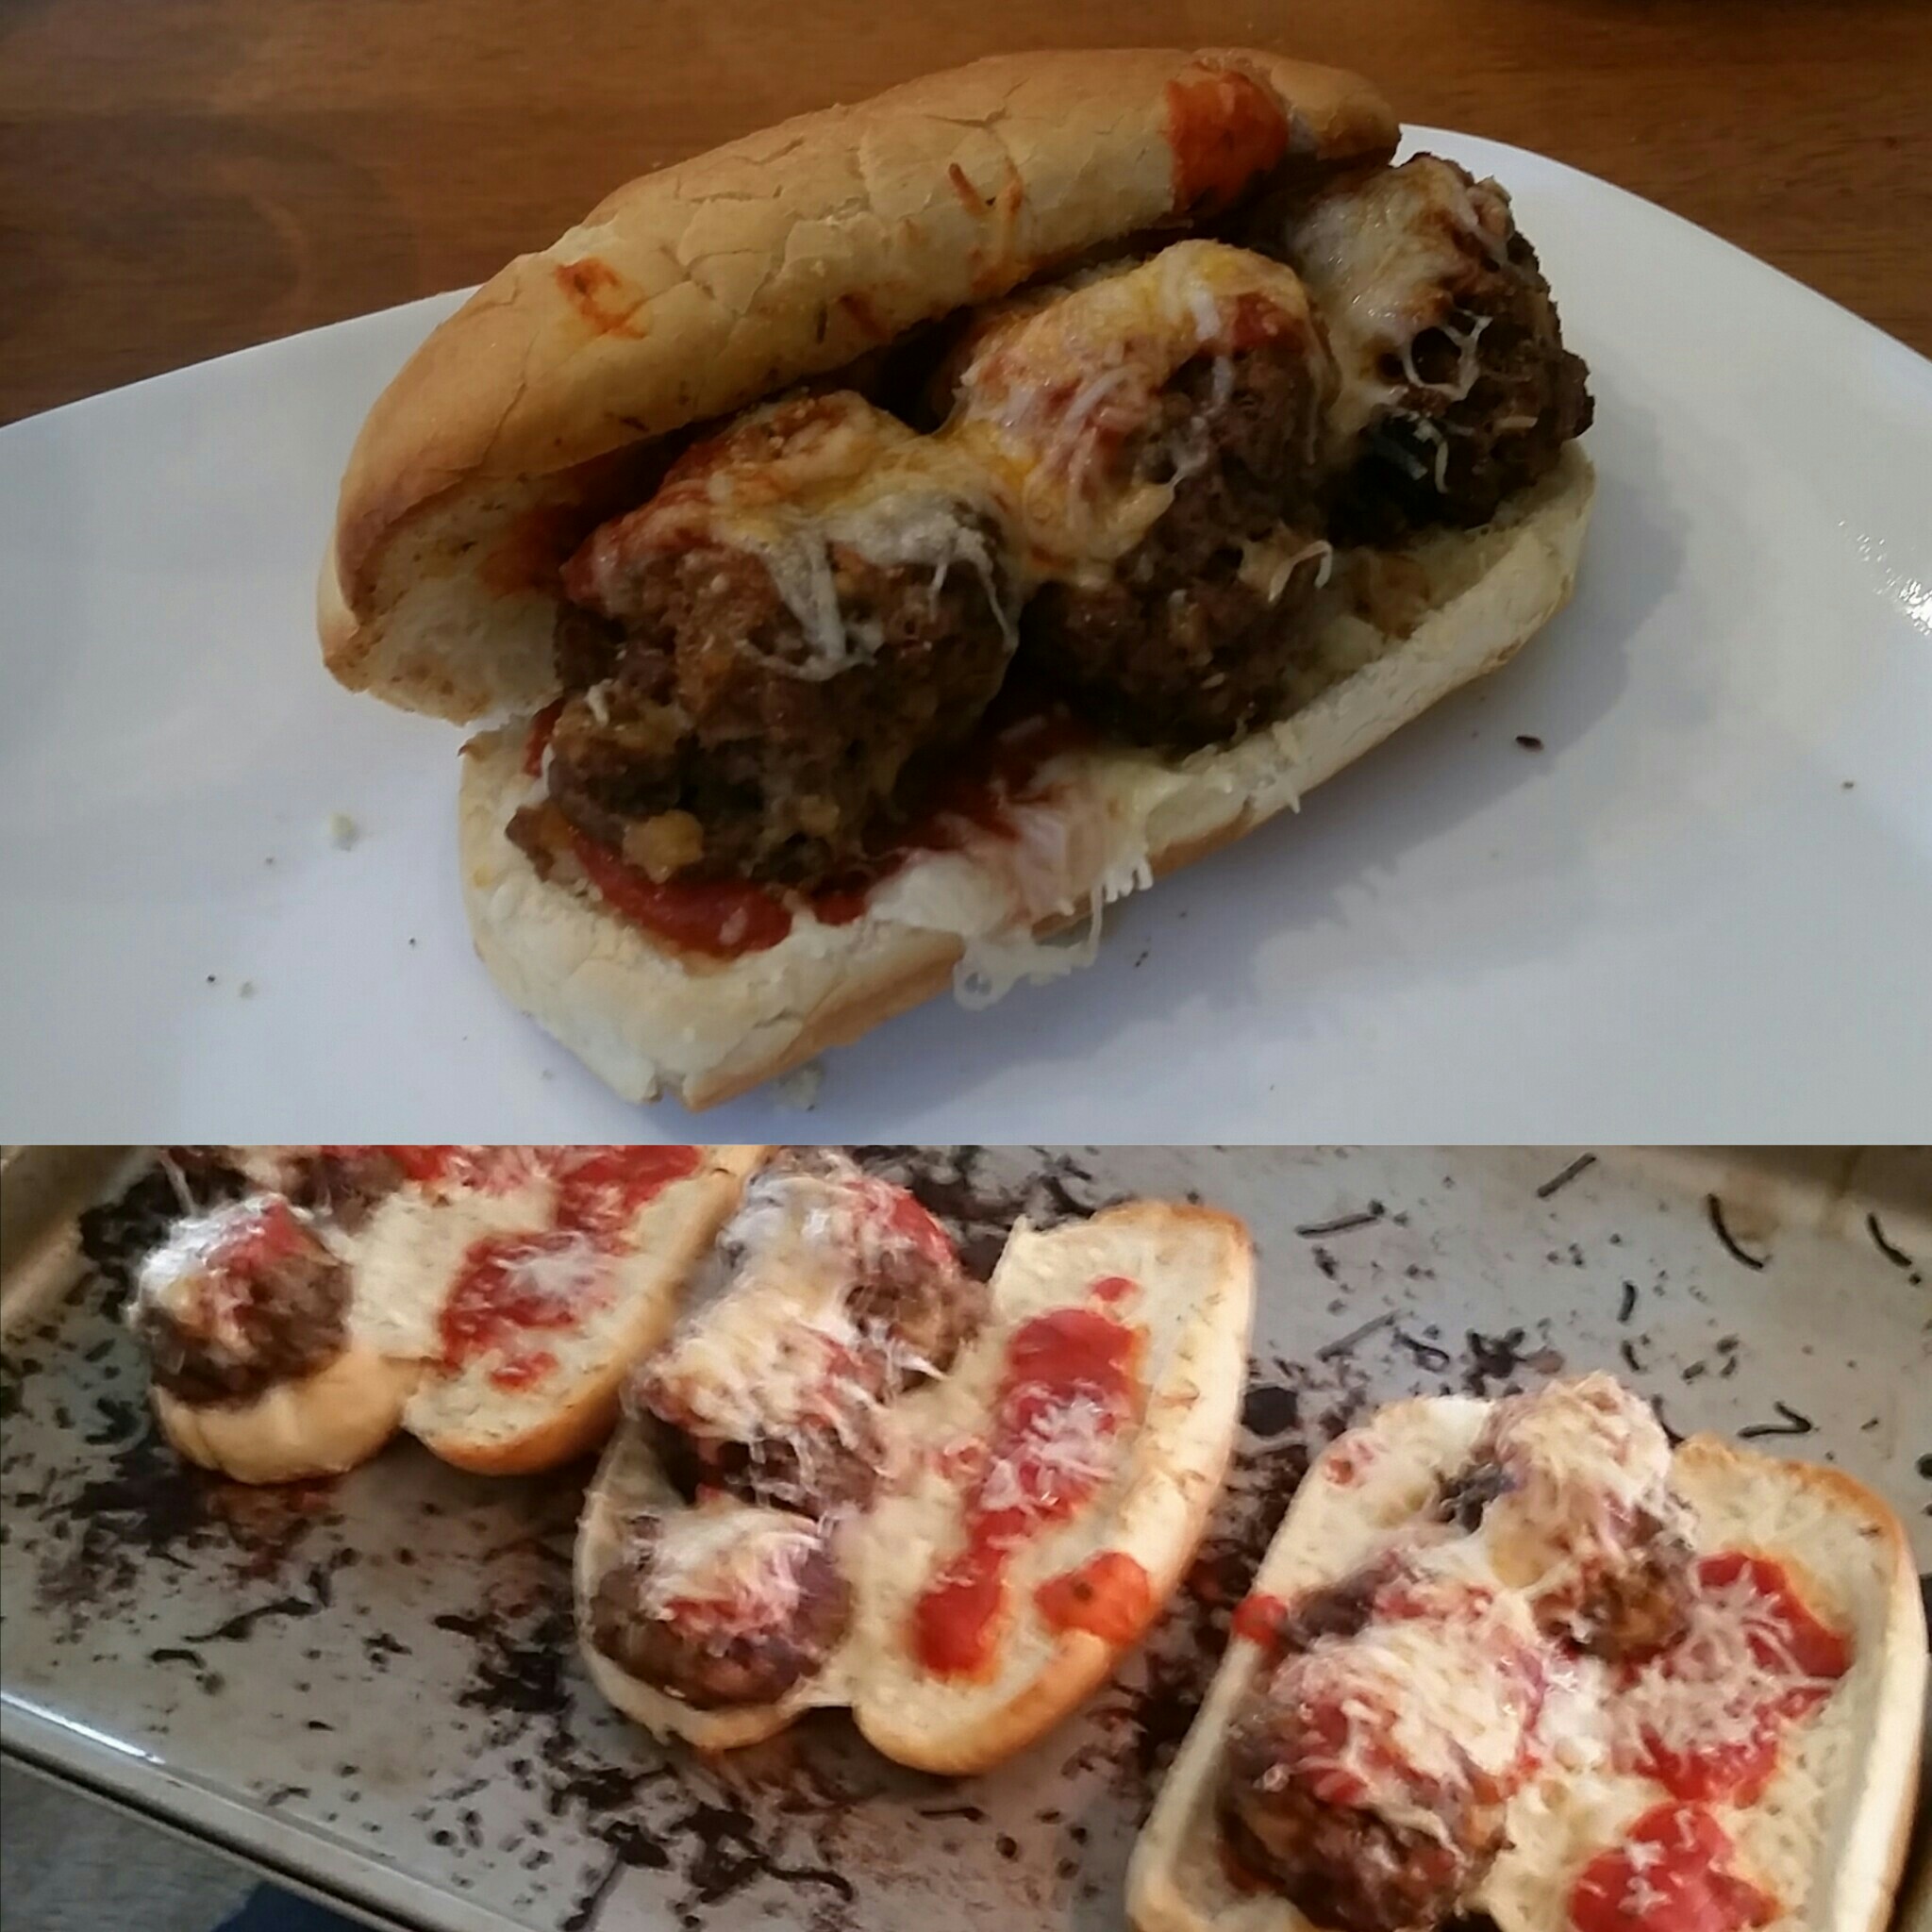
So, I’ve been hungry for meatball subs.  They’re so simple to make, but we just never seem to do it at home.  I shared the photo on social media, because I’m weird like that and it annoys people, and some people seemed to dig it.  wanted to share how easy it was with a minimal amount of effort.

So, the wife got a pound of ground meat from Aldi the other day, and I picked up the rest of the stuff that we didn’t already have at Giant Eagle on my way home from work.  I probably could have gotten all of this from Aldi.

So this is what I used…

  • 1 lb. of ground beef
  • a handful or two of finely shredded fancy 6 cheese “Italian” stuff – I started with a 2 cup bag.  We always have this or something similar around.
  • Whatever “shake cheese” you put on spaghetti. I have Parmigiano-Reggiano because they think it needs to sound fancy.
  • A handful of crackers.  We had “club” crackers from Aldi
  • Italian Dressing (we seem to really dig Kraft Roasted Red Pepper Italian)
  • A jar of cheap-ass pizza sauce  (I probably should have used some better marinara sauce)
  • Spices (Season All, cracked black pepper, onion powder, garlic powder, salt, Italian seasoning, paprika …whatever floats your boat.)
  • Brown sugar
  • Sub buns (I like the Cellone’s or bakery ones, but I was being cheap this shopping trip and got some weird mass-produced ones.)
  • EVOO
  • Butter

And this is what I did…

Meatball Subs

MEAT.

Turn the oven on first so you don’t have to worry about it later.  Put it on 375° because that’s always what they seem to say to put it on.  I don’t know why.  I don’t even know who they are.

I made some meatballs with the meat, some hand-crushed crackers, a dash of the pizza sauce, a dash of Italian dressing, a dash of whatever spices I grabbed off the rack (probably pepper, season all, onion powder, garlic powder, and paprika), a bit of the Parmesan shake cheese and the mysterious “six cheese Italian” stuff.

I put some spices on the outside because why not, and tossed them into a frying pan with EVOO and a small pat of butter on the bottom.  I pre-heated it to high, then turned it to 6 before I tossed in the balls.  6 is at about 6:00 on my stupid electric stove top.

I melted a bit of butter in the microwave.  I quickly cut open the buns, put them on a baking sheet, spread on some melted butter with a brush and added… garlic powder, onion powder, a dash of shake cheese, and “Italian seasoning” to the buns.  No Italian seasoning for my wife, and no garlic powder for my 2½ year old.  I popped them in the 375° oven on the middle rack for a bit.

I used tongs to turn the meatballs over & popped a lid on the pan.

I dumped the remaining pizza sauce into a soup cup (it was a little jar), and added a sprinkle of brown sugar.  I nuked it for 45 seconds or so.  Why?  I like sweet sauce, and grandma always said “it cuts the acid.”

I turned the meatballs on to an undone side, and got the sub rolls out of the oven.  I knew they were done because… I didn’t even look at them.  I just took them out.  They looked fine.  Plus, we’re not totally finished.  I added some pizza sauce and some of the finely shredded awkwardly named cheese to the buns.

I made sure the meatballs weren’t going to kill us with the food thermometer.  They weren’t.  I put those on the buns and added more sauce, shredded cheese, and shake cheese.

I set some meatballs aside for my 10 month old.  The sandwich was a little much for him, but he will eat just about anything you put in front of him.  Seriously.  even if it’s not edible.

I put the now built subs into the oven and cranked the knob to 400° because I am impatient and my 2½ year old kept asking if lunch was ready.  I turned the light on in the oven and watched the cheese melt.  Not only was that fun, I could also make sure I wasn’t going to burn the bejesus out of things.  I didn’t.  I took it out in time.

Well, some of the cheese that fell on to the baking sheet burned, because I made a mess.  Oh well.

These were pretty good, although next time I will use different/better sauce.  That squeeze stuff isn’t bad.  Maybe I can make a simple marinara.  Also, homemade-ish deli rolls or Cellone’s are worth it… and I would cut a little triangle out of the top like Subway used to, before we were over-saturated with them and they started to serve terrible cream-of-deathfish.

At any rate.  This is easy to do.  You could buy your own meatballs or bake your own bread or use cheese slices to make this as easy or as difficult as you like.  I cut my 2½ year old’s into 3 sections so she had sliders.  I cut my wife’s in 2.  I ate the whole thing in one big sandwich like a hungry hungry pig.  I refuse to apologize.

Share photos of yours or links to your own blogged recipe in the comments!