They say Pennsylvania has two seasons, Winter & Construction. The secret is, it’s always construction season! Celebrate with a maze while you’re sitting in traffic. Just, not while you’re driving.
I was recently in the hospital & had the time to draw a ridiculous amount of mazes. They helped me work through the pain and just kind of zone out a bit. Check them all out on my Instagram accounts at @AiXeLsyD13 & @MyMazes. (A few have multiple mazes in each post.)
Since Twitter became 𝕏, WordPress doesn’t push links there. I think Facebook eats links. And, I get no interaction from Threads or Blue Sky so far.
If you print & complete one of these, or finish it right on your screen, please post to your favorite social media & tag me! I’m @AiXeLsyD13 on pretty much everything, and it’s easy to find the blog page or me on Facebook.
Hopefully, I have some more cool maze-related news coming soon.
If this inspires you to do one, that would be awesome. Post on social media & tag me @AiXeLsyD13 on just about everything. (Except PayPal. Whoever has that must be a real asshole because I have been using AiXeLsyD13 since like Angelfire and AOL Instant Messenger.) I am trying out Threads and Blue Sky while Twitter is becoming 𝕏. I gave up on Mastodon and that one other one I forget the name of.
You can also email it to me like this anonymous solver did at world.and.lunar.domination@gmail.com.
☡🚧🚨🚨🚨🚧 SPOILER ALERT!Solution Below: 🚧🚨🚨🚨🚧☡
Reader-submitted solution to a 2012 maze that I inexplicably called “Shift Spiral Spin.”
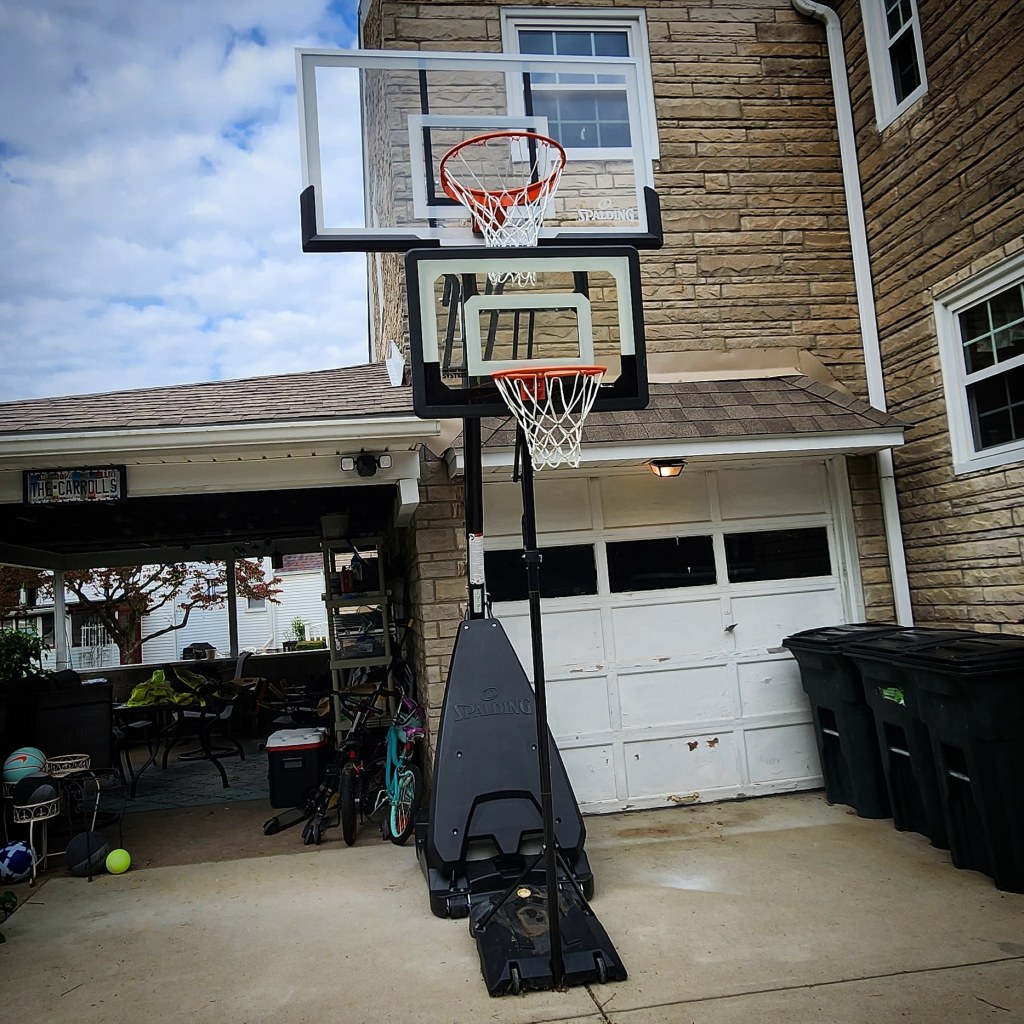
The kids have shown a commitment to their respective basketball teams over the years, so it was time for a significant upgrade in height and backboard size.
So, following is my review that should eventually go live on Amazon. I thought you may get a kick out of it.
🏀 This is a sturdy stylish basketball hoop. It is the described height and backboard size. The delivery was courteous and professional despite the dilapidated box. 🏀
That concludes the positive portion of my review. Putting this together was an exercise in patience & mental fortitude, and I failed. I mean, is it together now? Yes. Did it take much longer than it needed to? Yes. Am I, perhaps, just an idiot that can’t follow instructions? I doubt it, because every piece of furniture or children’s toy that I have purchased from the late 1900′ s to now has involved my dumb☆$$ assembling it. My resume includes, cabinets, beds, desks, dining room sets, shelves, dressers, Batcaves, a Kid Kraft Kitchen, doll furniture, the TMNT lair, Barbie’s dream house, and even an outdoor swingset treehouse thing. I have gotten pretty good. I even build LEGO as a hobby. I can follow instructions. I am quite familiar with my local Harbor Freight and Home Depot stores. I have some power tools and I know how to use them. 🔧🔨🪛🗜🚧
This manual had to have been written by someone that has never seen a basketball, a bolt, a screwdriver, or assembled anything. The frustration therein is compounded by the fact that the packaging was obtuse and the instructions at times were actually absurd.
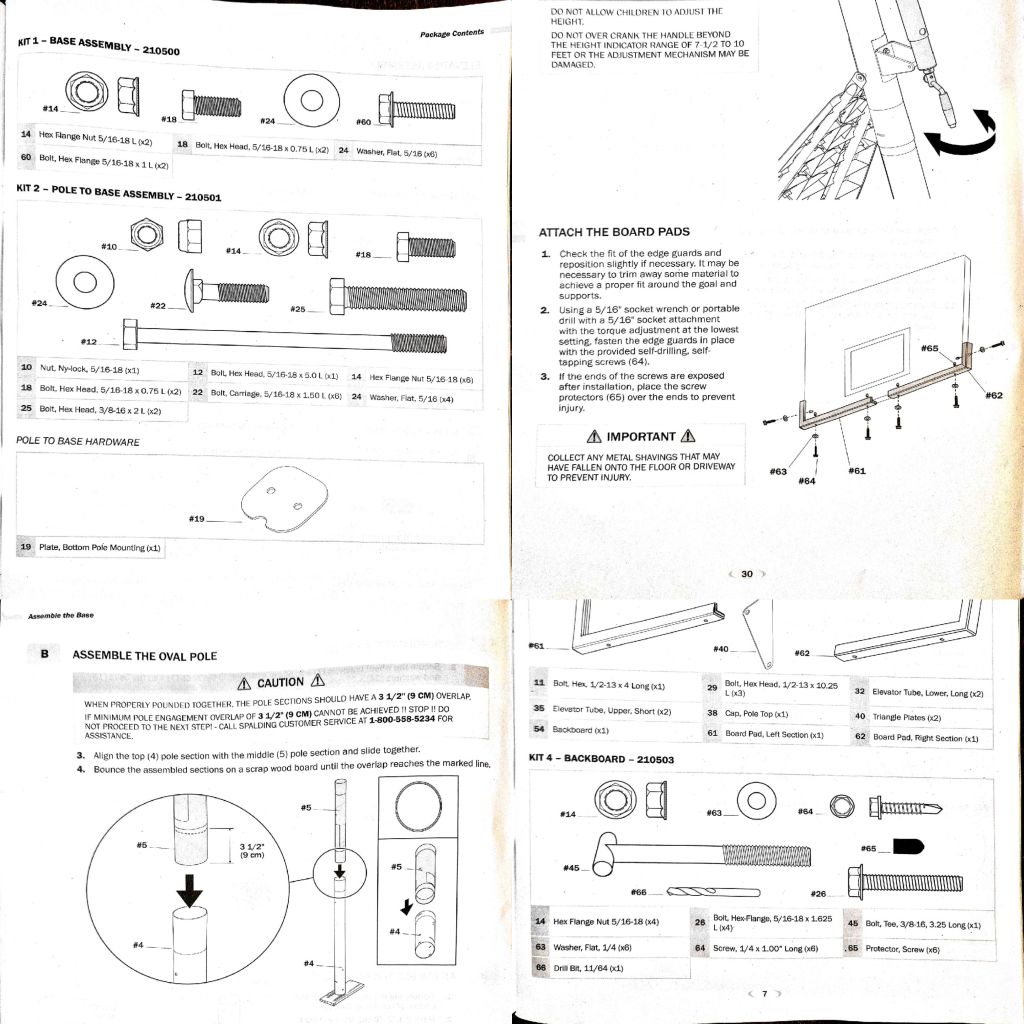
I’m not even sure where to begin. Most furniture to be assembled has the packaging that directly labels the parts. Maybe stickers, maybe it’s stamped, maybe there is a cardboard backing to a pack numbering or lettering each bolt.
Here, we had none of that. They seemingly came in packs to facilitate the process, labeled 1B, 2B, 3B, etc. The book calls the packs Kit 2, Kit 2, Kit 3, etc. and of course the numbers do not correspond. The first bit that was maddening is that the #60 bolt from the first pack was one of the last bolts used. I found no discernable rhyme or reason to the contents relationship in packaging to each other at some points.
The backboard parts list shows an ¹¹/₆₄ drill bit. We’ll get to that in a bit (𝘱𝘶𝘯 𝘪𝘯𝘵𝘦𝘯𝘥𝘦𝘥).
The list of tools required did include sand, a garden hose, a sawhorse, a “scrap wood board,” and “2 capable adults.” While we won’t pause to question if the authors at Spalding were calling me and my wife tools, I will ask you to note the distinct lack of a drill in the tool list.
The first indication that this whole project was, as the young people say “shady AF,” was the fact that to assemble the main pole, I had to measure and mark 3½” down from the top of 2 of the 3 pieces. There was no pencil, chalk, crayon or Sharpie mentioned in the tool list. OK. I have a pencil & a tape measure. The next step was the head-scratcher. The actual instructions are to jam the tubes together and 𝗯𝗲𝗮𝘁 𝘁𝗵𝗲𝗺 𝗼𝗻 𝘁𝗵𝗲 𝗴𝗿𝗼𝘂𝗻𝗱 (on top of your scrap of wood) until they’re properly seated at the mark you hopefully measured correctly and marked, perhaps scratching with the drill bit?
I mean, this could have been made exponentially easier and fail-proof by maybe marking it at the factory, or having the joints fitted and maybe lock together with a pin or bolt? I mean, the Christmas tree people have had that figured out since what, the 50’s or 60’s?
Throughout the process, I was repeatedly measuring the bolts… because while it said things like #18 or #12, nothing on the bolt or packaging indicated that number.
After most of the assembly, it was time to attach to board pads/edge guards to the backboard. There were no holes in the frame around the backboard for this. Odd. They did, however, include self-tapping screws and suggested that you try to use a ⁵/₁₆” socket wrench to break though the metal frame. 🤣 Here is the first time a portable drill is mentioned. It doesn’t even note using the inexplicably included drill bit, that conveniently is the exact right size. I know I didn’t need to be Sherlock Holmes there, but I did manage to figure that one out.
The rest of the assemble went as expected. I did get a sawhorse/work bench thing out of the deal from Harbor Freight. I mean, it was in the list, so I 𝘩𝘢𝘥 to get it, right?
I will say I made a layman’s error in building that I had to rectify after the initial assembly. When I attached to lower elevator tubes to the backboard brackets, I neglected to be sure that I had went through the screw-jack, and only went through the sleeve. You can imagine my f̶i̶t̶ ̶o̶f̶ ̶l̶a̶u̶g̶h̶t̶e̶r̶ absolute fury at discovering my error. 🤬 This, my friends, was all on me.
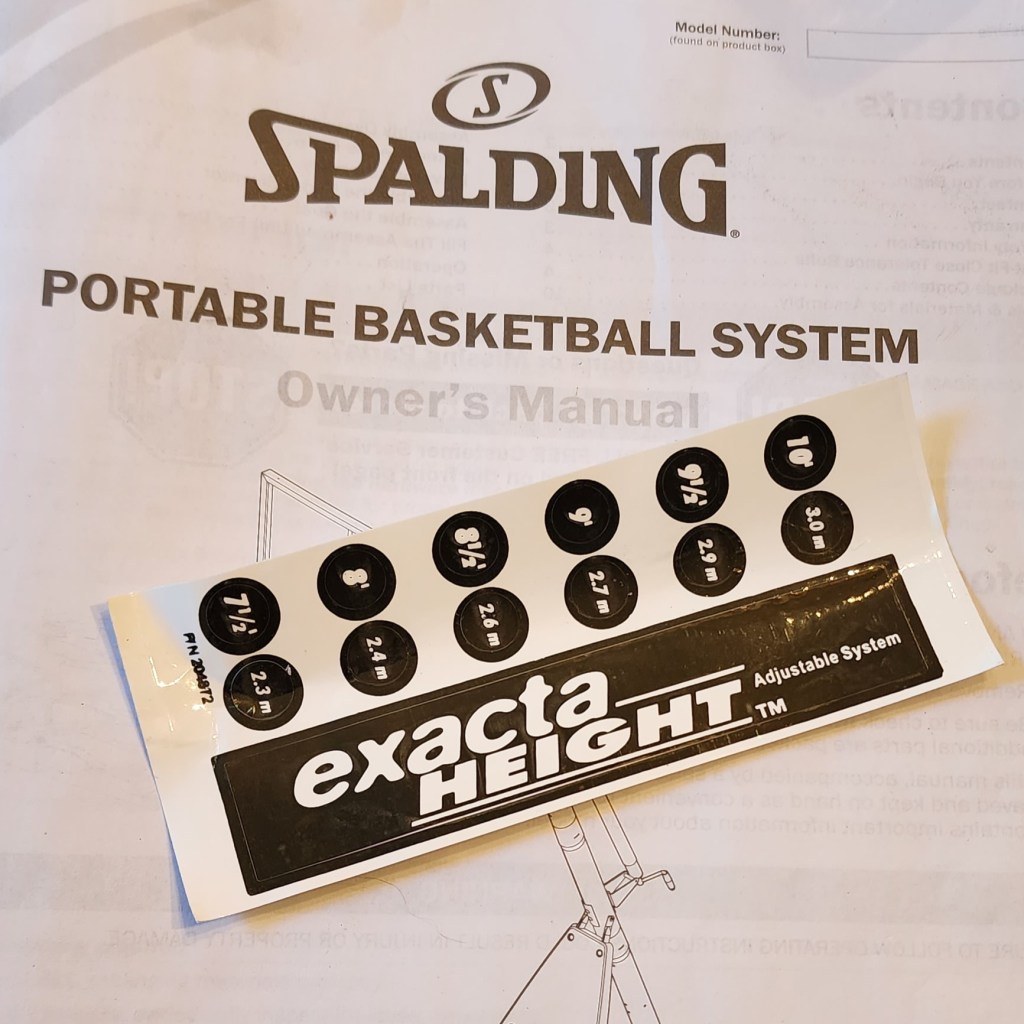
At the end, I had to literally use a tape measure to check hoop height. It does indeed go above 10′. I suspect that you expect me to measure the heights of the hoop to match of all the provided poorly-screened stickers and place them neatly on the screw-jack to be displayed by the conveniently placed hole in the sleeve at each of the 6 suggested settings? For what I paid for the hoop… those increments should have been stamped into or printed on the screw jack already. This takes me back to the argument that there is probably a better way to build the main tube for more efficient assembly.
If you, dear potential purchaser, have stayed with me this long, then you are brave, resilient, persistent and you may just be a masochist. If you have read all of this and still add it to your cart without selecting professional assembly, then may whatever higher power you ascribe to have mercy on your soul.
I may even email the address in the manual, and try to reach out directly to Spalding somehow either via email or social media.
I don’t want or need anything, other than for them to re-think their entire process.
Well. Damn, you Pinterest. Ha ha. We made more progress on the Back Yard Race Car Track. It may now also be a construction zone, gravel pit, monster truck arena, and dinosaur garden. Molly even asked about building a volcano. I do have an extra bag of concrete.
Check out the latest photos. We added a gravel pit, some large rocks for edging-work to try to contain the gravel, and dug out the grass so we have a dirt pit. Not sure if I should plant grass and leave a dirt track, or make it all a dirt pit. I may try to buy some river rock to make the outside edges look a little neater, and mix some more extra sloppy concrete to smooth it over, and fill in the edges smooth.
So, on Labor Day this year, we labored. We finally got around to pouring cement for the Backyard Race Car Track, and we started a Fairy Garden.
I have been sitting on the race car track idea for a while, and wondering what to do landscape-wise around the one small tree in the back. We recently got some fairy garden furniture stuff as a gift… so we thought that would be a cool second (3rd, 4th, 5th, 6th?) backyard play-space.
We had an easy enough start, put down some gravel, and mixed two of the three bags of Sand/Topping Mix with the coloring. I mixed it a little thick, and really what was all the coloring was meant to cover. The track was only about ⅔ of the way complete. So, I mixed the one other bag we had on hand. It was a little sloppier and went on really well. The kids helped in a kid-helping capacity, and Bethany did nearly all of the troweling/finishing work. Molly told me that she wanted to use the trowel because that’s what “brick builders” use to put the stuff in between bricks. I have no idea where she learned that.
I asked the little man if we should get 3, or 4. He was adamant about getting 4. We also got the cheapest bag of garden soil, and some pebbles. Sadly, the bottle of coloring didn’t last long, and maddeningly Home Depot didn’t carry it… even with two shelves full of Quikrete products. I ended up asking if they had anything in the paint department, and they just had a concrete paint or dye to use after the fact.
We got back and Bethany made us a delicious salad for lunch. We needed to re-fuel for more work out back! I mixed 2 more bags, with some help:
After that, we did use just one more bag… but that’s OK. I can use the rest for some driveway patch work now that I have some more recent practice with this stuff. (A long time ago, I worked for a bit for a general contractor, and would sometimes mix mortar all day for the subcontracted bricklayers.)
For now, that’s about all we can do. The bag says it needs to set up for five days. Hopefully we can be patient and the neighborhood wildlife (including my children) stays out of it. I did grab an odd old brick from out front that had originally been in the back yard, and made a sort of garage out of it. I plan to get some river rocks or pebbles or something to kind of clean up the edges of the track. Maybe they will need to go on with concrete, or some of that stuff that comes in a caulking-gun dispenser. If they’re not stuck down, they will end up all over and most likely destroy my lawn mower.
The other quick family project was to make a fairy garden. I was hoping to use stuff that we had around in addition to the recently gifted furniture and starter items.
After thinking about a couple of different ideas, we settled on me taking a chainsaw to some large branches and small logs that we had out back, and driving nails partway into the bottom so we could drive them into the ground and they would hopefully hold. It worked!
I played with the chainsaw, demonstrated the nail technique, then Bethany and the kids did most of the nail-driving… and I think that was mostly Bethany. Molly helped me place them around the tree in sort of a kidney bean shape, including an old wooden bucket that I think we bought from the estate sale of the previous owner of this house (who coincidentally said she would miss the little tree in the backyard most of all).
Then we pulled up 90% of the grass, and Ian hauled it away in his wheelbarrow. We put down the bag of cheap garden soil and it was perfect for coverage & fairy garden decoration placement. We also planted a small succulent plant that my mom had recently given us in a small pot that should be durable outdoors, but may look cool covered in small round stones so it looks like a fairy house. We’re putting Grandma on craft duty to help make little projects to decorate the space. I would love to use some of the stuff we have around the yard or house like tiny terracotta pots, or Popsicle sticks, or wire.
It would be nice to plant some small ornamental succulents, moss, or super tiny flowers eventually too. Luckily (?) Pinterest is an endless rabbit hole when it comes to fairy garden stuff. Speaking of rabbits, our backyard is overrun with them as well as squirrels, chipmunks, birds, deer, and who knows what else. Think they’ll leave this stuff alone?
At any rate, playing in the dirt has been proven over-and-over to be good for you. These spaces offer two additional opportunities for the kids to get into the dirt in the back yard. It’s great to learn about gardening, ecosystems, using your imagination, and more… all without even realizing that you’re learning.
Check out some photos from the day if you have the time and interest, and let us know what you think in the comments!
If this is something you’d like to try yourself, check out these Pinterest boards for inspiration:
If it’s something you have tried yourself, please share your stuff in the comments! I would love to see some other backyard family projects.
My wife & I have very generous cousins with a cabin in the woods where they throw a bunch of fun parties throughout the year. One yearly weekend gathering can get exciting. Here’s some video of Molly swimming in the plake (big pond or a small lake?), and Ian getting a lesson on some heavy machinery!
Molly Swimming at the “Plake” 🏊:
Ian Driving a Skid Steer with “Uncle” Jim 👷:
Ian Driving an Excavator with “Uncle” Jim 🚧:
As always, we had a great time! Molly is getting confident with swimming lessons, and Ian looked so serious in those machines. I am so grateful to be able to share these kinds of experiences with these two.
My phone seemed to “skip” a bit. May be time to back up & remove photos? Also, I’m getting used to playing with the YouTube Video Editor, and it’s apparently going away? Boo, I say.


")
")
")
")
")
")
")
")
")
")
")
")
")
")
")
")
")
")
")
")
")
")
")
")
")
")
")
")
")
")
")
")
")
")
")
")
")
")
")
")
")
")
")
")
")
")
")
")
")
")
")
")
")
")
")
")
")
")
")
")
")
")
")
")
")
")
")
")
")
")
")
")
")
")
")
")
")
")
")
")
")
")
")
")
")
")
")
")
")
")
")
")
")
")
")
")
")
")
")
")
")
")
")
")
