Zucchini Two Ways


Like everyone who has a vegetable garden, or even just one potted plant, we have an abundance of zucchini. I was asking AI language models for casserole cooking times & temperatures based on what I had around & could easily grab from the store, and I sort of picked a hybrid of all of them. I used ChatGPT, Gemini, Perplexity, & CoPilot. Originally I had been asking about zucchini bread recipes, then asked about the casserole. It is interesting to bounce ideas off of them.

Zucchini Casserole & Pizza-ish Zucchini Things on a white plate.
“Zucchini!” (But, say it like a Jawa yelling “Utini!” in Star Wars.)

I had the idea for the lil’ zucchini things last time I made breaded zucchini & ran out of breadcrumbs before zucchini.

Zucchini Ditalini Chickpea Chikini

I hesitate to call this a casserole, because the kids are on a brainrot social media kick where they have been informed somehow that Crock⬩Pot meals & casseroles are bad. The best part is they both ate & loved it… one even went back for more. It was a hit with the wife too, and I’d eat it again.

Zucchini Ditalini Chickpea Chikini - the top of a casserole dish just out of the oven, with a nice brown crispy breadcrumb topping over gooey melted cheese.
Zucchini Ditalini Chickpea Chikini

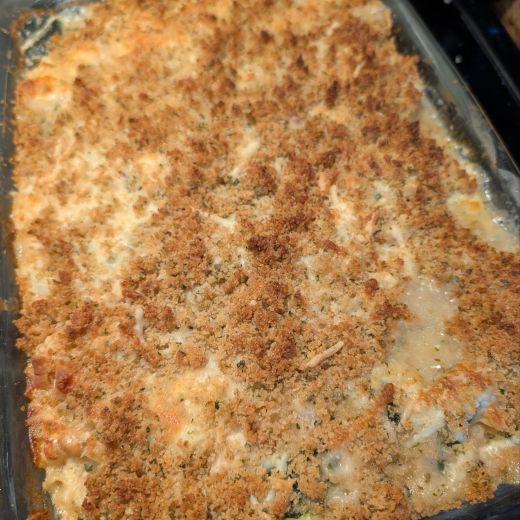
I felt like making a casserole, but not making a mess by pre-cooking/par-cooking or measuring anything. So… I ended up making two 9″x13″ casseroles. Here it is to the best of my memory.

The ingredients:

  • 1 ridiculously large zucchini from the garden.
  • 1 Spanish onion
  • 1 orange bell pepper
  • 1 pack (1½ lbs.) of chicken breasts
  • 2 large eggs
  • 1 (16 oz./1 lb.) box of Ditalini pasta
  • 1 (15.5 oz.) can of garbanzo beans
  • 2 (8 oz.) blocks of cream cheese, softened (Leave it out for a bit, nuke it, or cradle it in your armpits.)
  • 1 (2 cup) bag of shredded white cheddar cheese
  • 1 (2 cup) bag of Havarti cheese
  • 1 (1½ cup) bag of Gouda cheese (Same damn size bag – thanks, shrinkflation!)
  • 1 (32 oz./4 cups) box of chicken stock
  • 1 stick (4 oz./½ cup) butter.
  • Breadcrumbs – Maybe 3 cups?
  • 2 Tbsp. minced garlic from a jar because elicits unwarranted hate.
  • Seasonings to taste – I used Rotisserie Chicken seasoning, Mrs. Dash’s Table Blend, Black Pepper, White Pepper, Onion Powder, Garlic Powder, Paprika, & dried parsley. Ain’t nobody measuring all that.

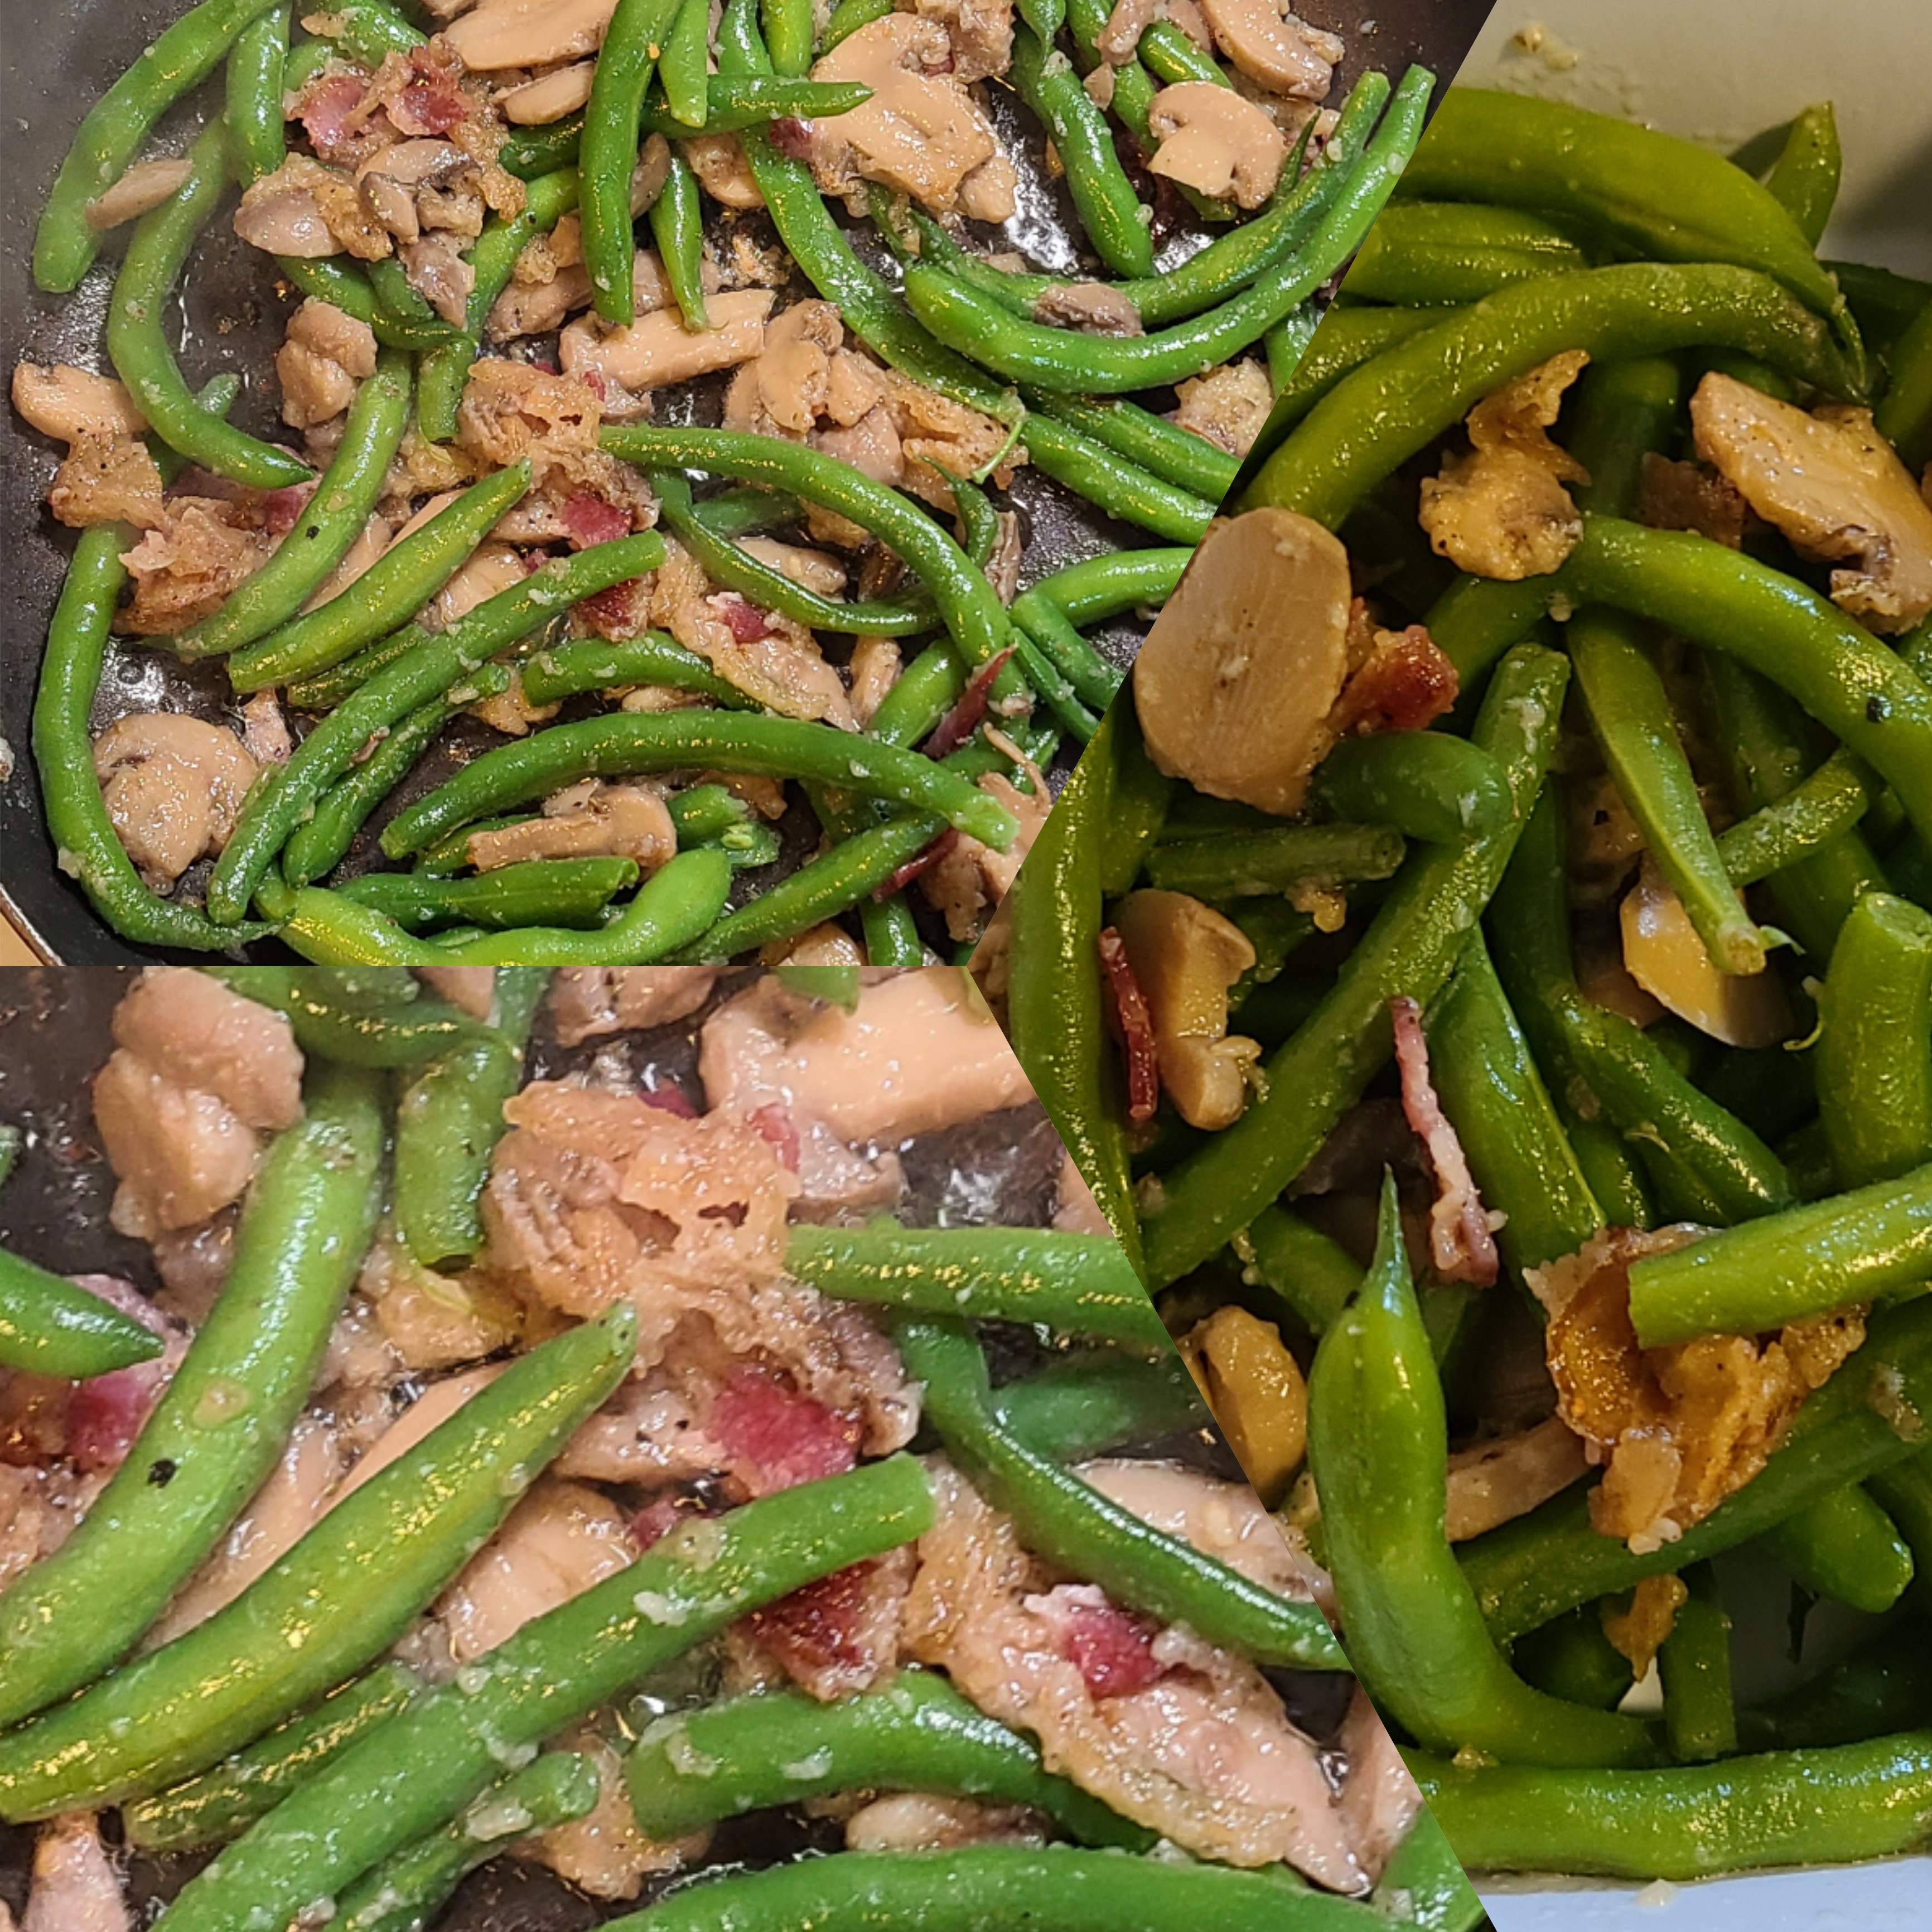
I was going to include some “bacon pieces,” but I must have left them in the store, or they fell out in the car, or I put them in a weird place or threw them out, because they absolutely are in what may as well be a pocket dimension.

The Method:

  1. Pre-heat the oven to 375°
  2. Grease apparently two 9″x13″ glass baking dishes with a stick of butter.
  3. Get two mixing bowls. In one, whisk the egg, then fold in the cream cheese, the chicken stock, the garlic, the (drained) chickpeas, about half of each of the shredded cheeses, the dry Ditalini, and spices in one mixing bowl.
  4. Slice up the bell pepper, onion, zucchini, & chicken in consistently sized cubes. (If you left the zucchini in the garden too long like I did, cut out the spongy center.) Put all that in the other mixing bowl, toss it with some more of all the spices.
  5. Mix the contents of the two bowls together as you string together new swear words and wish you have an even more ridiculously larger mixing bowl.
  6. Put those into the baking dishes. Or one big one, or a casserole dish, or whatever you’ve got. Cover with foil, place in oven, & bake for 45 min.
  7. Melt the remainder of the stick of butter in a microwave safe bowl. Or a microwave unsafe bowl if you’re an agent of chaos. Dump in some breadcrumbs and toss them in the butter, so the breadcrumbs are coated but not all gross. I used a mix of panko & regular. I did not measure.
  8. Pull from the oven, but leave it on, remove foil.
  9. Spread the remaining shredded cheese on the top of the casseroles, then the buttery breadcrumbs… and put it back in the oven. I swapped it to 350° on a convection setting at this point for 15 minutes… but you do you.

Notes:

  • YOU DO NOT NEED TO PRE-COOK THE CHICKEN, PASTA, OR VEGETABLES. You certainly can, and it may deepen the flavors and reduce baking time, but I wanted to do this all in one go. I checked the chicken in a few sports with an instant-read and it was a bit over the USDA recommended 165°.
  • I was going to mix the cheeses together at the end, but why dirty another bowl? I dumped them on almost somewhat evenly.
  • Obviously, cut out what you don’t like, add what you do, skip stuff, or add stuff.
  • I may try this again with bacon or ham… but there was a good bit of salt in all the cheeses already, and probably the chickpeas.
  • I may try this with shredded zucchini and maybe leaving the chicken breast cutlets whole on top. Maybe.
  • Ricotta instead of cream cheese may be good too.
  • Use chicken broth, bone broth, vegetable broth, milk, water, or whatever… just give the pasta enough liquid to absorb.

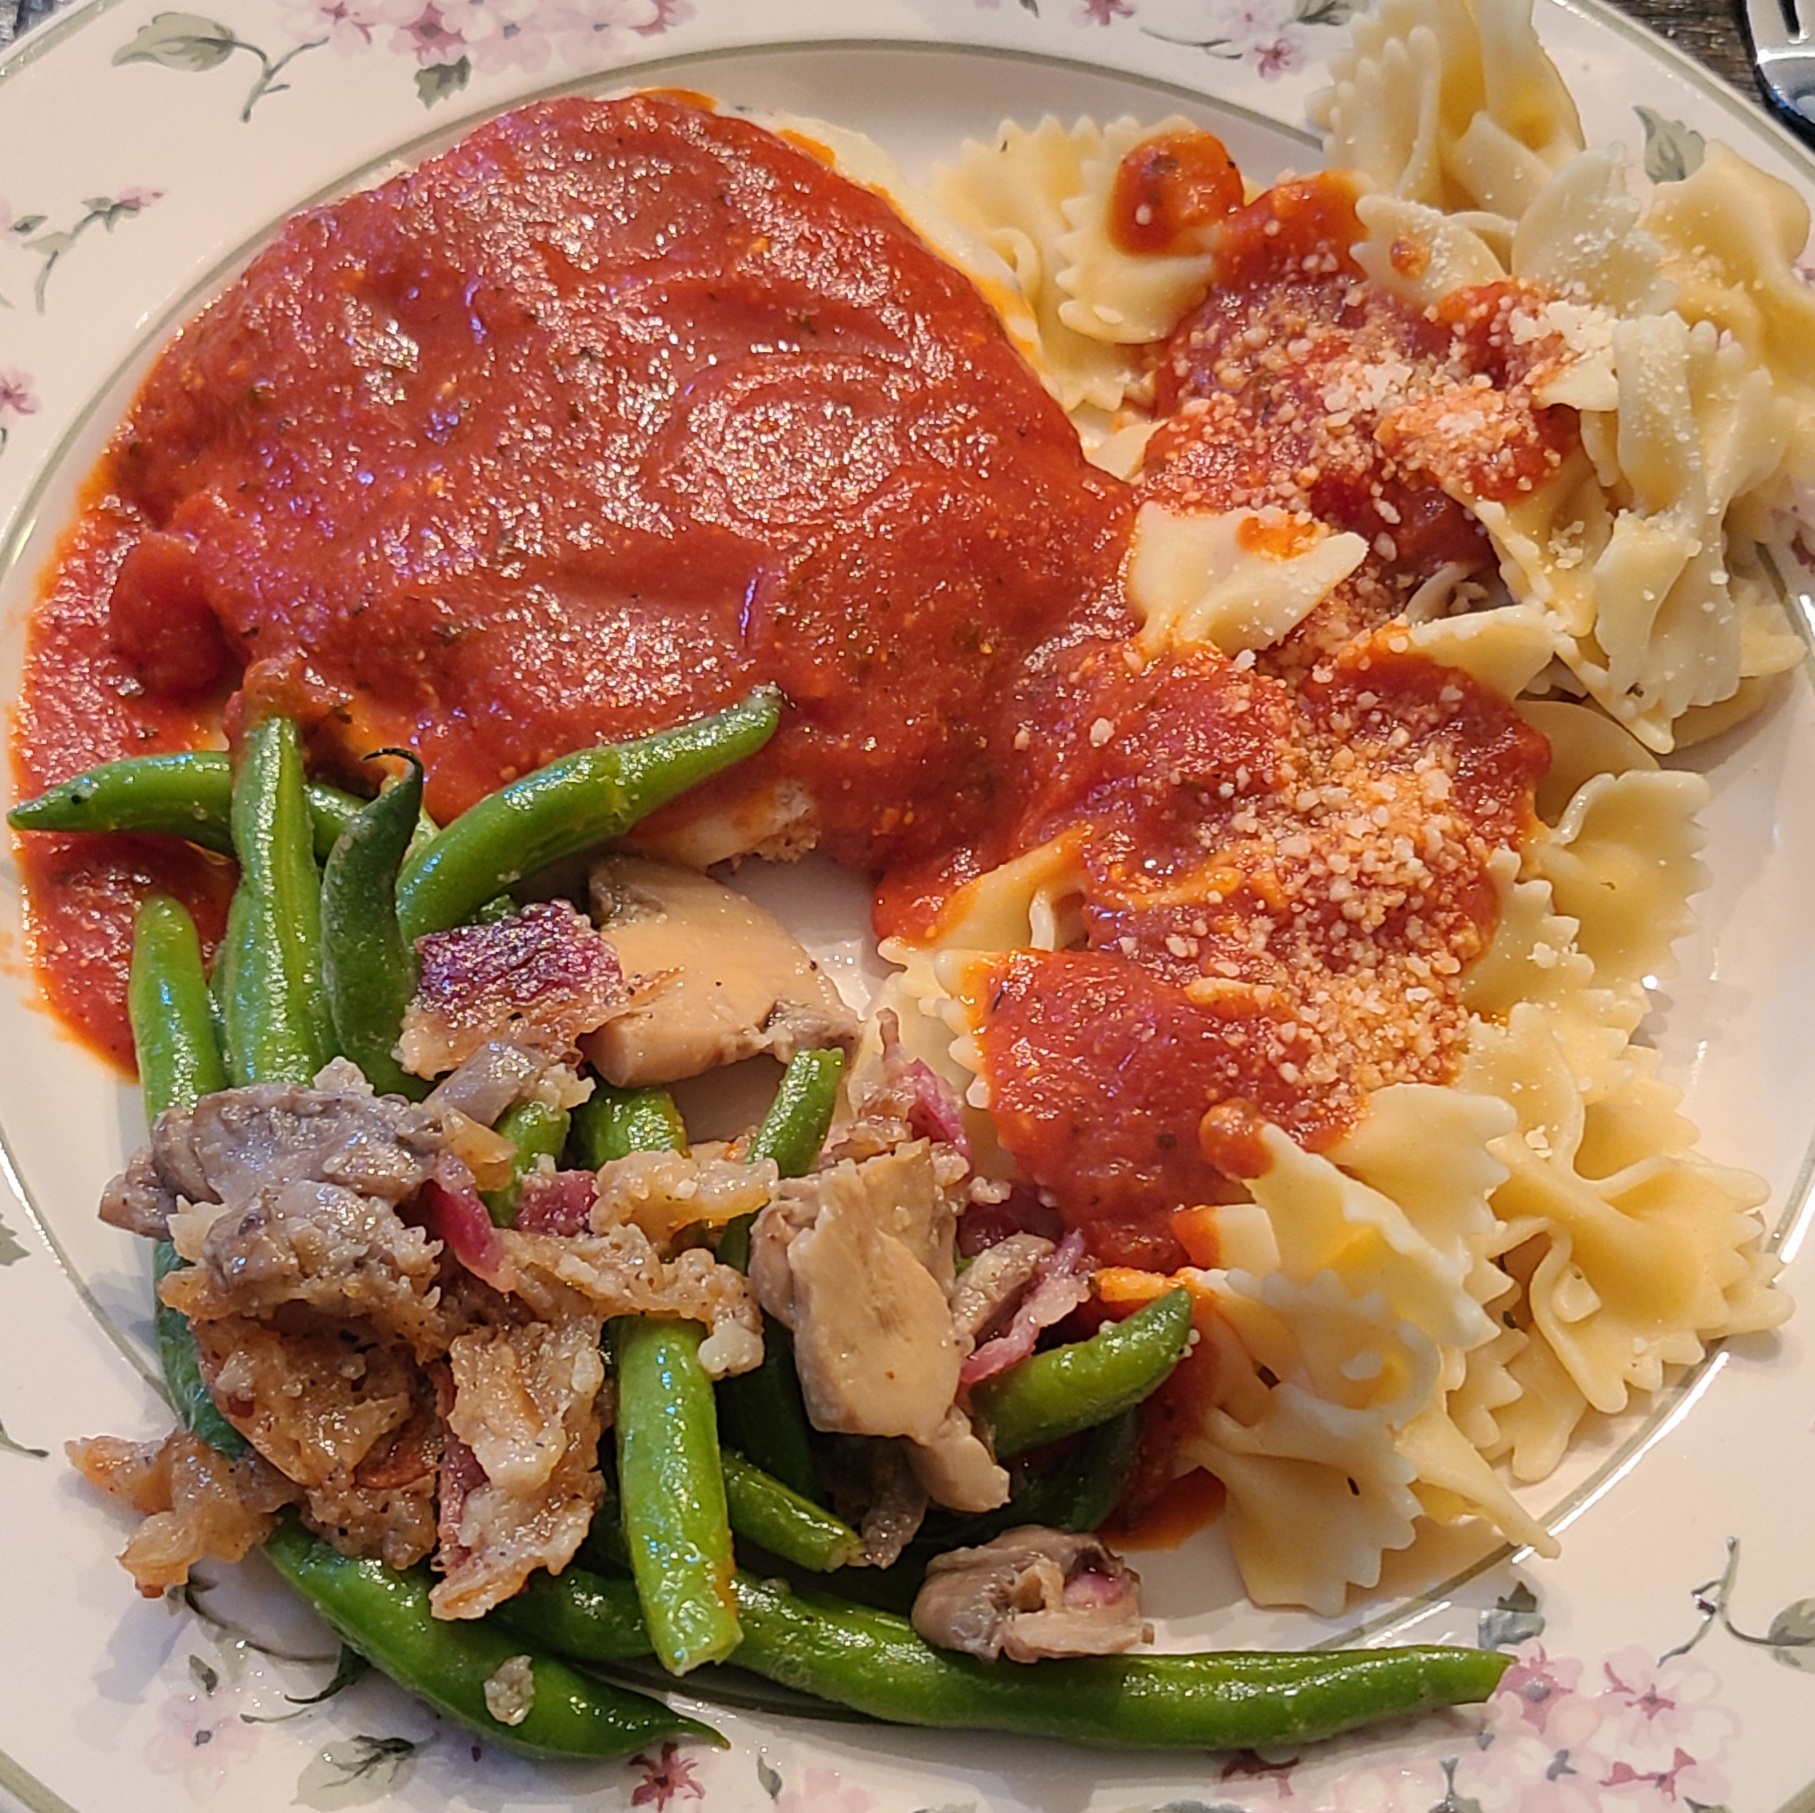
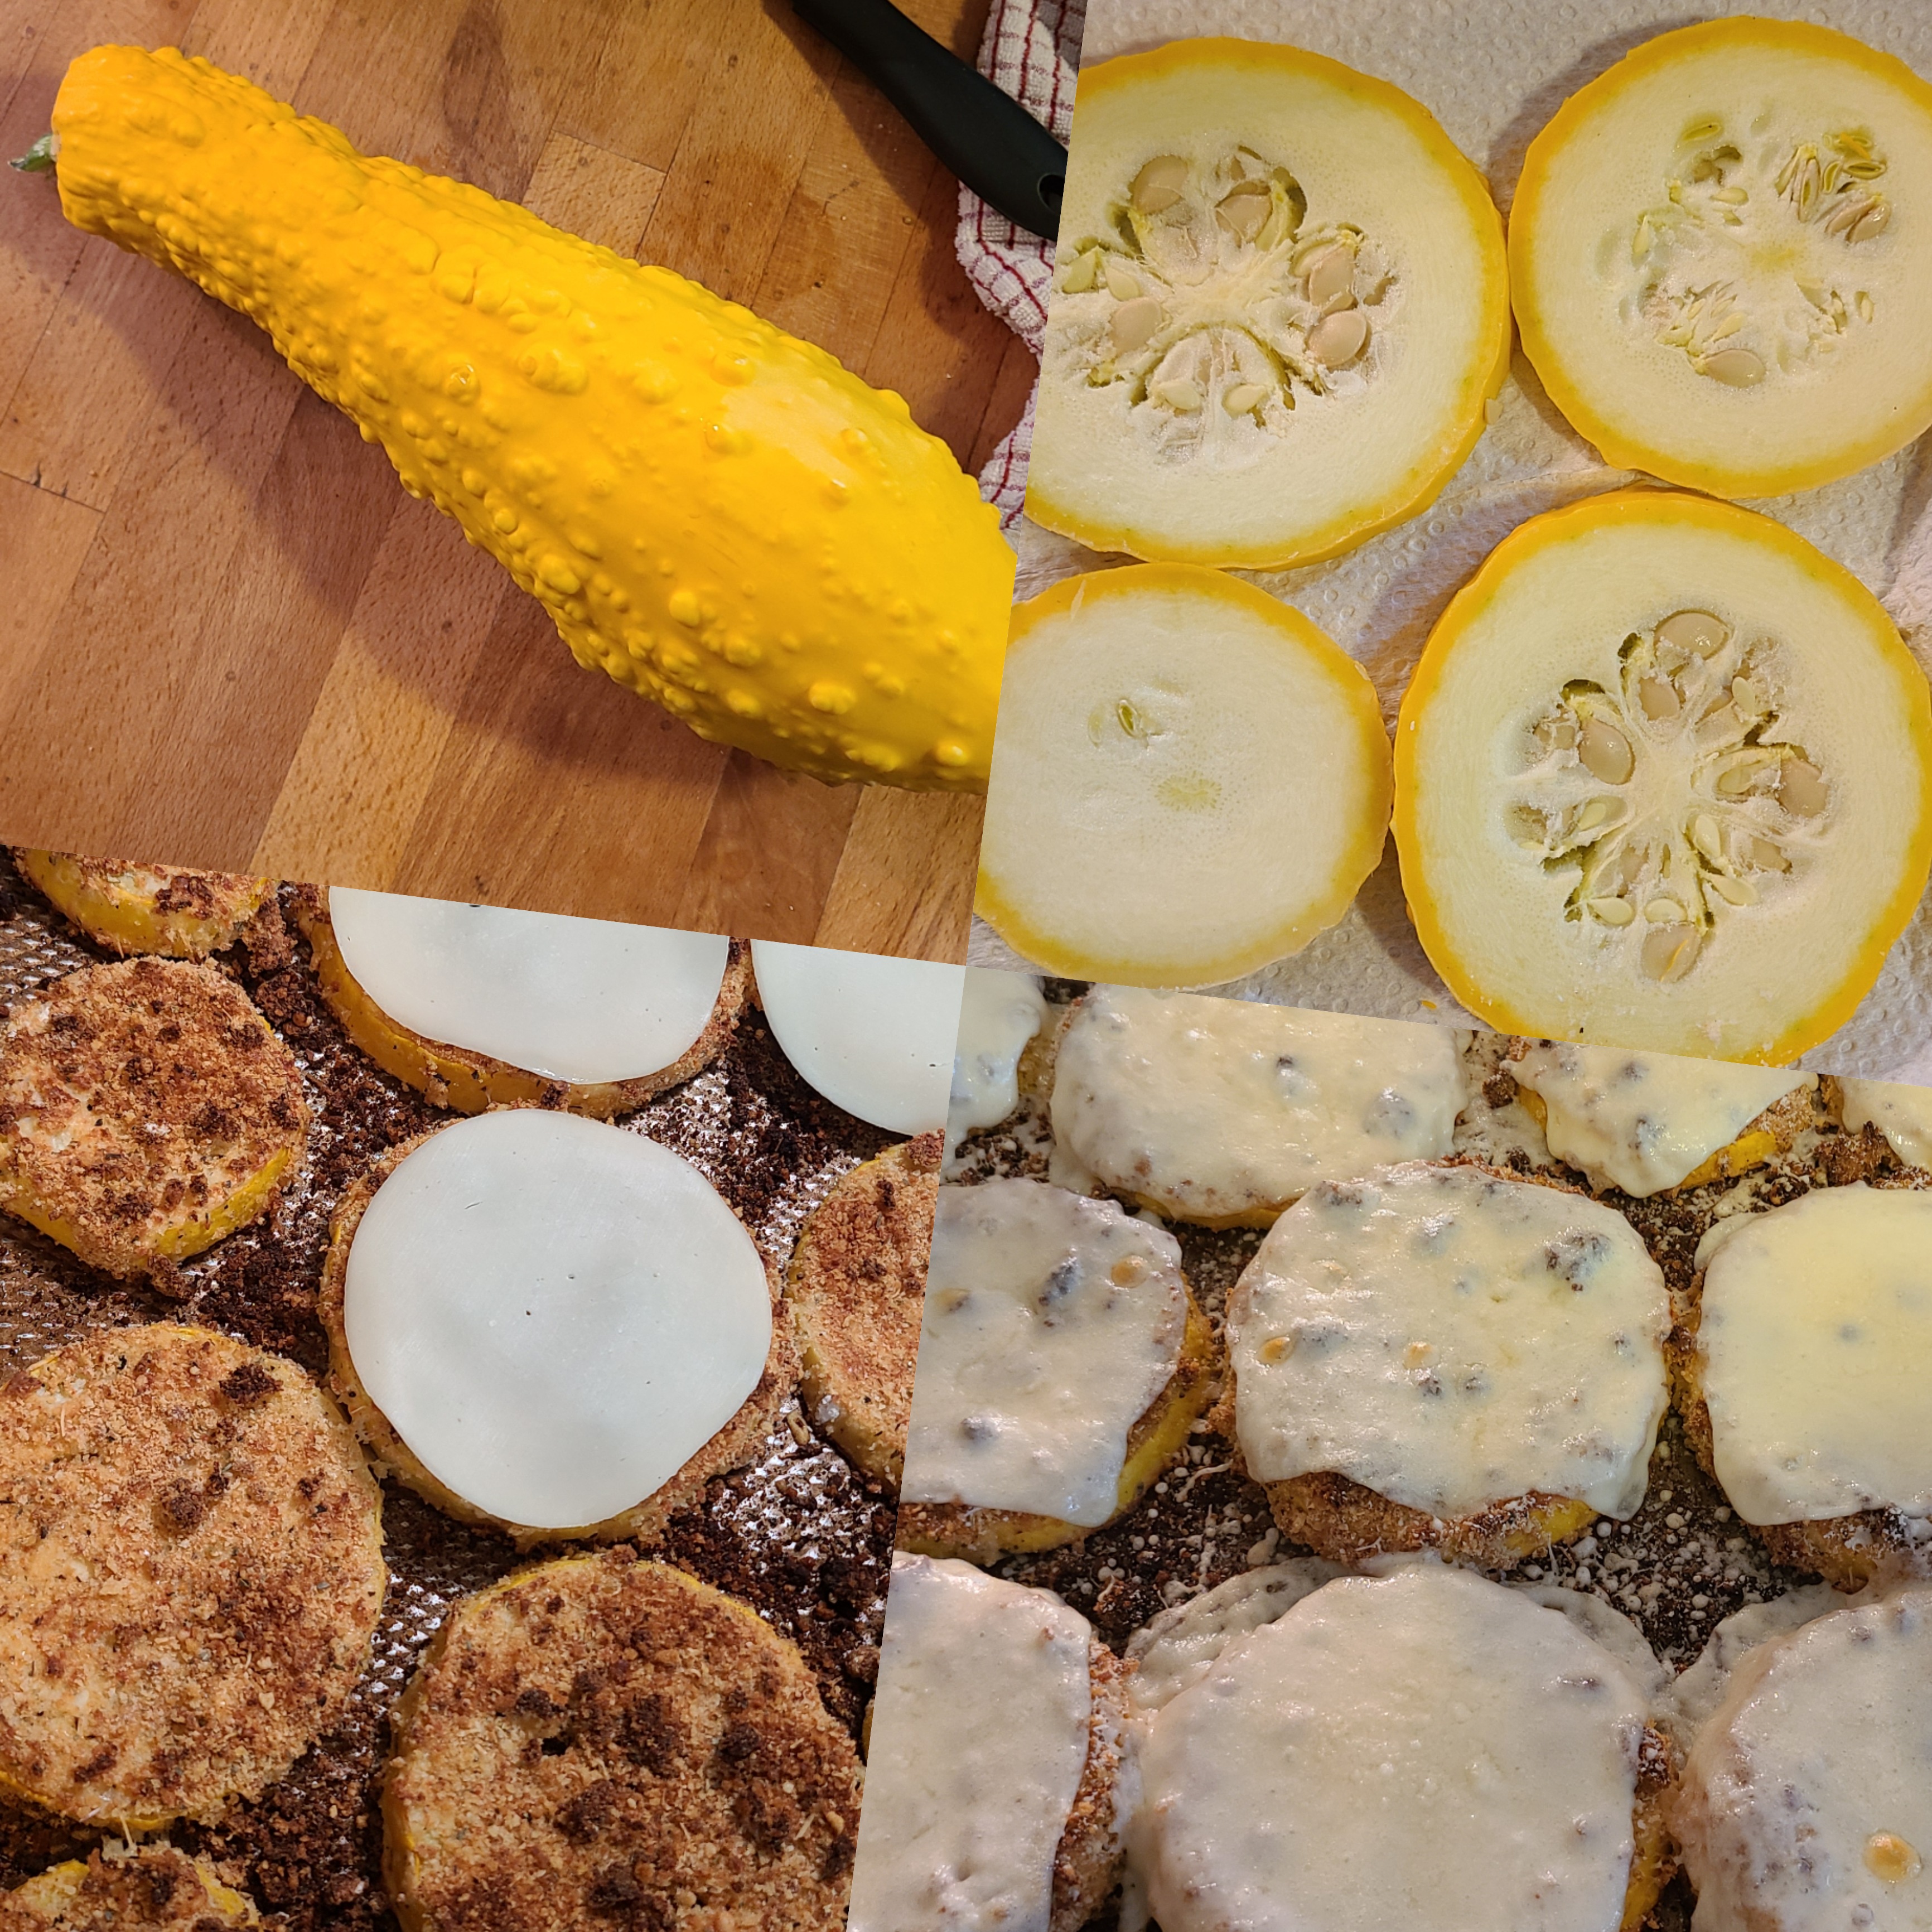
Pizzucchini Teeny Mini

Again, this was a quick idea I had last tame I made air-fried breaded zucchini and ran out of bread crumbs because the zucchini multiplies as I sliced it. I did it in the oven quick after I yanked out the “let’s not call this casserole a casserole.”

Melted cheese, some toasted breadcrumbs, & pizza sauce over a round slice of zucchini.
Pizzuchini Teeny Mini

Ingredients:

  • 1 normal-sized zucchini.
  • 1 (2 cup) bag of “pizza cheese”
  • 1 (15 oz.) squeeze bottle of pizza sauce
  • a bit of EVOO
  • Maybe ½ cup of breadcrumbs

The Method:

  1. Do you really need instructions here? I put the oven on 400° on the air-fryer setting. I didn’t pre-heat it because it was already running.
  2. I sliced the zucchini about ¼-inch thick, and put it on the baking sheet over a bit of EVOO.
  3. I dropped on some sauce, some cheese, and a tiny bit of breadcrumbs.
  4. I put it the oven for 15 minutes.

Notes:

  • What the hell is “pizza cheese?” It said that on the bag. I guess mozzarella & provolone? Please tell me in the comments that it is all plastic & slowly killing me. Maybe I should have read the bag.
  • I will probably skip the EVOO or get a cooking rack for the air fryer setting.

~🧀~

OK, so that’s it. Hit me up with suggestions, questions, love, or hate in the comments! Share your zucchini recipes, too!

French-Dip Sandwiches & Smashed Potatoes


I made these the other night, and they were good! Here’s a quick & dirty method more than a recipe…

A French Dip sandwich with some Au Jus and smashed potatoes.

~🍽️~

For the French dip above, I just sautéed a diced sweet onion and canned mushrooms in medium heat in butter, set the goods aside, cranked the heat, seared a roast from Aldi in the same pan, added it, the onions/mushrooms, some shredded carrots, & a can of condensed French Onion Soup to the crock pot on high for 4 hours.

I pulled the roast out to “rest” for a bit before slicing, then put it back into a bowl with some of the liquid for the crock pot

For the buns, I just bought Mancini sausage rolls, melted butter in the microwave, put them in at 375° for 2 minutes, then pulled them out.

Then I piled on the sliced/shredded beef & mushrooms/onions/carrots and some sliced white American cheese, then back in the 375° oven for 5 minutes.

I made an “Au Jus” McCormick packet, and added some of the liquid from the crock pot for dipping. Toasting the buns really helped it stand up to the dip so it didn’t fall apart.

The potatoes were just little Yukon gold potatoes boiled in salty water for 30 min., smashed on to an oil-brushed cooking sheet, then baked at 425° for ½ hour.

I spiced the onions, meat, butter, & potatoes throughout all the stops, I think I added chicken bullion to the potato water, too. I used a lot of garlic & onion powder, black pepper, and Season Salt or Mrs. Dash’s table blend.

Well that’s it. Do you make anything similar? Have some tips & tricks? I have made similar stuff before with Swiss or Havarti or Provolone, used all kinds of different beef or even Steak-Ums, whatever buns/bread look good, used the French’s fried onions, etc. Ya gotta change it up and/or use what you have on hand!

Stuffed Cabbage Recipe


So, recently I was hungry for stuffed cabbage. I had never made it before, so after Googling a few recipes and soliciting advice from a Facebook food group and Nextdoor, I came up with my own. You can put this URL into Just The Recipe or do the Cooked Wiki “hack” to skip all my bullshit up here.

I’m not a huge fan of rice in meatballs like you typically see with stuffed peppers or stuffed cabbage, so I was googling recipes without it and kept finding stuffed tagged as “keto,” or with other grains substituted in. I think it’s a texture thing for me, so I opted to go my own route. Also, get out of here with your sweet/hot sausage, I’ll add my own spices. Keep your veal/beef/pork mixes. Maybe ground turkey would be cool. Keep the lamb away.

It seems that many are tied to their family’s traditional way of making it, and that’s pretty cool. I always thought of it as an Eastern European type dish, but lots of cultures have their own spin & own words for it according to Wikipedia. The thought of omitting rice, or using condensed tomato soup instead of a tomato sauce or V8 sent some people into a tizzy. I even learned that lots of people include sauerkraut, and some people like it served with sour cream. Some people make it like a casserole. We always had the tomato soup version growing up, so that’s what I like/expected. Who knew? I’ll probably make it different next time… but both kids & the wife liked it, so I won’t experiment too much.

I used glass baking dishes covered with foil, but got advice that a roasting pan, an electric roaster, the crock pot, a Dutch oven, a soup pot on the stove, or a pressure cooker all work well, too.

Although, I would like to wrap a piece of bacon around the rolls and throw them on the smoker…

At any rate, check out the recipe, and give me your recipes. tips, tricks, advice, and heavily guarded family recipe secrets in the comments.

Also – What do you call them?

Here’s what I did. 🤷

Get It:

  • 1 head of cabbage.
  • 4-ish lbs. of ground beef. (I used 3 lbs of 8/20 & 1 lb. of 90/10)
  • 2 eggs
  • ½ Yellow Bell Pepper
  • ½ Spanish Onion
  • 1 cup shredded carrots (I bought a bag and I’ll use it for other stuff too.)
  • 1 beef bullion cube
  • 1 stick of butter
  • 3 23.2 oz. cans condensed Tomato Soup
  • Bread crumbs (Do I look like I measure stuff? Probably a cup and a half?)
  • Shredded Parmesan Cheese (in the ‘lil fancy container by the expensive cheese)
  • Minced Garlic (just have the jar ready I’m lazy and don’t crush/mince my own)
  • Spices. I used salt, black pepper, white pepper, onion powder, garlic powder, Season All, & Table Blend. (I just throw it on at every step indiscriminately with complete abandon and total anarchy.)

Do it:

  1. Preheat Your oven to 400°.
  2. Get a stock pot, fill it enough to cover your cabbage. Drop in the bullion cube, and salt, minced garlic, and whatever seasoning your heart desires, and crank it to high with the lid on.
  3. Chop your onion in half. Toss half in the boiling water, but take the lid off first & then put it back on.
  4. Mince the rest of the onion.
  5. Cut up the yellow pepper. Feed half to your kids, the dog, or your significant other. Or just eat it. That’s the perk of being the cook. Mince the other half.
  6. Pull out a handful of the minced carrots, a big knife, and what them up until they are tiny pieces of shredded carrots. Our dog loves carrots, so I sprinkled some on her food bowl.
  7. I greased 3 glass baking dishes with the stick of butter. I used a 9″x13″, an 8″x9″, & a 9″x9″ because that’s what I had. I swear we broke like 3 glass dishes last summer.
  8. Melt what can surely be described as an obscene amount of butter in a skillet and sauté the onion, then the pepper & carrots on medium heat. I was sure to hit them with onion powder, garlic powder, salt, & pepper. I like to cook onions slow & low.
  9. Drop the head of cabbage in your now boiling water while you’re doing all that. Yes, remove but do not replace the lid.
  10. Put the sautéed veggies aside and let them cool a bit while you get the meat mixture ready.
  11. Set up a colander or strainer over a large bowl, & get your tongs ready.
  12. Beat your eggs, & add spices.
  13. Mix the meat, eggs, breadcrumbs, some cheese, sautéed veggies, some minced garlic, and lots of spices. I do it by hand. I wash my hands very well before & after, so you probably should too. But hey, you do you.
  14. By this time, hopefully your cabbage has been boiling 10-ish minutes. Use tongs to gently peel one leaf at a time and place it lovingly in your colander. Don’t go too quick with it and splash/burn yourself, because I would definitely never ever do that.
  15. Open the cans of tomato soup and cover the bottom of your baking dishes.
  16. Get the leaf, cut out the bottom tough part of the leaf rib if so inclined, slap in your meat mixture, and wrap it like a burrito – folding in the ends part way through. I didn’t measure, I eyeballed the meat to leaf ratio.
  17. Fill the baking dish(es), pour on & season the rest of the condensed tomato soup, sprinkle on some more parmesan cheese, cover in foil, and bake for an hour.

Tips/Lessons Learned/Parting Thoughts:

  • I was going to bake it at 375° and I probably should have, taking the foil off for the last 15 min. They were well over the recommended 160° internal temp for ground beef. Maybe some browning/caramelizing would not be a bad thing?
  • I saw a lot of tips for freezing the cabbage instead of boiling it, but I also read just as many responses saying that it can drastically affect the texture and not in a good way.
  • I may put in back next time. Maybe inside? Maybe wrapped outside?
  • Hear me out… Reuben cabbage rolls. Corned beef? Sauerkraut? Thousand Island or Russian dressing? Rye breadcrumbs? (We make non-traditional stuffed peppers sometimes, too.)
  • If you like rice, by all means include it. Or barley, or any other grain. I considered those tiny lil’ pasta balls… but maybe I just like to say Acini de Pepe way too much. Some people recommended cauliflower rice, also.
  • Check out all my other recipes and let me know what you think!
  • I got some thoughts from more tips & feedback when I posted photos on the FB food group & Nextdoor, too.
  • Are you still reading? Check out the recipe, and give me your recipes. tips, tricks, advice, and heavily guarded family recipe secrets in the comments.

Hot Turkey Sandwich Dinner (Quick Style!) 🦃


I love a good hot sandwich smothered in gravy, be it roast beef, meatloaf, or turkey. I was in the mood for a turkey one like you’d get at a diner, and being a week night after work, wanted to put it together pretty quickly as I hadn’t thought ahead to use the crock pot.


Putting it here, so if I want it again I’ll remember what I did right & want to try it again. I may have to double the recipe when the kids are home. This fed two of us & left enough for me for lunch.

The Turkey:

  • 2 Breast Cutlets
  • 1 can of Yuengling Traditional Lager (Or Straub Amber, or Shiner Bock, or Smithwick’s, or Killian’s Irish Red. Pick a good beer.)
  • ⅔ cup carrot chips. (Yup, cheated & bought those in a bag too.)
  • 1 Spanish Onion, peeled & quartered.
  • 2 tsp. of minced garlic from a jar like a lazy person.
  • A bunch of your preferred spices. (I used, cracked pepper, poultry seasoning, sage, thyme, onion powder, garlic powder, paprika, Mrs. Dash’s table blend, and a bit of Season All.)
  1. Pre-heat the oven to 350°
  2. Put the turkey cutlets in a roasting pan, & pour the beer over them. Again, get good beer. No one wants you to cook with Coors or Budweiser or Mic Ultra.
  3. Toss in the onion & carrot.
  4. Add all the spices. When you think it’s too much, keep going.
  5. Stick in your meat thermometer probe that reads temperature while cooking.
  6. Pit the lid on, put it in the oven.
  7. I set the timer for 50 minutes, but it was done in a half hour or so. Cook to 165° internal temp & let it rest. I got distracted & took it to 170° and no one died, so don’t worry if it’s not precise.

The Veggies:

  • Bundle of Broccoli
  • Carrots from that bag you already opened.
  • Chicken Bullion Cube.
  • You still have those spices out, right?
  1. Eyeball some water into the pot, ad the bullion & spices.
  2. Chop that broccoli up and compost the stems or make those little fried things that looks delicious.
  3. Put the broccoli & carrots in the steamer thing that goes on top of the pot.
  4. Boil it for… I dunno. Not long. I like my broccoli bright green & crunchy. Bonus with the carrots being cut like this, they cook quickly too.

The ‘Taters:

  • They’re from a box. Follow the directions… sort of. I bought the store brand.
  • Use more butter than they call for.
  • Put a chicken bullion cube in the water instead of salt.
  • instead of lowfat milk, use ½ whole milk and ½ buttermilk. Add sour cream if you’re into complete and total anarchy.

The Gravy:

  • 2 jars of turkey gravy
  • roasting pan drippings
  • A bit of those carrots & onions.
  1. Heat the gravy on medium-high.
  2. Add pan drippings to taste
  3. Chop up the carrots & onions pretty small, & add them too.
  4. Cook it on medium until it thickens back up.

The Sandwich:

  • Texas Toast (Why do they call it that? it wasn’t toasted.)
  • That turkey, sliced after it has rested a bit.
  • That gravy.
  1. Put the bread on the plate, with some mashed potatoes beside it.
  2. Put the turkey on top.
  3. Add some gravy on top of everything.
  4. Put another piece of bread on the top. (Unless you want an open-faced sandwich.)
  5. Slather more gravy on that.
  6. Drink a shot of gravy.

Don’t forget to eat your vegetables so it’s a healthy meal. This is a quick week night dinner that tastes like it cooked all day.

Things I might try next time…

  • Toast the Texas Toast, or grill it up like grilled cheese or a patty melt?
  • Bacon pieces in the gravy.
  • Bacon on the sandwich.

Have any suggestions, tips, tricks, or secrets?

If you were a lunch lady in the 80’s and know how to make/where to get that greenish-yellow glow-in-the-dark colored school cafeteria gravy, hit me up in the comments! I am super nostalgic for that,

Cooking Stuff From the Garden 🌶🥒


So, today I felt like cooking. We recently came back from a weekend at a cabin and a week at camp. We had a bunch of new stuff ready in the garden, and some stuff past ready.

Here are three quick recipes that I posted on Instagram. The Poblano peppers, banana peppers, straightneck squash, and snap beans were grown in our garden.

🥓🧀🌶🍄🍝🥒🌱

Bacon-Wrapped Poblano Peppers

Well, that turned out well. Got some poblano from the garden this week. I mixed some bacon bits, minced garlic, shredded cheddar cheese, and steak seasoning into some cream cheese, cut the peppers in half, stuffed with the peppers with the mixture, sprinkled more cheddar on top, wrapped with bacon, & baked on a sheet pan at 375° for 40 min.

Turned out pretty good if I do say so myself!

Snap Beans with Mushrooms & French Fried Onions

Some fresh snap beans from the garden. Steamed, then tossed in with some sautéed mushrooms, French fried onions, minced garlic, a pinch or 2 of flour & fresh cooked bacon pieces. (Used the leftovers from the peppers.)

Straightneck Squash Parmesan

Had some straightneck squash that grew a bit too big while we were at camp. I had it in my head to prepare it sort of like eggplant parmesean & fried zucchini. I didn’t want the stacked lasagna version, I wanted something with a bit of crunch.

I sliced then up, dredged in flour/cornstarch, egg/buttermilk. & coated in regular & panko breadcrumbs with a bit of parmesan “shake cheese” mixed in. I seasoned each step with Italian seasoning, garlic powder, & black pepper.

I baked them for about 25 or 30 min. on 400°, then topped with provolone & mozzarella slices & a bit more parmesan. They went back in for 10 min.

Served with bowtie pasta & covered in our favorite slightly doctored sauce.

Added the needed flavor to the overgrown squash and I actually preferred the consistency to eggplant.

🥒🧀🌶🥓🧄🍄🌱🍝

All in all, I was really pleased with the results, and I think the family was too.

Do you have some good recipes, tips, & tricks for these garden ingredients?

What do you like to grow and cook?

Smokin’ Spare Ribs 🍖 (3·2·1 Style)


So, recently I got a smoker attachment for my Char-Griller grill as a gift for Father’s Day. I tried it out today and the results we fantastic. I hit up the Google machine and some non-BBQ-ing Facebook groups for advice, tips, & tricks. (I imagine that they are as intense as guitar groups and I am just not ready yet.) I kept getting advice on the 3-2-1 method of smoking ribs. There are many variations of that technique. I think it went well. I tracked my progress with the #AiXeLsyDBBQ hashtag. Maybe I’ll do some more next time.

The quick and dirty of this method is…

  1. Get your coals to 225°-ish. (I used a chimney to avoid lighter fluid and it was awesome.) I added some wood chunks in the chimney, and on top once I spread on the coals. I did not soak the wood, but I may next time. Control the temp with your vents. Open a bit warms it up, closed cools it off… all because of airflow.
  2. Remove the silverskin, and put a nice rub on the ribs. I used one from the section of Walmart by all the grilling stuff.
  3. Put the ribs in the grill part if you have an attachment, or not on the heat for 3 hours.
  4. Pull the ribs out, wrap in heavy duty grilling foil, add some apple cider, apple juice, vinegar, pop, or whatever. I added some Straub. Unfortunately I made 2 racks and used the whole bottle, so I drank one myself.
  5. Put them in for 2 hours, smoking really isn’t necessary at this point if your wanna save your chunks or chips.
  6. Pull them out and unwrap them. I should have saved the drippings for the barbecue sauce on the side, but I did not. Shame on me. Do that.
  7. Sauce those ribs up. Liberally. Like, and obscene amount.
  8. Put them back on for 1 hour. (3-2-1… get it? Guys! They said the thing!)
  9. Always check with a thermometer for done-ness. They should be pretty damn done at this point, arguably overdone.
  10. EAT.

I know fall-off-the-bone isn’t competition style. A bone did pull right out of one rack, but the meat was in tact, not falling completely apart. I know the foil wrapping bit is then steaming not smoking… but, rules are made to be broken and a healthy dose of anarchy warms my little punk rock heart.

I would definitely do the ribs like this again. I may try a homemade sauce. This was pretty basic store-brand stuff from Shop ‘n Save with some dry mustard, brown sugar, garlic powder, onion powder, and black pepper, and Straub American Amber Lager. I may try different chips, or a smoker box, or to soak the wood. I even read some people eschew charcoal in favor of all wood once the fire is going.

I also threw on some baked potatoes, turkey legs, grilled veggies, and sauce on the attached burner.

Can’t wait to try out a turkey, pork loin, brisket, and whatever else I haven’t thought of. Mac n’ cheese? Jalapeño poppers? Meatloaf? Bacon?

What do you do in the smoker? What are your go to foods? Got any tips & tricks worth sharing? Do you click the tongs twice or three times? Before, during, or after?

Any excuse to drink beer and play with fire all day is a good excuse to me. Plus, the family was awed by my hereto unknown skills with smoked meats.

What music are you playing while you’re grilling or smoking?

This is the full adventure as told via Instagram: