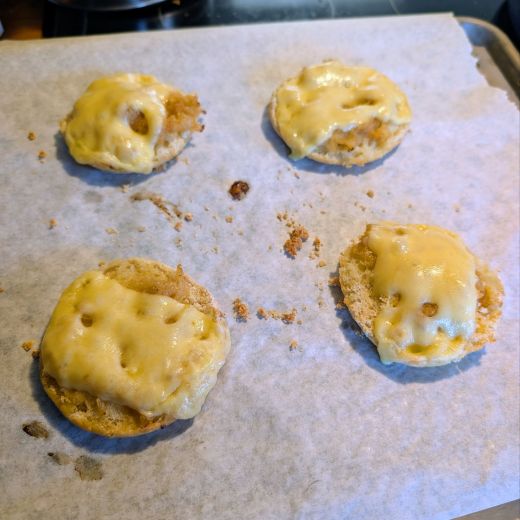
So, the other night, I caramelized some onions for some burgers. In my time-honored tradition of always making too much… I had some leftover. I had an idea for English muffins for breakfast topped with the onions & some Swiss cheese, so I tried it, out.
The were absolutely delicious. Just posting this so I can pin it & refer back to it.
When caramelizing the yellow onions in a ridiculous amount of butter, I added some salt, onion powder, garlic powder, paprika, ground mustard, & black pepper. I have no idea if this is “correct” but it was delicious. I start them out on medium until they’re translucent, then cook on medium-low for a ridiculously long time.
Fast forward to the next morning, I split some L’Oven Fresh English Muffins, spread butter on them, spread some of the leftover caramelized onions on them, and topped with half a slice of Swiss cheese… and baked in a pre-heated 350° F oven for about 13 minutes. (The onions were cold from the ‘fridge, & I wanted to be sure they were heated up before everything was too toasted.)
It was a great breakfast… but I did miss a beef broth or au jus kind of flavor. Would have been like French Onion English Muffins then. Maybe next time?
What would you call this? Have you done something similar? Would you do it different? Ever try the oven method to caramelize onions, or something other than slow & low on the stovetop? Let me know in the comments!
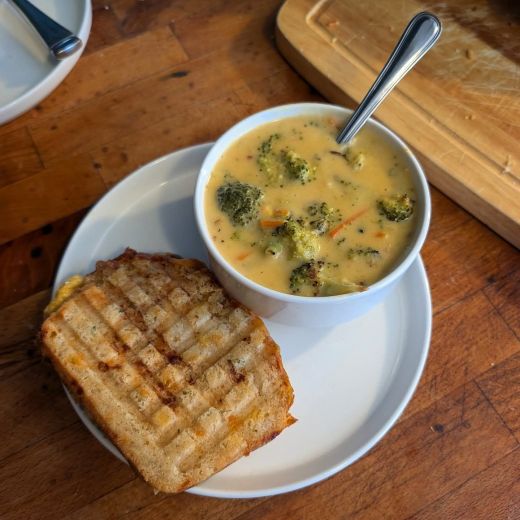
It’s cheeseception. I wanted to try that cheesy beer bread in some grilled ham & cheese sandwiches… and I needed some soup for the side, right? Why not up the cheese level with my old broccoli cheese soup or my potato soup? I thought the fiber from the broccoli may be beneficial. 😆
Roasted Broccoli Cheddar Soup and a Cheesy Beer Bread Grilled Ham & Cheese Sandwich
I probably should have stuck with a traditional tomato soup to combat the absolute decadent richness, but this soup was pretty damn good. I want to try to make a roasted butternut squash soup eventually too… but not sure that would pair well with this sandwich?
I did spice-up my original broccoli cheese soup recipe. This could be a full meal, or a side to a nice turkey or roast beef sandwich. Recipe down below. That’s what I did this time. I’ll probably make it slightly different next time. Everyone does that, right?
As far as the sandwich, I just cooked some lunchmeat ham for a few seconds on the panini grill, sliced up the cheesy bear bread, buttered the outsides with softened butter, and stacked it with some individually wrapped cheese slices… cooked on high on the countertop grill to sear & melt it all at once. I should have gotten a side view, but I was hungry.
Fresh real bacon would be incredible here, maybe more of it… or even bits of cubed ham.
You could skip the beer & do 1½ cups of water with the ham bullion or Better Than Bouillon. I like to use Straub Amber to cook too.
I wonder if a red bell pepper would be good in this too?
This makes a large pot, so hope you like leftovers.
My apologies to vegans, the lactose-intolerant, and the dairy-allergic.
🥦🧀🥣
OK, so how would you make your broccoli cheddar soup? Can I call this broccoli cheddar when it also includes other kinds of cheese? What are your thoughts on the roasting? Would you try this? Do you have a broccoli cheese soup go-to recipe? How about any tips & tricks?
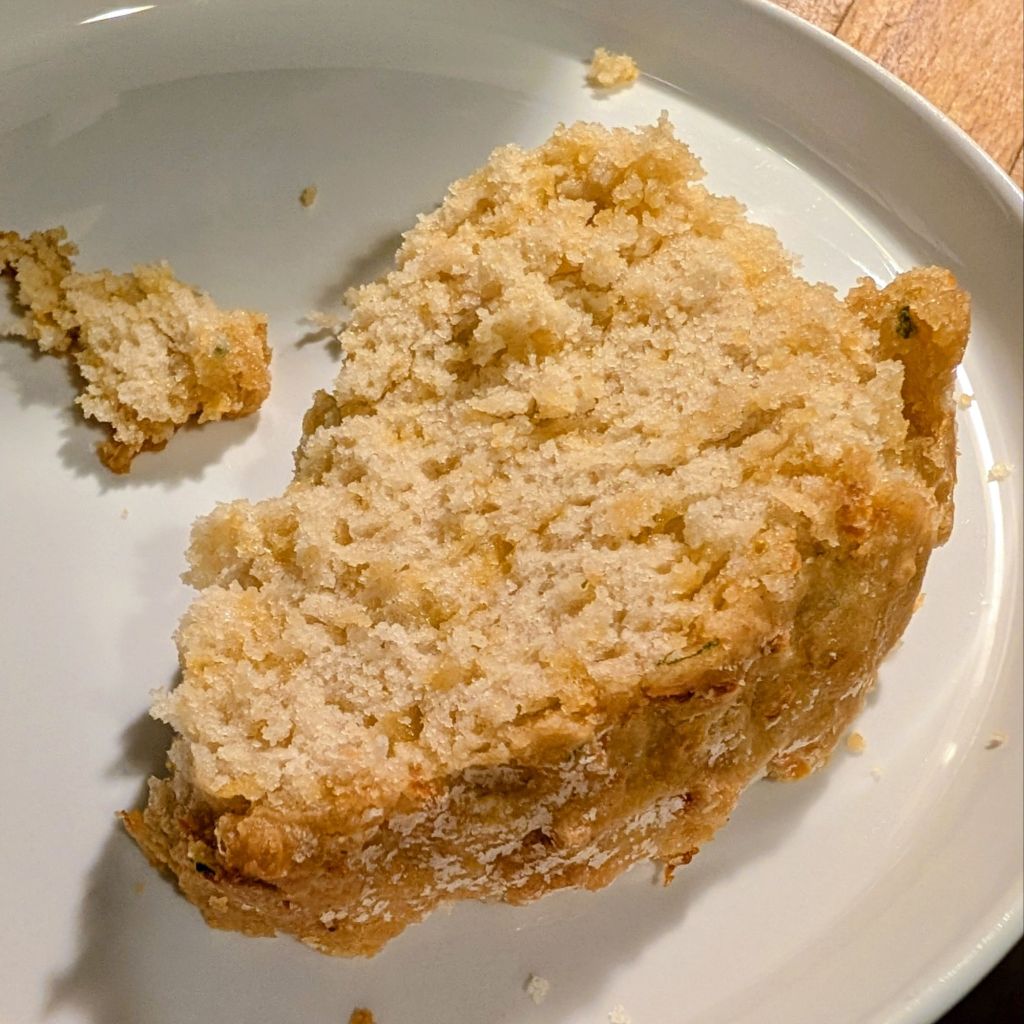
Apparently beer & cheese have been on my mind lately. I saw a post by @swampmuse on threads of some cheesy beer bread and it looked awesome. She was cool enough to share her recipe. That got me thinking about beer cheese dip because of the shared ingredients. I was in a cooking mood last night. I’ll definitely be making the bread again, and the cheese dip would be great for pretzels… so maybe new years or a cold October night?
They were good together. I wonder if beer cheese bread in beer cheese dip is meta, or merely going hard?
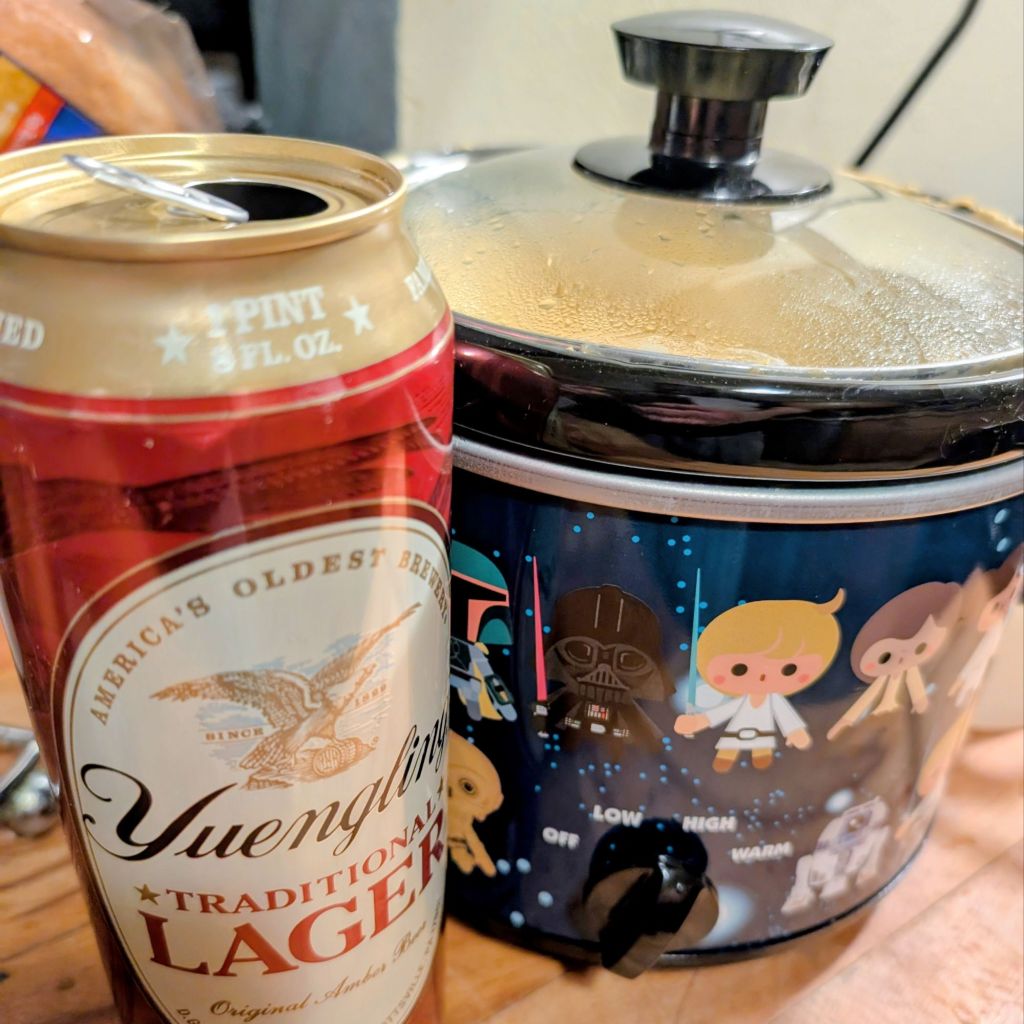
I hardly drink any more, and the big bird was out of Yuengling bottle six packs & only had Straub Amber can 15 packs… so, I ended up with 2 big-ass 24 oz. cans of Yuengling Traditional Lager.
Brush additional melted butter on top @ 35 minutes.
Notes: I’m a dumbass, I left all the butter for the end when I should have mixed it in. Next time! I may have went heavy on my pinch of salt, too. I did brush all the butter on at 35 minutes, & it went for another 15 minutes, & was perfect. I think I will also sprinkle some additional shredded cheese on the top at the 35 min. mark… because, I mean… why not?
My 10 year old said he “thought it was going to be gross because it looked all bumpy” but was an immediate fan upon tasting.
Thank you so much to @swampmuse for the original post, the inspiration, and the recipe!
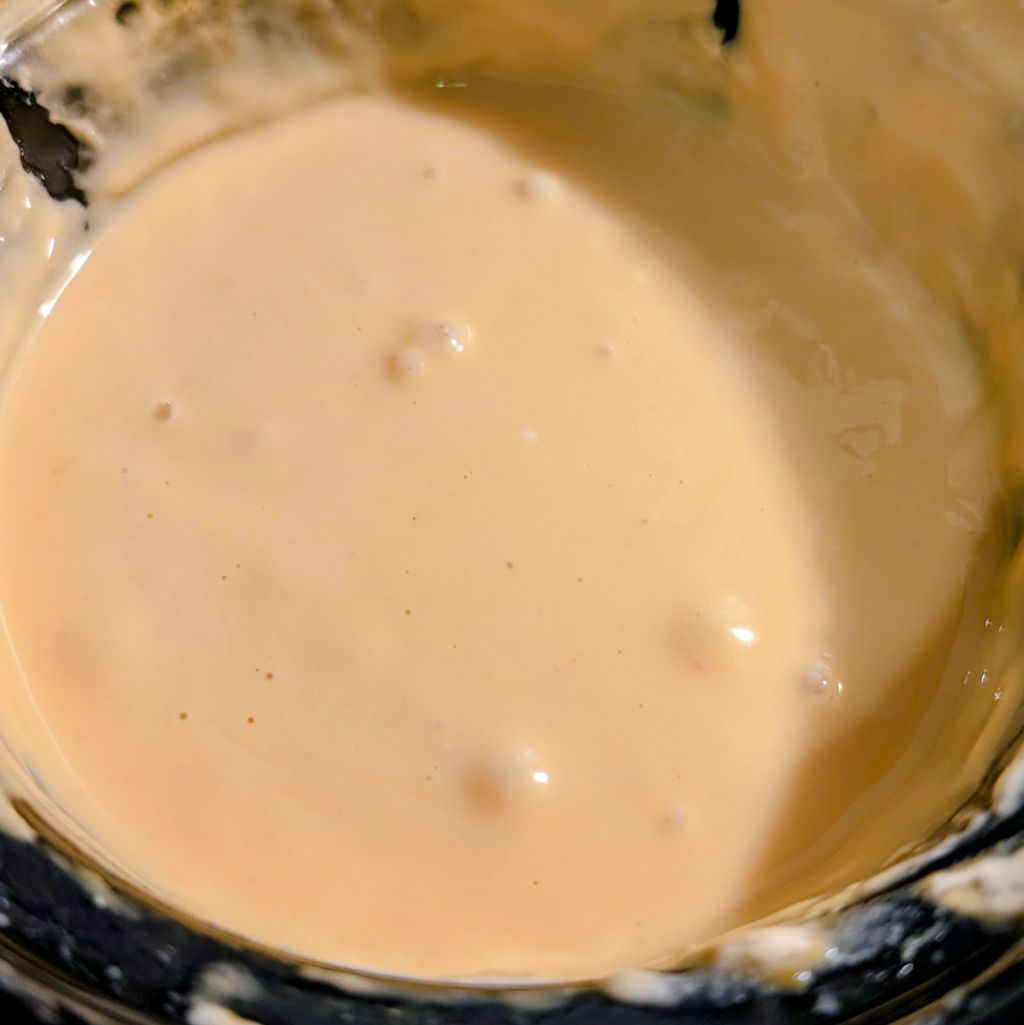
Beer Cheese Dip 🍺🧀
I had this on my mind, looked at a bunch or recipes online, and just winged it.
Ingredients:
1 16 oz. block of Velveeta
1 8 oz. block of cream cheese
1 cup beer
1 cup shredded sharp cheddar
1 cup shredded Gouda
ground mustard to taste
white pepper to taste
yellow mustard to taste
Instructions:
Cube up the Velveeta & cream cheese, put it in a crock pot on high.
Toss on the mustard powder & white pepper to taste, add a dollop of yellow mustard.
Stir it every 10 min. or so until it’s melty.
Add in the beer, stir.
Add in the shredded cheese, stir.
Stir.
Be incredibly patient.
Stir.
Notes: It takes longer than you think & looks weird until it hits that “just right” point. This is probably a different time estimate for every appliance. You could obviously do this in a sauce pan or double boiler if that’s what you’ve got. The mustard is an emulsifier and helps with smoothness. I picked white pepper over garlic or hot sauce as other recipes noted. I also skipped Worcestershire sauce as some recommended as it can contain anchovies, and weirdly anchovies can trigger shellfish allergies. Dropping some jalapeño or poblano from the garden into this also would have been pretty killer.
Overall, these recipes are just a guide, and you can go all anarchy on them. What kind of beer do you like to cook with? What kind of cheese or spices would you add or swap out for? And, what would you dip in it? Would you did the cheesy beer bread in the beer cheese dip? Got any recommendations on either recipe?
🍻🧀🍺🍞🍻
While you’re making or eating these, consider rocking out to these playlists…
The algorithm wanted me to try the canned biscuit dough pretzel bites. It kept coming up. I kept clicking. I posted about it on social media asking questions. I looked at recipes online. They all had different methods! Are these people even trying their own recipes? They’re wildly different.
I decided to try some different methods, & bounce it off of AI to get a cooking time/temp. I put the following into Gemini, ChatGPT, & Perplexity:
Hello. I have seen many recipes for pretzel bites made from pre-made canned biscuit dough online. There are so many variations, I was wondering if you could recommend one singular method as to time and temperature. I would like to bake them in the oven. My oven has traditional, convection, and air fry settings. Can you suggest a time, temperature, and setting?
Also, I am having trouble deciding if boiling in baking soda water, or just coating in baking soda water is the way to go. Also, what is the best ratio of water to baking soda?
And, I hear egg wash and just a melted butter wash are good ways to coat them before baking. Would you use the whole egg, or just the whites or yolks? Can you do both?
I am tempted to bake pretzels in 4 quadrants, one quarter each of them in the following combos;
Boiled in baking soda water / Egg wash.
Boiled in baking soda water / Melted butter.
Coated in baking soda water / Egg wash
Coated in baking soda water / Melted butter
Do you think that would solve most of my questions? Can you put together the baking time & temp, and baking soda solution measurements and boiling or coating times?
Here’s what they said:
Gemini’s Answer
GhatGPT’s Answer
Perplexity’s Answer
I’ll try to link to the full answers here too, as I did keep all 3 conversations going for a bit with different queries.
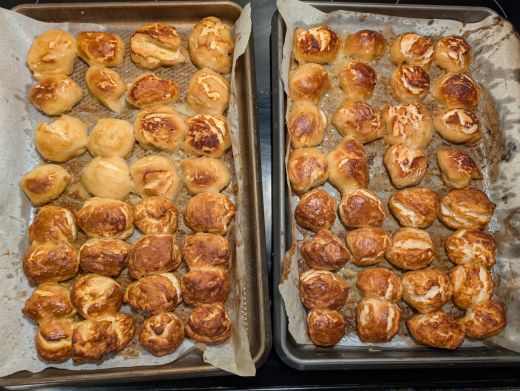
They looked OK for the most part. I had two cans of pre-made biscuit dough, both were Pillsbury Grands Southern Homestyle. One was Butter Tastin’, one was Buttermilk. Butter Tastin’ was tray 1, Buttermilk was tray 2. I tried all the things. Baked at 425° for 8 minutes. The boiled ones puffed up a bit, I only let them go for 15 seconds using Alexa as my timer, as I read that boiling too long in the baking soda can give you a metallic taste. The baking soda bath was in warm water… I only left them in for as long as it took me to boil the other ones. I did forget to put salt on until halfway through cooking. I used the coarse salt grinder.
Pre-Made Biscuit Dough Pretzel Blobs by AiXeLsyD13
I broke each quadrant down & gave it a letter, & a really short summary…
Absolute 🥨 Shenanigans
A | Butter Tastin’ / Boiled in Baking Soda / Egg Wash – Most pretzel-like texture. Needed baked a bit more.
B | Butter Tastin’ / Boiled in Baking Soda / Butter Wash – Seemed like crunchy biscuits.
C | Butter Tastin’ / Baking Soda Bath / Egg Wash – Tasted burnt-ish.
D | Butter Tastin’ / Baking Soda Bath / Butter Wash – Straight up biscuit.
E | Buttermilk / Boiled in Baking Soda / Egg Wash – The outside was very pretzely.
F | Buttermilk / Boiled in Baking Soda / Butter Wash – Close to a pretzel. -ish.
G | Buttermilk / Baking Soda Bath / Egg Wash – Good… but crunchy. Maybe baked less time?
H | Buttermilk / Baking Soda Bath / Butter Wash – Very biscuit-like.
So, that was a thing. Definitely going boiled, & egg wash next time. May seek out some coarse salt or pretzel salt. I may try it at 400° on the convection setting for 8 minutes, or a little longer on the regular setting at 425°. Also, may try cooking on a baking rack & cooling on a cooling rack. I may go got more traditional biscuit dough too, instead of what I had. At the end of the day, these all tasted great dipped in some Herlocher’s. I just wish I had some beer left, but I used my last can of Straub Amber making BBQ pulled pork sandwiches (and rocking out) today. Also, gotta try some with cheese in the middle, right?
Also, I know they’re not perfect yet, but these AI chat bots can REALLY help consolidate / create recipes pulled from so many online sources. It seems like you can search for 5 recipes, & get 7 different cooking times & temperatures at the very least. Then, like my stuff, if there’s no “Jump to Recipe” button, you gotta use Cooked.Wiki, JustTheRecipe.com, or Just The Recipe. As of now, the AI bots are not riddled with advertising and paid ad placement/rankings. They all have their strengths & weaknesses.
Here’s where you hit me up in the comments and/or on social media with your tried-and-true pretzel & pretzel bite methods. I’m not really all that super interested in making dough, so that’s why the canned dough piqued my interest. And, have you used AI prompts for cooking or anything else interesting lately?
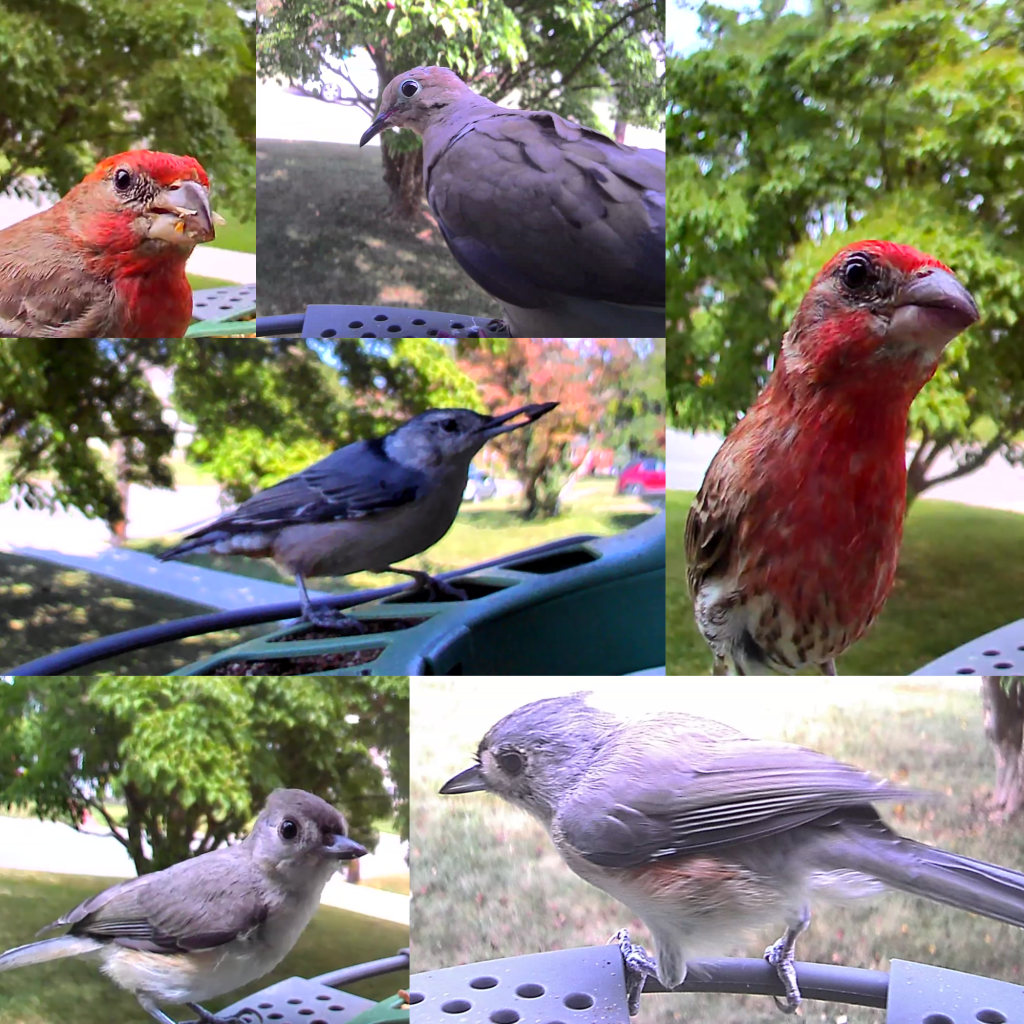
I have really enjoyed seeing the wildlife in my backyard through my Birdfy Feeder & my Birdfy camera (& the accessories). The folks at Birdfy reached out to ask if I would like to test a new product, so of course I said yes! I have been using it, sharing my camera feeds with the company, & providing feedback for a while now with the company, & uploading photos/videos to a private Google photos album. It was exciting to see them respond & change features/settings as the testing went on. They really improved tracking, AI recognition, & picture/video quality rather quickly.
It has ben hard to keep quiet about it & not share the video or photos!
As a company, they’re constantly reaching out to solicit suggestions on product ideas, design, features, and more. They have recently updated their app to enable editing of AI tags as per customer suggestions.
I’m relieved to be able to share the fact that I have been helping to test the new camera, & to finally share the photos/video.
🐦
I need to make a blog post when I get time, but if you're looking to get a camera birdfeeder, and you like my videos, please consider buying a Birdfy by Netvue, and doing so with this affiliate link:https://t.co/KBCtDHH9D1
Here my son helped me film the unboxing/setup, if you want to see a really poorly edited video. I have set up over 7 Birdfy cameras at this point through the app, and all of them have been really simple.
The one that was sent to me has two cameras, the Birdfy 2, & the Birdfy 2 Pro, and it’s a Duo feeder with the Pro camera mounted in the middle, and the 2 mounted on the side. It also came with a solar panel. I mounted it on a pole that I had purchased from Amazon.
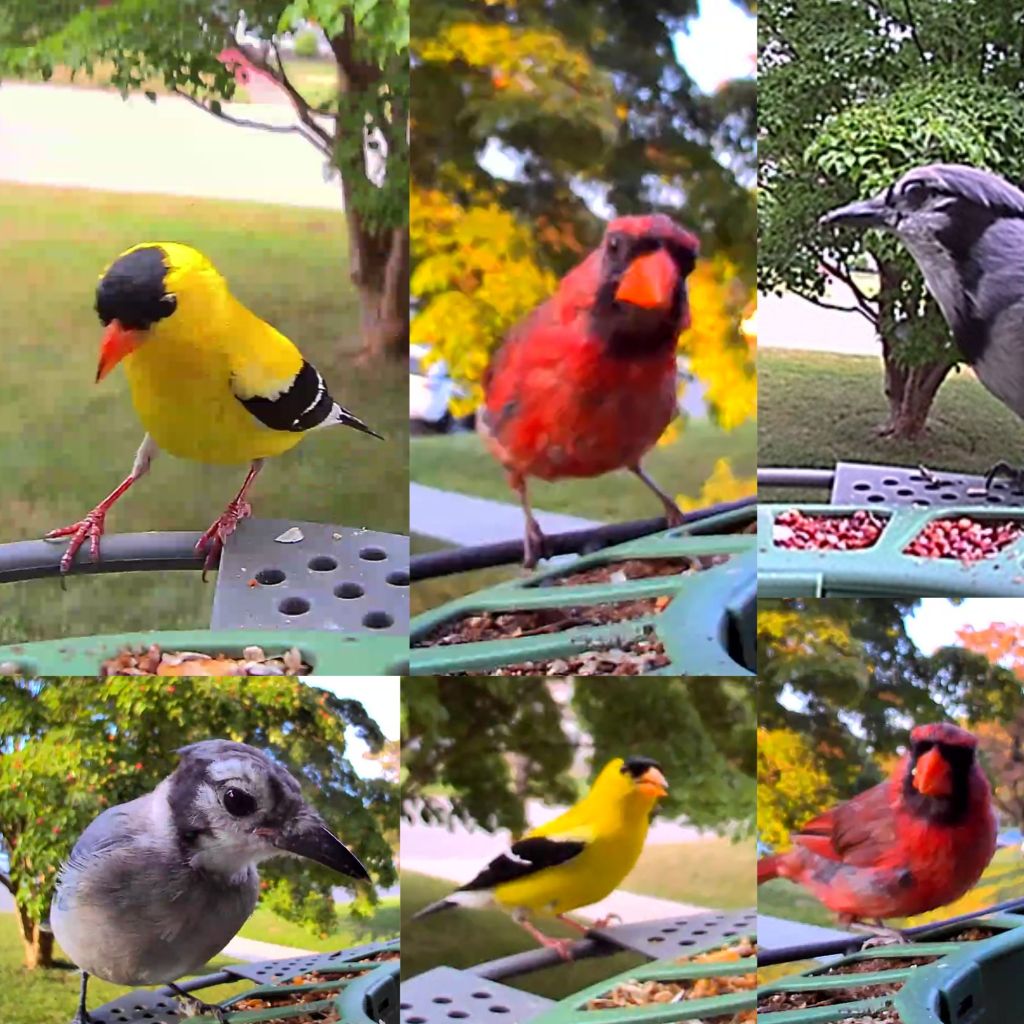
The Birdfy 2 Duo Feeder with the Birdfy 2 Pro & Birdfy 2 cameras.
I like the looks of it, and the color when compared to the original feeder. It just seems a bit more elegant or classic of a design. The bamboo feeder is really nice looking, too. I also like that the lid of this newer model opens up & back, so you can see better into the hopper as you’re filling it… and that the cameras are wholly independent of the housing for ease of access. I have removed the two plates per Birdfy’s request, as the bords seem to have more room to perch without them in the way.
The cameras take a while to charge at first, but the solar panel typically keeps it close to 100%. Occasionally, I do have to bring a camera in for a recharge across all the products. (I don’t have a nest or a hummingbird feeder yet, but maybe someday.)
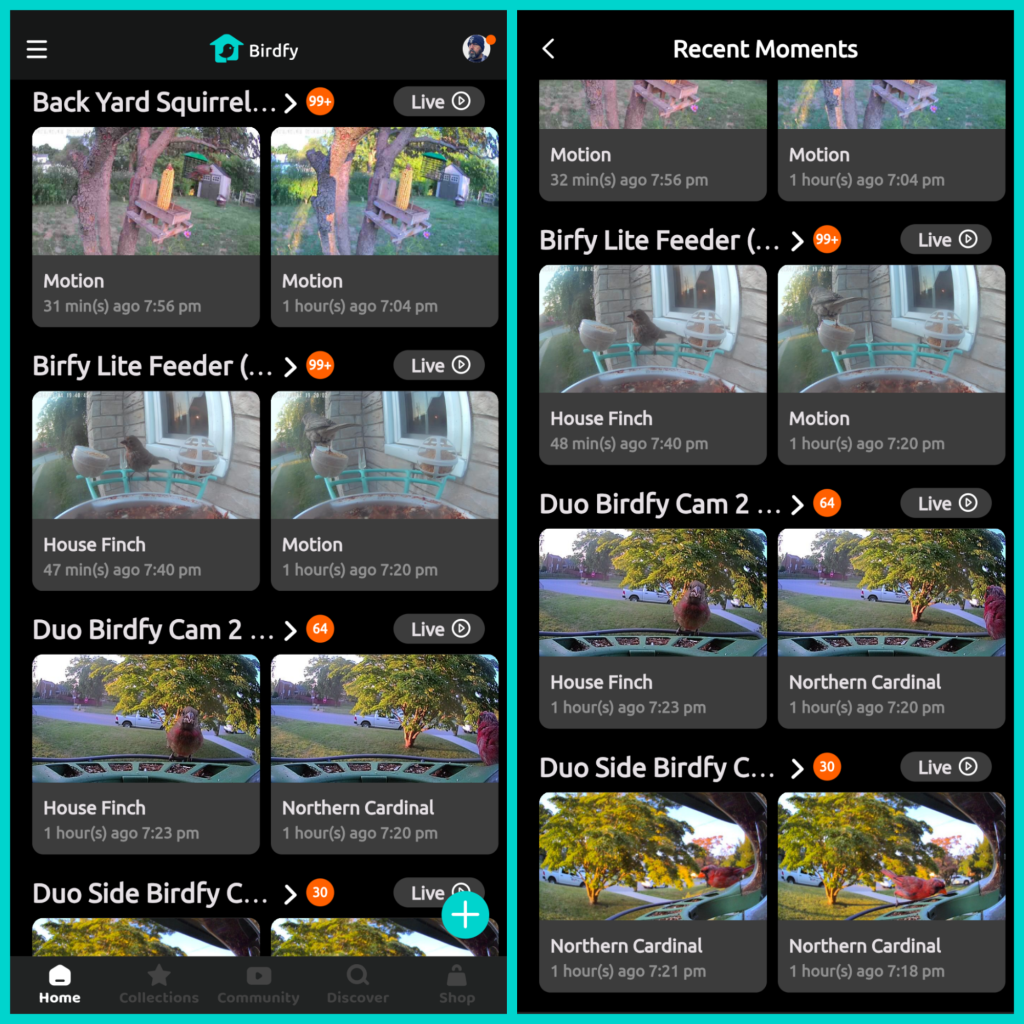
The app is easy to navigate from the setup of the cameras, to checking out the various videos and photos captured. It has a daily highlights feature, and a monthly recap. The FB community is great for ideas and seeing others’ setups and the birds (& other animals)#CaughtOnBirdfy, and Birdfy support is incredibly responsive.
The video & photos are what shines here, though. The Pro 2 has two cameras, one that moves & tracks the birds. Videos can be downloaded, shared with the community or “collected” in the app, and you can see both cameras at once from the live view. I had to quiet the notifications, because I literally get them all day. The AI bird recognition is pretty good, and getting better, especially now that functionality for correcting the tags has been implemented.
Photos from the Birdfy Duo Feeder with the Birdfy 2 Pro & Birdfy 2 cameras.
🥜
If you have any questions about the feeders, my setups, or anything related to this… don’t hesitate to ask in the comments or reach out on social media. I enjoy vegetable gardening, keeping a nice backyard, and living in harmony with nature even here in the suburbs. These feeders add to the enjoyment. I don’t have to be outside all day to catch a glimpse of nature at work. I try to plant flowers for the pollinators, I’m working on a birdbath and may eventually make a little pond. I have bee/butterfly baths & bug houses.
Bird people seem to be mixed on the squirrels & chipmunks though. I love to watch them, too. Ha ha. I have a squirrel feeder out with a camera trained on it, but may use a Birdfy camera to build into a squirrel feeder eventually. Maybe a barstool style feeder? I’ll have to fortify the wires, as sometimes they can apparently chew them and be quite destructive.
🐿️
I am in the suburbs just south of Pittsburgh, PA, and I use a varying mix of fruit & nut mix, dried mealworms, a songbird seed mix, sunflower seeds, & sometimes some hot pepper seed mix or cayenne pepper or chili powder. The latter tends to keep the squirrels at the squirrel feeder, but the dust can smudge the camera lenses sometimes. I also tent to put out peanuts and corn for the squirrels (although that pulls in raccoons & deer, too).
You can poke through my whole playlist, or see some videos from just the Birdfy 2 cameras here:
Yeah, I have had some down-time lately, so I finally hit the maze thing full force. You may have read about it here or here.
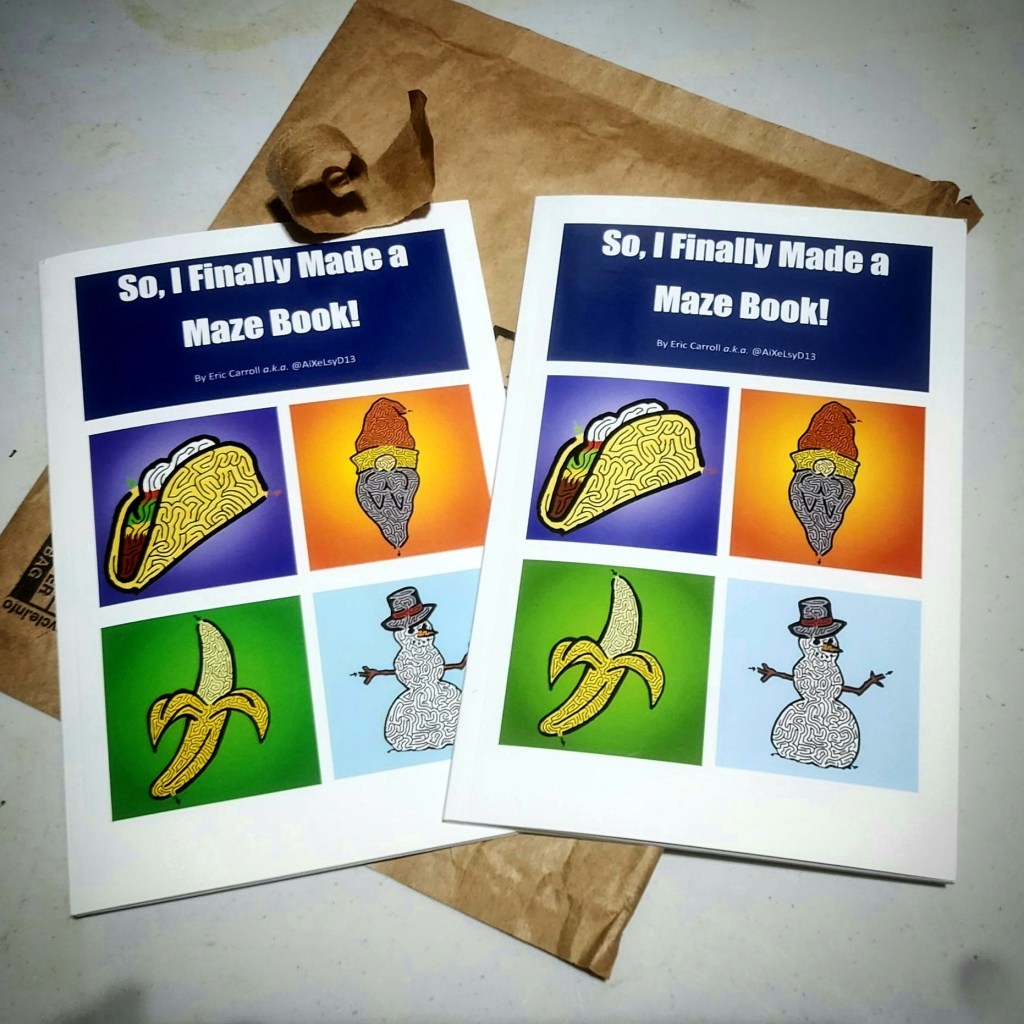
I got my books today! Getting reports from others that they have theirs too, thanks for posting & tagging me! Feel free to share the link anywhere & everywhere! Ha ha.
As of now, I have sold 25 copies, and it’s staying solid there. It’s not a huge number, but hey… it’s more than I have ever sold before! We did get a private photo of our friends’ daughter solving one of the mazes in the book, too. How cool is that? Early reports are that it is challenging and fun for a 10yo.
I need help getting the word out, as I have a $0 advertising budget.
If you can, leave a review on Amazon, or even at GoodReads! It would be awesome if you add it to your “to read” or wish list, or even marked as “read” at GoodReads, or follow me as an author there.
The consistently most visited post at my blog is In a maze mood, I guess. from January 2012. I have no idea what drives everyone there. Maybe Pinterest? I am tempted to update that page with a link to the book!
I’m also very interested in the Kindle books… Is it useless on a Kindle? Can you mark it up on anything?
I had some time recently, and I wanted to see what the process was to publish a print-on-demand book from Amazon. I grabbed a bunch of my smaller easy mazes with no discernable theme that I had previously posted here & on Instagram, and assembled them into a book. All of them were scanned in & maybe fixed a bit with paint.NET, and I put the pages of the book together with OpenOffice, so my only cost came down to the pens & paper. (Not sure how to quantify time & sanity.)
Yup, I finally did it. After drawing mazes for decades.
It was very simple to publish with Amazon. This gave me the confidence to put together another book, perhaps with a bit more coherence, and definitely with a much better cover. I have already started drawing new mazes in a neat little box template so they’re a bit more consistent. What’s a good number? 30? 50?
Also, I need to get all of these older mazes scanned & into a book too. I have some pages that are bigger than my scanner bed though. Perhaps a trip to FedEx Office or Staples is in order.
I just kind of set the price arbitrarily to make a little bit off of publishing. I’m not looking to get rich, but it would be nice to finally make income of off artistic output after decades of ostensibly doodling. (I won’t delve into my musical endeavors which are break even at best but probably a negative sum game. 🤣)
Luckily the creative outlet for me is just that, an outlet. I think we all need to express ourselves artistically or through sports, gardening, or other hobbies.
It also suggested I make a Kindle version, so I did that too. I am not sure if the concept will work there. Can you draw on a Kindle screen with a stylus or your finger? Can you print from a Kindle? I must confess I don’t have one. I am still a fan of books in the traditional form.
If you have ever enjoyed my mazes, or have been one of the awesome people that has completed them and sent in the solution – I humbly ask you (if you’re so inclined) to purchase a paperback for around $6 or a Kindle book for around $3 and let me know what you think. Should I do more? Did you enjoy it? Is the quality any good?
Really, I ask you to try even if you have never solved one of my mazes. Now is a good time to start!
It might make a good gift for kids or adults. It’s a nice way to pass some time or zone out.
If you do buy, can you leave an honest rating/review? I feel like that goes a long way with Amazon.
If you can’t buy or are really not interested, that’s OK too! I would ask you to maybe share the link around.
My thoughts on the next one are that I probably need a table of contents, to maybe title the mazes, and… should I include the solutions in the back? That’s one of my issues. I like to draw the mazes, but don’t really solve them. I may need to reach out for help on that part & pay someone to complete them so I can include the solutions (and make sure they’re solvable).
I probably need help with a title, too.
Thanks for reading, tanks for considering, and please share this link on every social media platform known to humankind: https://www.amazon.com/dp/B0CH2FMH7W
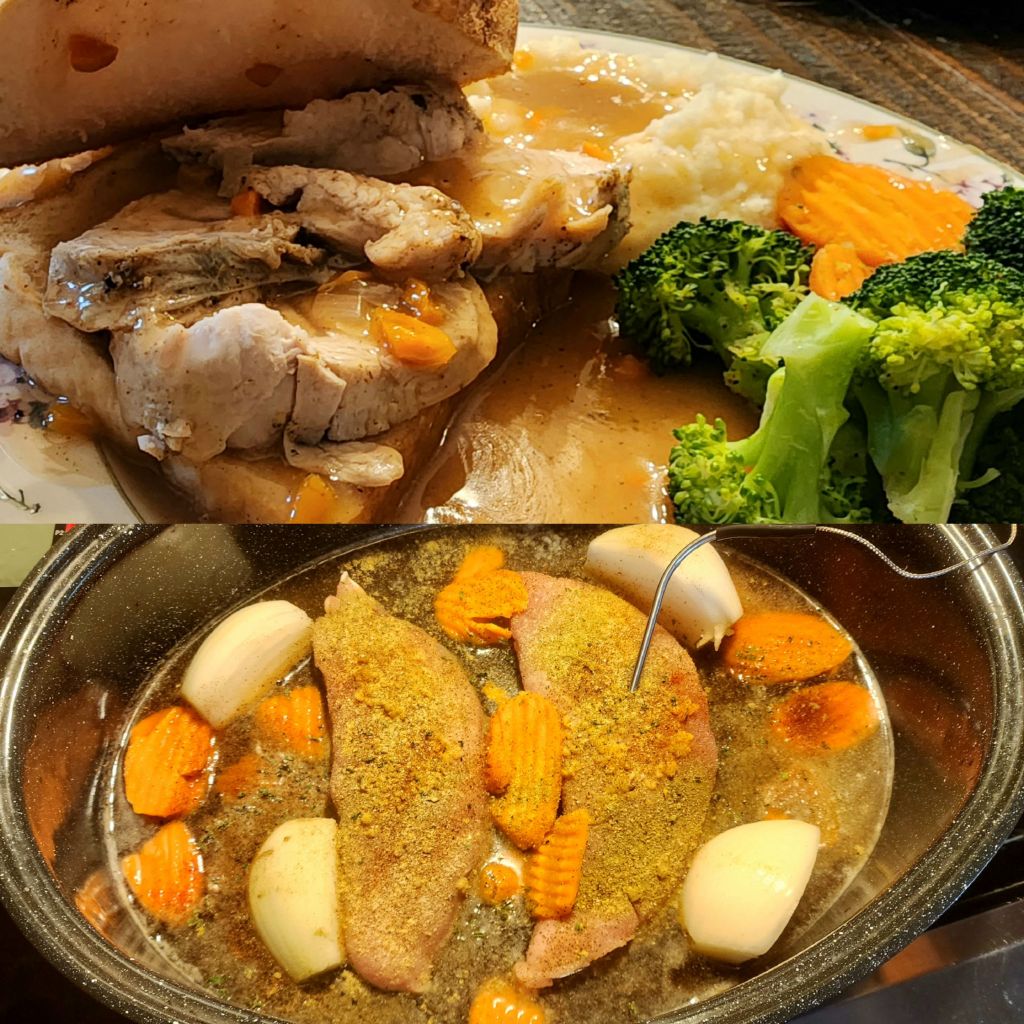
I love a good hot sandwich smothered in gravy, be it roast beef, meatloaf, or turkey. I was in the mood for a turkey one like you’d get at a diner, and being a week night after work, wanted to put it together pretty quickly as I hadn’t thought ahead to use the crock pot.
Putting it here, so if I want it again I’ll remember what I did right & want to try it again. I may have to double the recipe when the kids are home. This fed two of us & left enough for me for lunch.
The Turkey:
2 Breast Cutlets
1 can of Yuengling Traditional Lager (Or Straub Amber, or Shiner Bock, or Smithwick’s, or Killian’s Irish Red. Pick a good beer.)
⅔ cup carrot chips. (Yup, cheated & bought those in a bag too.)
1 Spanish Onion, peeled & quartered.
2 tsp. of minced garlic from a jar like a lazy person.
A bunch of your preferred spices. (I used, cracked pepper, poultry seasoning, sage, thyme, onion powder, garlic powder, paprika, Mrs. Dash’s table blend, and a bit of Season All.)
Pre-heat the oven to 350°
Put the turkey cutlets in a roasting pan, & pour the beer over them. Again, get good beer. No one wants you to cook with Coors or Budweiser or Mic Ultra.
Toss in the onion & carrot.
Add all the spices. When you think it’s too much, keep going.
Stick in your meat thermometer probe that reads temperature while cooking.
Pit the lid on, put it in the oven.
I set the timer for 50 minutes, but it was done in a half hour or so. Cook to 165° internal temp & let it rest. I got distracted & took it to 170° and no one died, so don’t worry if it’s not precise.
The Veggies:
Bundle of Broccoli
Carrots from that bag you already opened.
Chicken Bullion Cube.
You still have those spices out, right?
Eyeball some water into the pot, ad the bullion & spices.
Chop that broccoli up and compost the stems or make those little fried things that looks delicious.
Put the broccoli & carrots in the steamer thing that goes on top of the pot.
Boil it for… I dunno. Not long. I like my broccoli bright green & crunchy. Bonus with the carrots being cut like this, they cook quickly too.
The ‘Taters:
They’re from a box. Follow the directions… sort of. I bought the store brand.
Use more butter than they call for.
Put a chicken bullion cube in the water instead of salt.
instead of lowfat milk, use ½ whole milk and ½ buttermilk. Add sour cream if you’re into complete and total anarchy.
The Gravy:
2 jars of turkey gravy
roasting pan drippings
A bit of those carrots & onions.
Heat the gravy on medium-high.
Add pan drippings to taste
Chop up the carrots & onions pretty small, & add them too.
Cook it on medium until it thickens back up.
The Sandwich:
Texas Toast (Why do they call it that? it wasn’t toasted.)
That turkey, sliced after it has rested a bit.
That gravy.
Put the bread on the plate, with some mashed potatoes beside it.
Put the turkey on top.
Add some gravy on top of everything.
Put another piece of bread on the top. (Unless you want an open-faced sandwich.)
Slather more gravy on that.
Drink a shot of gravy.
Don’t forget to eat your vegetables so it’s a healthy meal. This is a quick week night dinner that tastes like it cooked all day.
Things I might try next time…
Toast the Texas Toast, or grill it up like grilled cheese or a patty melt?
Bacon pieces in the gravy.
Bacon on the sandwich.
Have any suggestions, tips, tricks, or secrets?
If you were a lunch lady in the 80’s and know how to make/where to get that greenish-yellow glow-in-the-dark colored school cafeteria gravy, hit me up in the comments! I am super nostalgic for that,
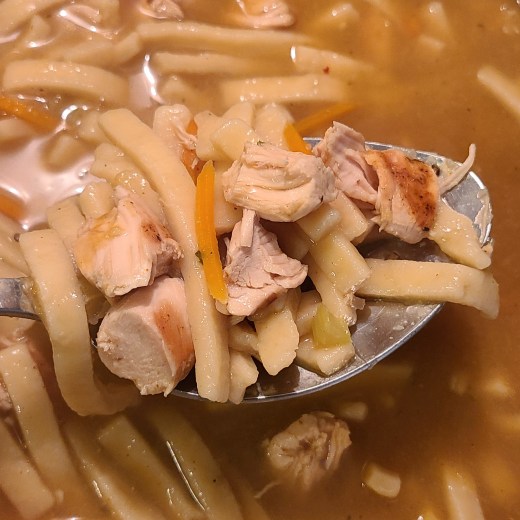
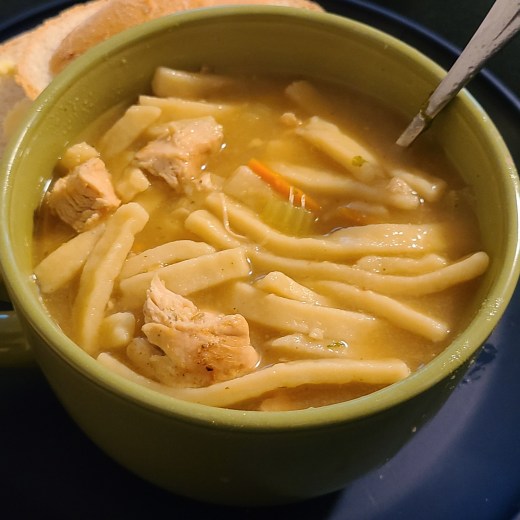
The wife & daughter are under the weather so I offered to make some home made chicken-noodle soup. Not much is more of a classic and traditional comfort than chicken-noodle soup, right? Around here, the stuff like Eat ‘n Park serves is a comfort-food staple. I love those style noodles. I make soups slightly differently every time, but this seemed to come together quickly and it was very flavorful. I’d definitely do it this way again.
I posted photos to Facebook & Instagram, & thought I’d share the recipe here too. I like to have leftover soup. Here’s what I posted on social media, maybe slightly edited;
This was the cheater method, but these frozen noodles are awesome. I made A LOT of soup. Ha ha. This could easily be halved.
I started with grilling chicken tenders on the panini grill, added a pretty good amount of “rotisserie chicken” spices. Two competing name brands happened to be in the spice rack, so that’s what I used.
I sautéed some shredded carrots, half a Spanish onion, and some celery stalks in a few pats of butter on the bottom of the stock pot.
Then I added some minced garlic (yes, the stuff from a jar soaked in olive oil because I am lazy), & some fresh parsley from the garden. I didn’t measure any of it.
I also used poultry seasoning, onion powder, garlic powder, white & black pepper, salt, & a shake of cayenne.
I de-glazed a bit with some chicken stock, then added the rest… 2 boxes of chicken stock, 1 box vegetable broth, 1 box low-sodium chicken broth (because vegetable broth usually has a much higher sodium content), 1 box bone broth. I ended up with 3 different name brands… just to get the mix of slightly different liquids.
I have used chicken bullion cubes in the past to save all kinds of money and use beer in my ham soups all the time.
I brought all that to a boil.
I added 2 bags of the frozen Reames egg noodles, the grilled chicken (that I cut up while it was boiling), and brought it back to a boil, simmered for about 20 minutes as per the directions on the noodles.
This almost overflowed my stock pot, but stirring kept it from boil over. Ha ha.
I have used regular dry noodles or Amish noodles, and even home-made noodles… but the Reaves ones really do taste fantastic and require zero work. Ha ha.
I like the taste of the grilled chicken in the soup. I left it just long enough to get grill lines. I have made it from scratch, using rotisserie chicken, made my own broth from a roasted chicken… I’d put this up against any of those methods and it’s super quick.
(Not-even-remotely-a-)Pro tip… For lunch the next day, all the noodles had soaked up all the liquid. Gonna put some chicken bullion cubes in some water in the stock pot, then add the soup to re-heat. It’s honestly good as-is re-heated in a bowl in the microwave.
If you make this, or your own version, tell me what you think in the comments! What are your favorite shortcuts for making tasty chicken noodle soup?
Someday I may try to make this (probably cut in half) in the pressure cooker, if I can get over how it wronged me on chili.
🥣🥣🥣
Stuff you need:
Countertop grill
Stock pot (and a stove, too I guess.)
Tongs
Spatula
Large Spoon
Ingredients:
(2) small packs of chicken breast tenders
Extra Virgil Olive Oil (I keep some it in a spray bottle and use it to coat the grill)
Rotisserie Chicken Seasoning (or your favorite Season-Salt or Mrs. Dash’s or whatever) – I don’t measure, I just shake it on.
(3) pats of butter
(1) cup (ish) shredded carrots
(1) cup (ish) chopped celery
(½) Spanish onion (I think they’re sweeter than sweet onions, but you’re cooking, so use your favorite onion.)
(1) tsp. minced garlic (the lil’ stuff from jar, or be difficult & use fresh)
Fresh parsley – A small unmeasured & finely chopped bit, I pulled mine from the garden.
(2) 24 oz. bags of frozen egg noodles
(2) 32 oz. cartons chicken stock
(1) 32 oz. carton vegetable broth
(1) 32 oz. carton low-sodium chicken broth
(1) 32. oz. carton chicken bone broth
Spices, I don’t measure any of these… I just shake it in:
So, I made some really easy turkey noodle soup yesterday. It turned out to be pretty delicious, and I lucked out because a lot of the ingredients were on sale.
My cell phone takes absolutely terrible photos, but trust me... this was delicious.
In the morning, I popped 2 turkey breast cutlets into the crock pot, piled on top of chopped baby-cut carrots & celery. I added some a cup of water with a chickenbullion cube… and piled on some spices; Poultry Seasoning, Season All, black pepper, garlic, sage, and parsley. I should have probably added an onion, but I forgot.
8 hours later, I boiled some wide noodles in 2 cans of turkey broth, 2 cans of vegetable broth, and 2 cans of low sodium chicken broth. When the noodles were cooked, I chopped up the turkey boobs, and dumped the contents from the crock pot into the boiling pot of noodles for the soup… I added a little more water, another bullion cube, and simmered for a while.
Result? Rather effortless yet delicious soup.
I found myself wondering if the broth & noodles would have cooked well in the crock pot. Will noodles cook well without the boiling & just the saturation? Would they eventually fall apart if over-cooked?
I’ve also done something similar with a rotisserie chicken… I’ll sauté the carrots, celery, & maybe garlic & onion with some butter in the soup pot, then add chicken and/or vegetable broth, boil the noodles, & add chicken.
How do you make chicken or turkey noodle soup?
How do you make your other favorite kinds of soup?
Have any secret ingredients?
I generally put in cayenne or something else hot… but I’ve been told to cool it with the spices for a while thanks to G.E.R.D. lately. Sometimes I add beer to soups… just because I can. I dunno if it’d go well in chicken or turkey noodle though?