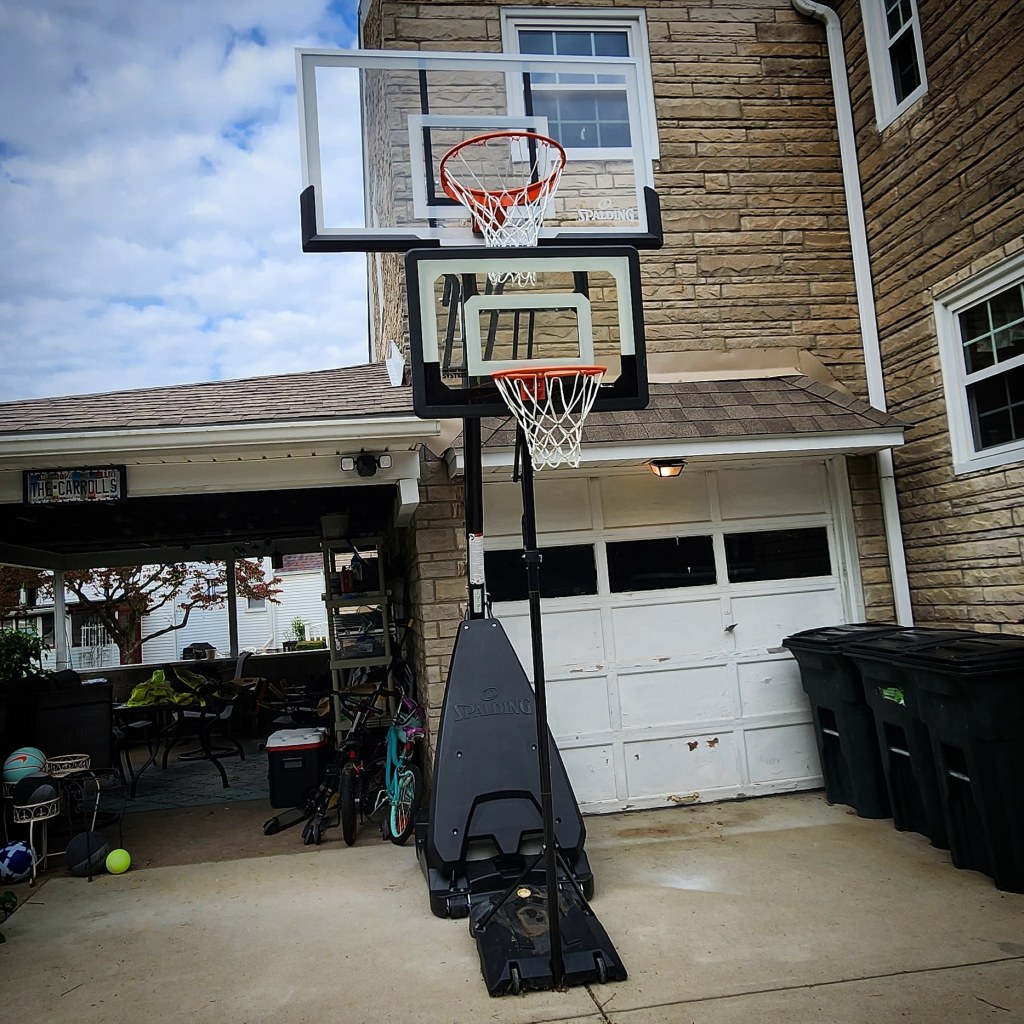
Did anyone actually try this? Assembling a Spalding basketball hoop according to the instructions. 🏀🤬


The kids have shown a commitment to their respective basketball teams over the years, so it was time for a significant upgrade in height and backboard size.

We bought a Spalding Ultimate Hybrid® 60″ Performance Acrylic Portable Basketball Hoop off of Amazon.

So, following is my review that should eventually go live on Amazon. I thought you may get a kick out of it.

🏀 This is a sturdy stylish basketball hoop. It is the described height and backboard size. The delivery was courteous and professional despite the dilapidated box. 🏀

That concludes the positive portion of my review. Putting this together was an exercise in patience & mental fortitude, and I failed. I mean, is it together now? Yes. Did it take much longer than it needed to? Yes. Am I, perhaps, just an idiot that can’t follow instructions? I doubt it, because every piece of furniture or children’s toy that I have purchased from the late 1900′ s to now has involved my dumb☆$$ assembling it. My resume includes, cabinets, beds, desks, dining room sets, shelves, dressers, Batcaves, a Kid Kraft Kitchen, doll furniture, the TMNT lair, Barbie’s dream house, and even an outdoor swingset treehouse thing. I have gotten pretty good. I even build LEGO as a hobby. I can follow instructions. I am quite familiar with my local Harbor Freight and Home Depot stores. I have some power tools and I know how to use them. 🔧🔨🪛🗜🚧

This manual had to have been written by someone that has never seen a basketball, a bolt, a screwdriver, or assembled anything. The frustration therein is compounded by the fact that the packaging was obtuse and the instructions at times were actually absurd.

I’m not even sure where to begin. Most furniture to be assembled has the packaging that directly labels the parts. Maybe stickers, maybe it’s stamped, maybe there is a cardboard backing to a pack numbering or lettering each bolt.

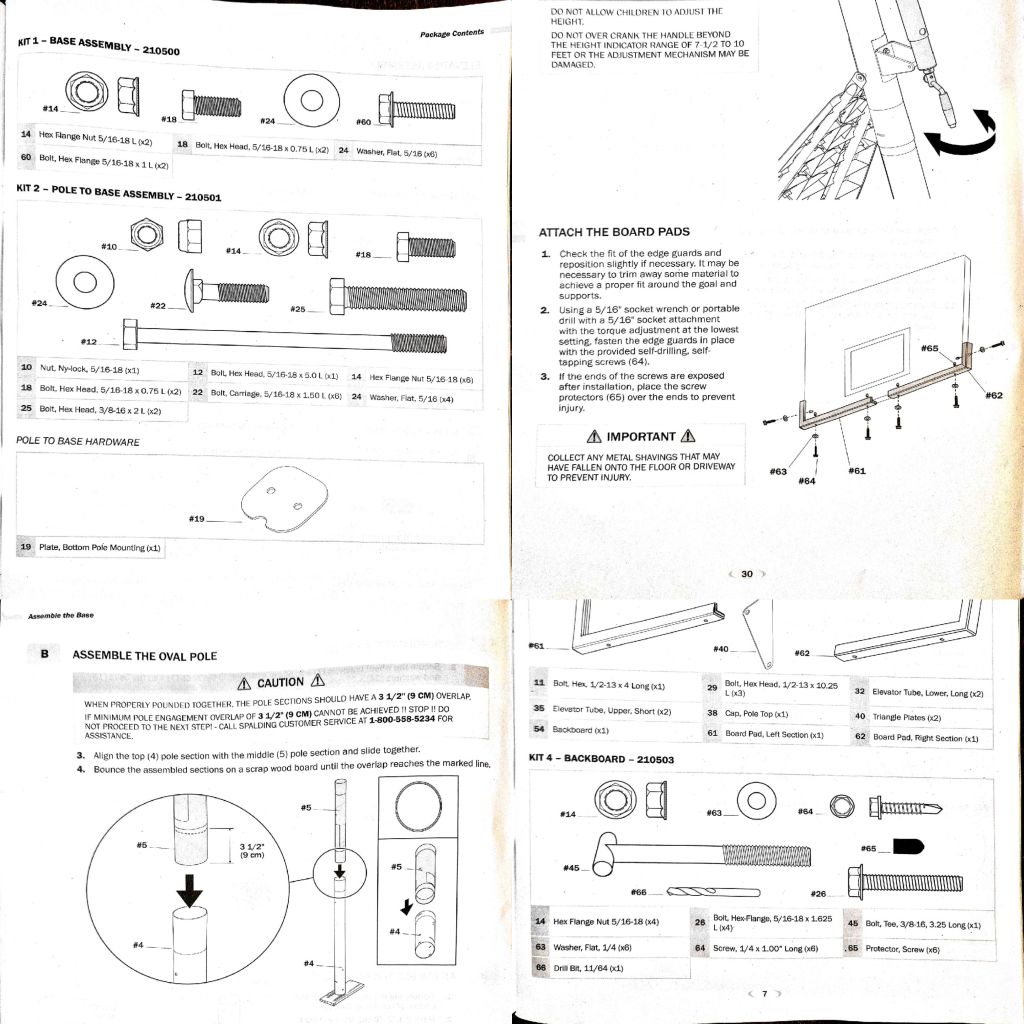
Here, we had none of that. They seemingly came in packs to facilitate the process, labeled 1B, 2B, 3B, etc. The book calls the packs Kit 2, Kit 2, Kit 3, etc. and of course the numbers do not correspond. The first bit that was maddening is that the #60 bolt from the first pack was one of the last bolts used. I found no discernable rhyme or reason to the contents relationship in packaging to each other at some points.

The backboard parts list shows an ¹¹/₆₄ drill bit. We’ll get to that in a bit (𝘱𝘶𝘯 𝘪𝘯𝘵𝘦𝘯𝘥𝘦𝘥).

The list of tools required did include sand, a garden hose, a sawhorse, a “scrap wood board,” and “2 capable adults.” While we won’t pause to question if the authors at Spalding were calling me and my wife tools, I will ask you to note the distinct lack of a drill in the tool list.

The first indication that this whole project was, as the young people say “shady AF,” was the fact that to assemble the main pole, I had to measure and mark 3½” down from the top of 2 of the 3 pieces. There was no pencil, chalk, crayon or Sharpie mentioned in the tool list. OK. I have a pencil & a tape measure. The next step was the head-scratcher. The actual instructions are to jam the tubes together and 𝗯𝗲𝗮𝘁 𝘁𝗵𝗲𝗺 𝗼𝗻 𝘁𝗵𝗲 𝗴𝗿𝗼𝘂𝗻𝗱 (on top of your scrap of wood) until they’re properly seated at the mark you hopefully measured correctly and marked, perhaps scratching with the drill bit?

I mean, this could have been made exponentially easier and fail-proof by maybe marking it at the factory, or having the joints fitted and maybe lock together with a pin or bolt? I mean, the Christmas tree people have had that figured out since what, the 50’s or 60’s?

Throughout the process, I was repeatedly measuring the bolts… because while it said things like #18 or #12, nothing on the bolt or packaging indicated that number.

After most of the assembly, it was time to attach to board pads/edge guards to the backboard. There were no holes in the frame around the backboard for this. Odd. They did, however, include self-tapping screws and suggested that you try to use a ⁵/₁₆” socket wrench to break though the metal frame. 🤣 Here is the first time a portable drill is mentioned. It doesn’t even note using the inexplicably included drill bit, that conveniently is the exact right size. I know I didn’t need to be Sherlock Holmes there, but I did manage to figure that one out.

The rest of the assemble went as expected. I did get a sawhorse/work bench thing out of the deal from Harbor Freight. I mean, it was in the list, so I 𝘩𝘢𝘥 to get it, right?

I will say I made a layman’s error in building that I had to rectify after the initial assembly. When I attached to lower elevator tubes to the backboard brackets, I neglected to be sure that I had went through the screw-jack, and only went through the sleeve. You can imagine my f̶i̶t̶ ̶o̶f̶ ̶l̶a̶u̶g̶h̶t̶e̶r̶ absolute fury at discovering my error. 🤬 This, my friends, was all on me.

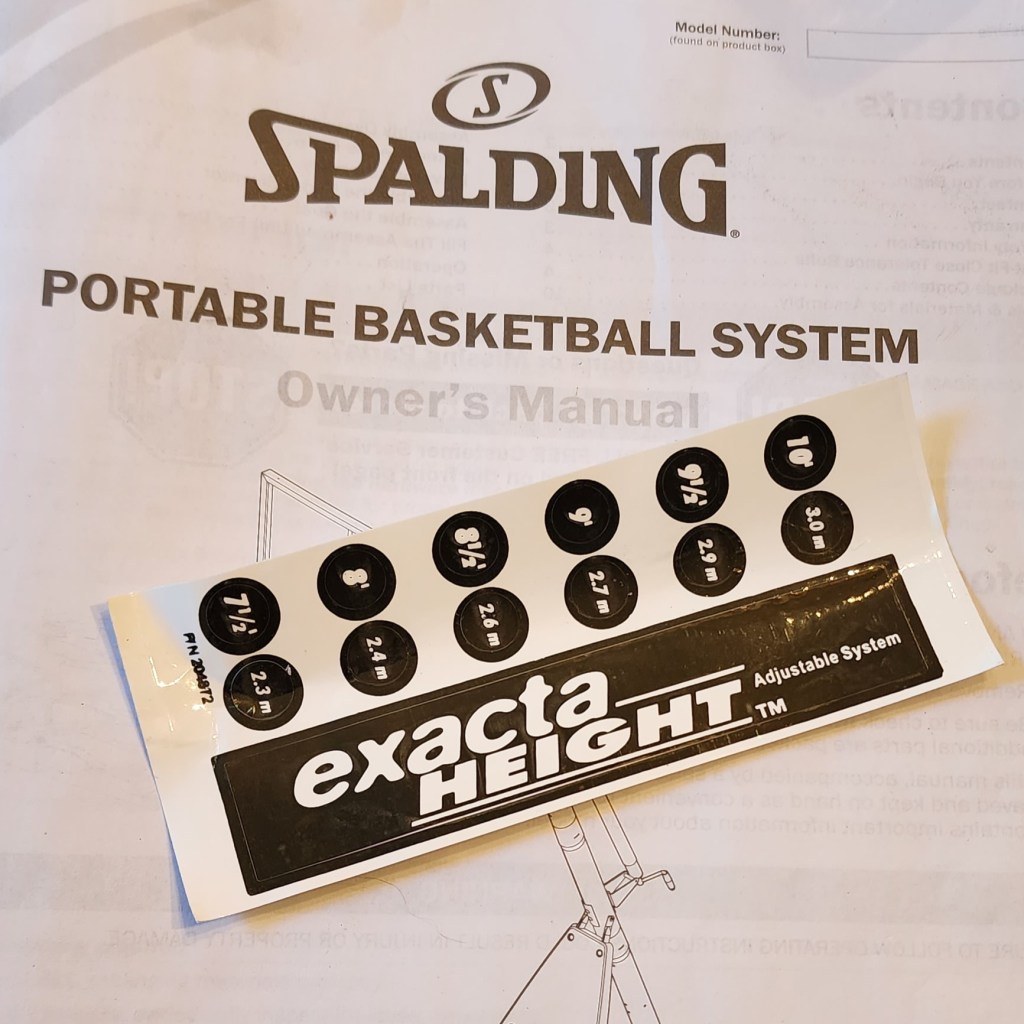
At the end, I had to literally use a tape measure to check hoop height. It does indeed go above 10′. I suspect that you expect me to measure the heights of the hoop to match of all the provided poorly-screened stickers and place them neatly on the screw-jack to be displayed by the conveniently placed hole in the sleeve at each of the 6 suggested settings? For what I paid for the hoop… those increments should have been stamped into or printed on the screw jack already. This takes me back to the argument that there is probably a better way to build the main tube for more efficient assembly.

If you, dear potential purchaser, have stayed with me this long, then you are brave, resilient, persistent and you may just be a masochist. If you have read all of this and still add it to your cart without selecting professional assembly, then may whatever higher power you ascribe to have mercy on your soul.
I may even email the address in the manual, and try to reach out directly to Spalding somehow either via email or social media.

I don’t want or need anything, other than for them to re-think their entire process.

Oh well. I am off to play basketball, poorly.

Smokin’ Spare Ribs 🍖 (3·2·1 Style)


So, recently I got a smoker attachment for my Char-Griller grill as a gift for Father’s Day. I tried it out today and the results we fantastic. I hit up the Google machine and some non-BBQ-ing Facebook groups for advice, tips, & tricks. (I imagine that they are as intense as guitar groups and I am just not ready yet.) I kept getting advice on the 3-2-1 method of smoking ribs. There are many variations of that technique. I think it went well. I tracked my progress with the #AiXeLsyDBBQ hashtag. Maybe I’ll do some more next time.

The quick and dirty of this method is…

  1. Get your coals to 225°-ish. (I used a chimney to avoid lighter fluid and it was awesome.) I added some wood chunks in the chimney, and on top once I spread on the coals. I did not soak the wood, but I may next time. Control the temp with your vents. Open a bit warms it up, closed cools it off… all because of airflow.
  2. Remove the silverskin, and put a nice rub on the ribs. I used one from the section of Walmart by all the grilling stuff.
  3. Put the ribs in the grill part if you have an attachment, or not on the heat for 3 hours.
  4. Pull the ribs out, wrap in heavy duty grilling foil, add some apple cider, apple juice, vinegar, pop, or whatever. I added some Straub. Unfortunately I made 2 racks and used the whole bottle, so I drank one myself.
  5. Put them in for 2 hours, smoking really isn’t necessary at this point if your wanna save your chunks or chips.
  6. Pull them out and unwrap them. I should have saved the drippings for the barbecue sauce on the side, but I did not. Shame on me. Do that.
  7. Sauce those ribs up. Liberally. Like, and obscene amount.
  8. Put them back on for 1 hour. (3-2-1… get it? Guys! They said the thing!)
  9. Always check with a thermometer for done-ness. They should be pretty damn done at this point, arguably overdone.
  10. EAT.

I know fall-off-the-bone isn’t competition style. A bone did pull right out of one rack, but the meat was in tact, not falling completely apart. I know the foil wrapping bit is then steaming not smoking… but, rules are made to be broken and a healthy dose of anarchy warms my little punk rock heart.

I would definitely do the ribs like this again. I may try a homemade sauce. This was pretty basic store-brand stuff from Shop ‘n Save with some dry mustard, brown sugar, garlic powder, onion powder, and black pepper, and Straub American Amber Lager. I may try different chips, or a smoker box, or to soak the wood. I even read some people eschew charcoal in favor of all wood once the fire is going.

I also threw on some baked potatoes, turkey legs, grilled veggies, and sauce on the attached burner.

Can’t wait to try out a turkey, pork loin, brisket, and whatever else I haven’t thought of. Mac n’ cheese? Jalapeño poppers? Meatloaf? Bacon?

What do you do in the smoker? What are your go to foods? Got any tips & tricks worth sharing? Do you click the tongs twice or three times? Before, during, or after?

Any excuse to drink beer and play with fire all day is a good excuse to me. Plus, the family was awed by my hereto unknown skills with smoked meats.

What music are you playing while you’re grilling or smoking?

This is the full adventure as told via Instagram:

Vegetable Garden 2021 🌱 II: The Wrath of Fawn


Damn deer ate my tomatoes.

Think they’ll come back from this, or is it just best to replace?

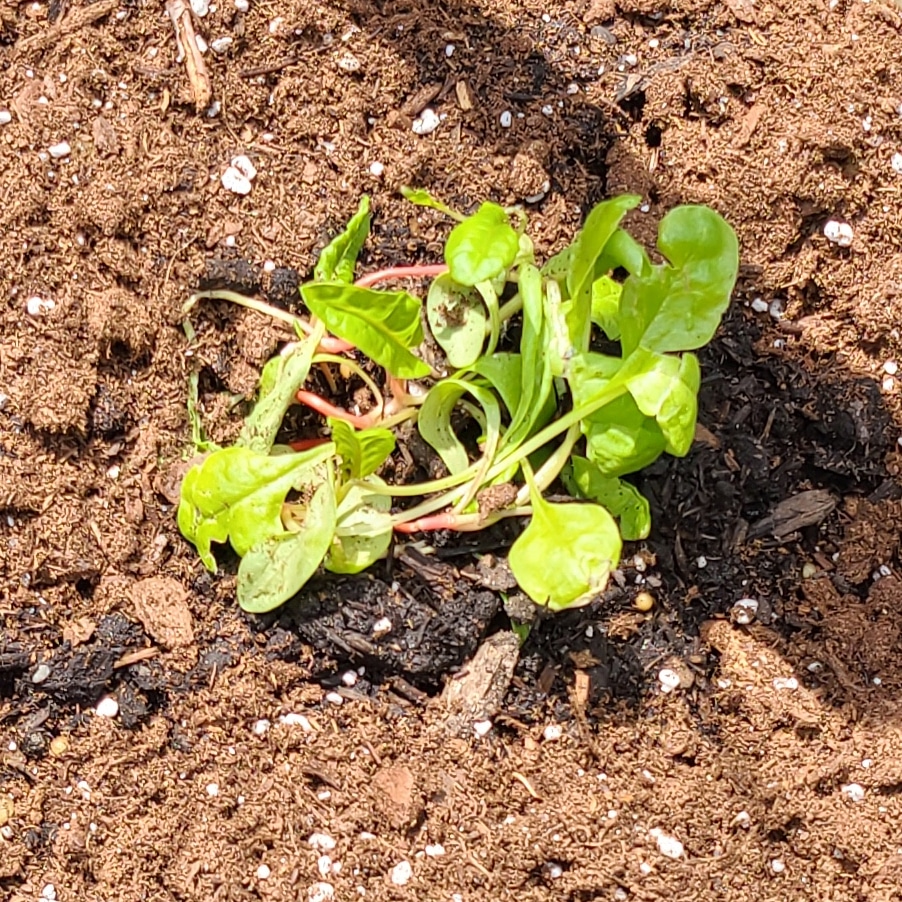
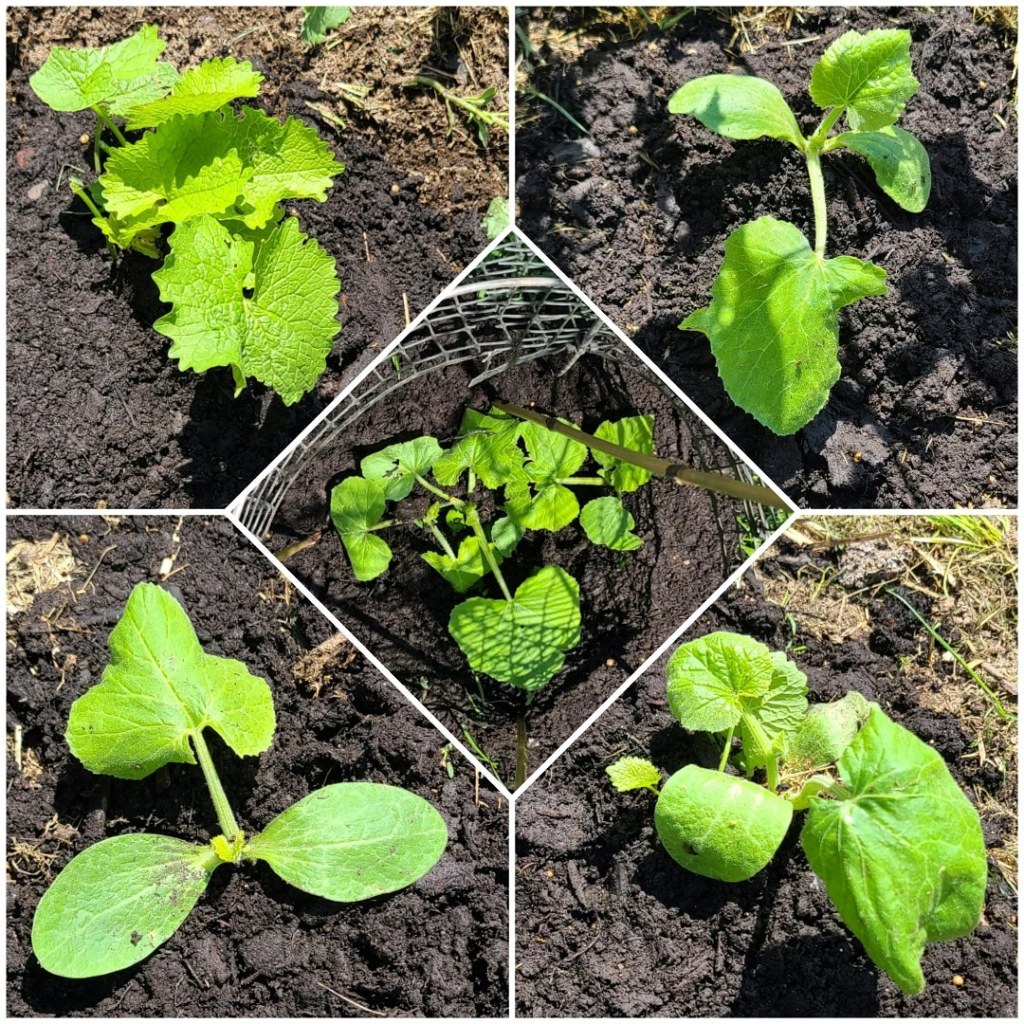
Also, we planted some swiss chard from my daughter’s school science class, some snap beans, some yellow onions, and garlic. We also had 1 volunteer squash pop up in the yard, and 4 back by the compost pile. Not really sure what they are. I have had some WEIRD hybrid stuff in the past. When you grow multiple varieties they can cross-pollinate and the seeds can make some wacky stuff. They could be that wacky stuff or just pumpkins, butternut squash, acorn squash or zucchini.

Gorillas in the Mint

Check out the original blog from this year for a nice embedded chart.

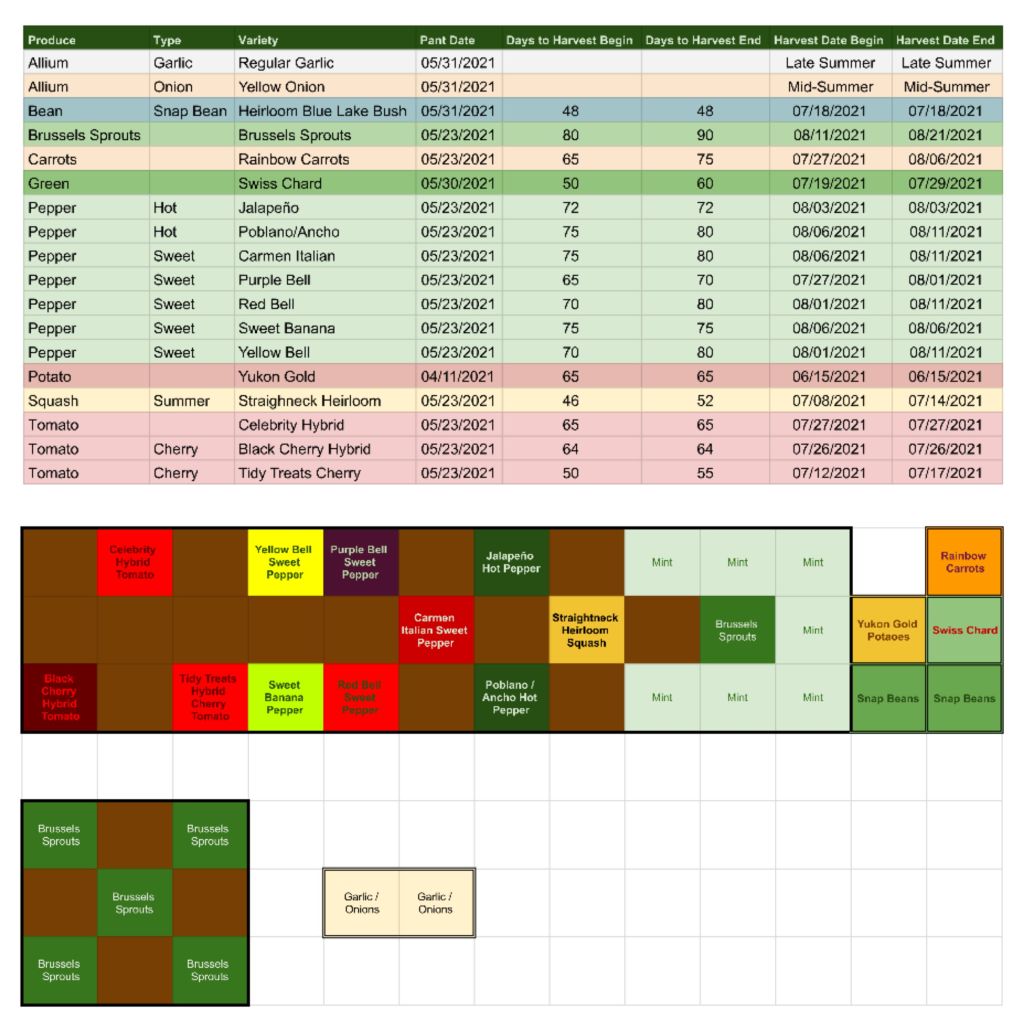
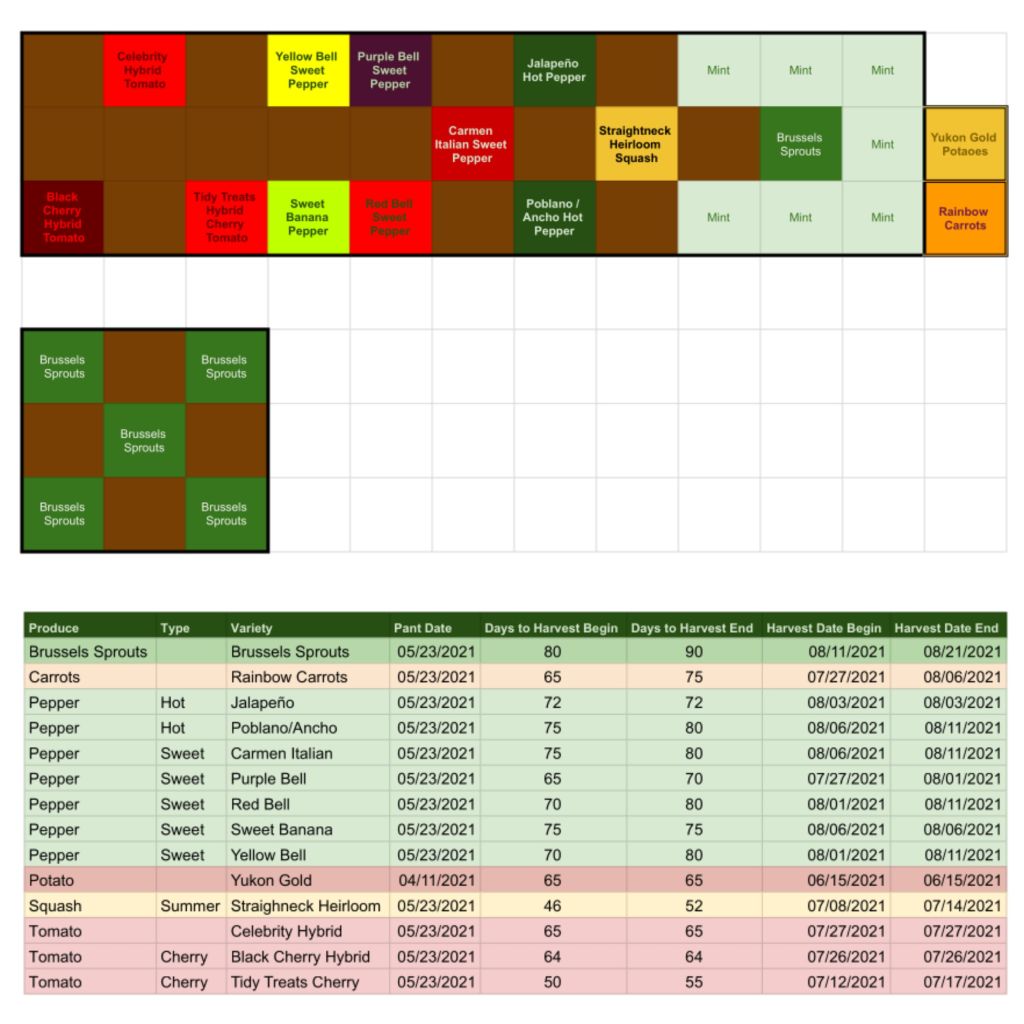
Revised Garden Map & Harvest Dates:

Follow my instagram for all the latest stuff, and some other plants around the yard.

Vegetable Garden 2021 🌱


This year, I had some big help in the garden! These two have been gardening since they could walk, and I think they’re enjoying it and really getting the hang of it.

The kids have their own YouTube channel now, with a little hep from some old guy that blogs occasionally. Check out their gardening how-to:

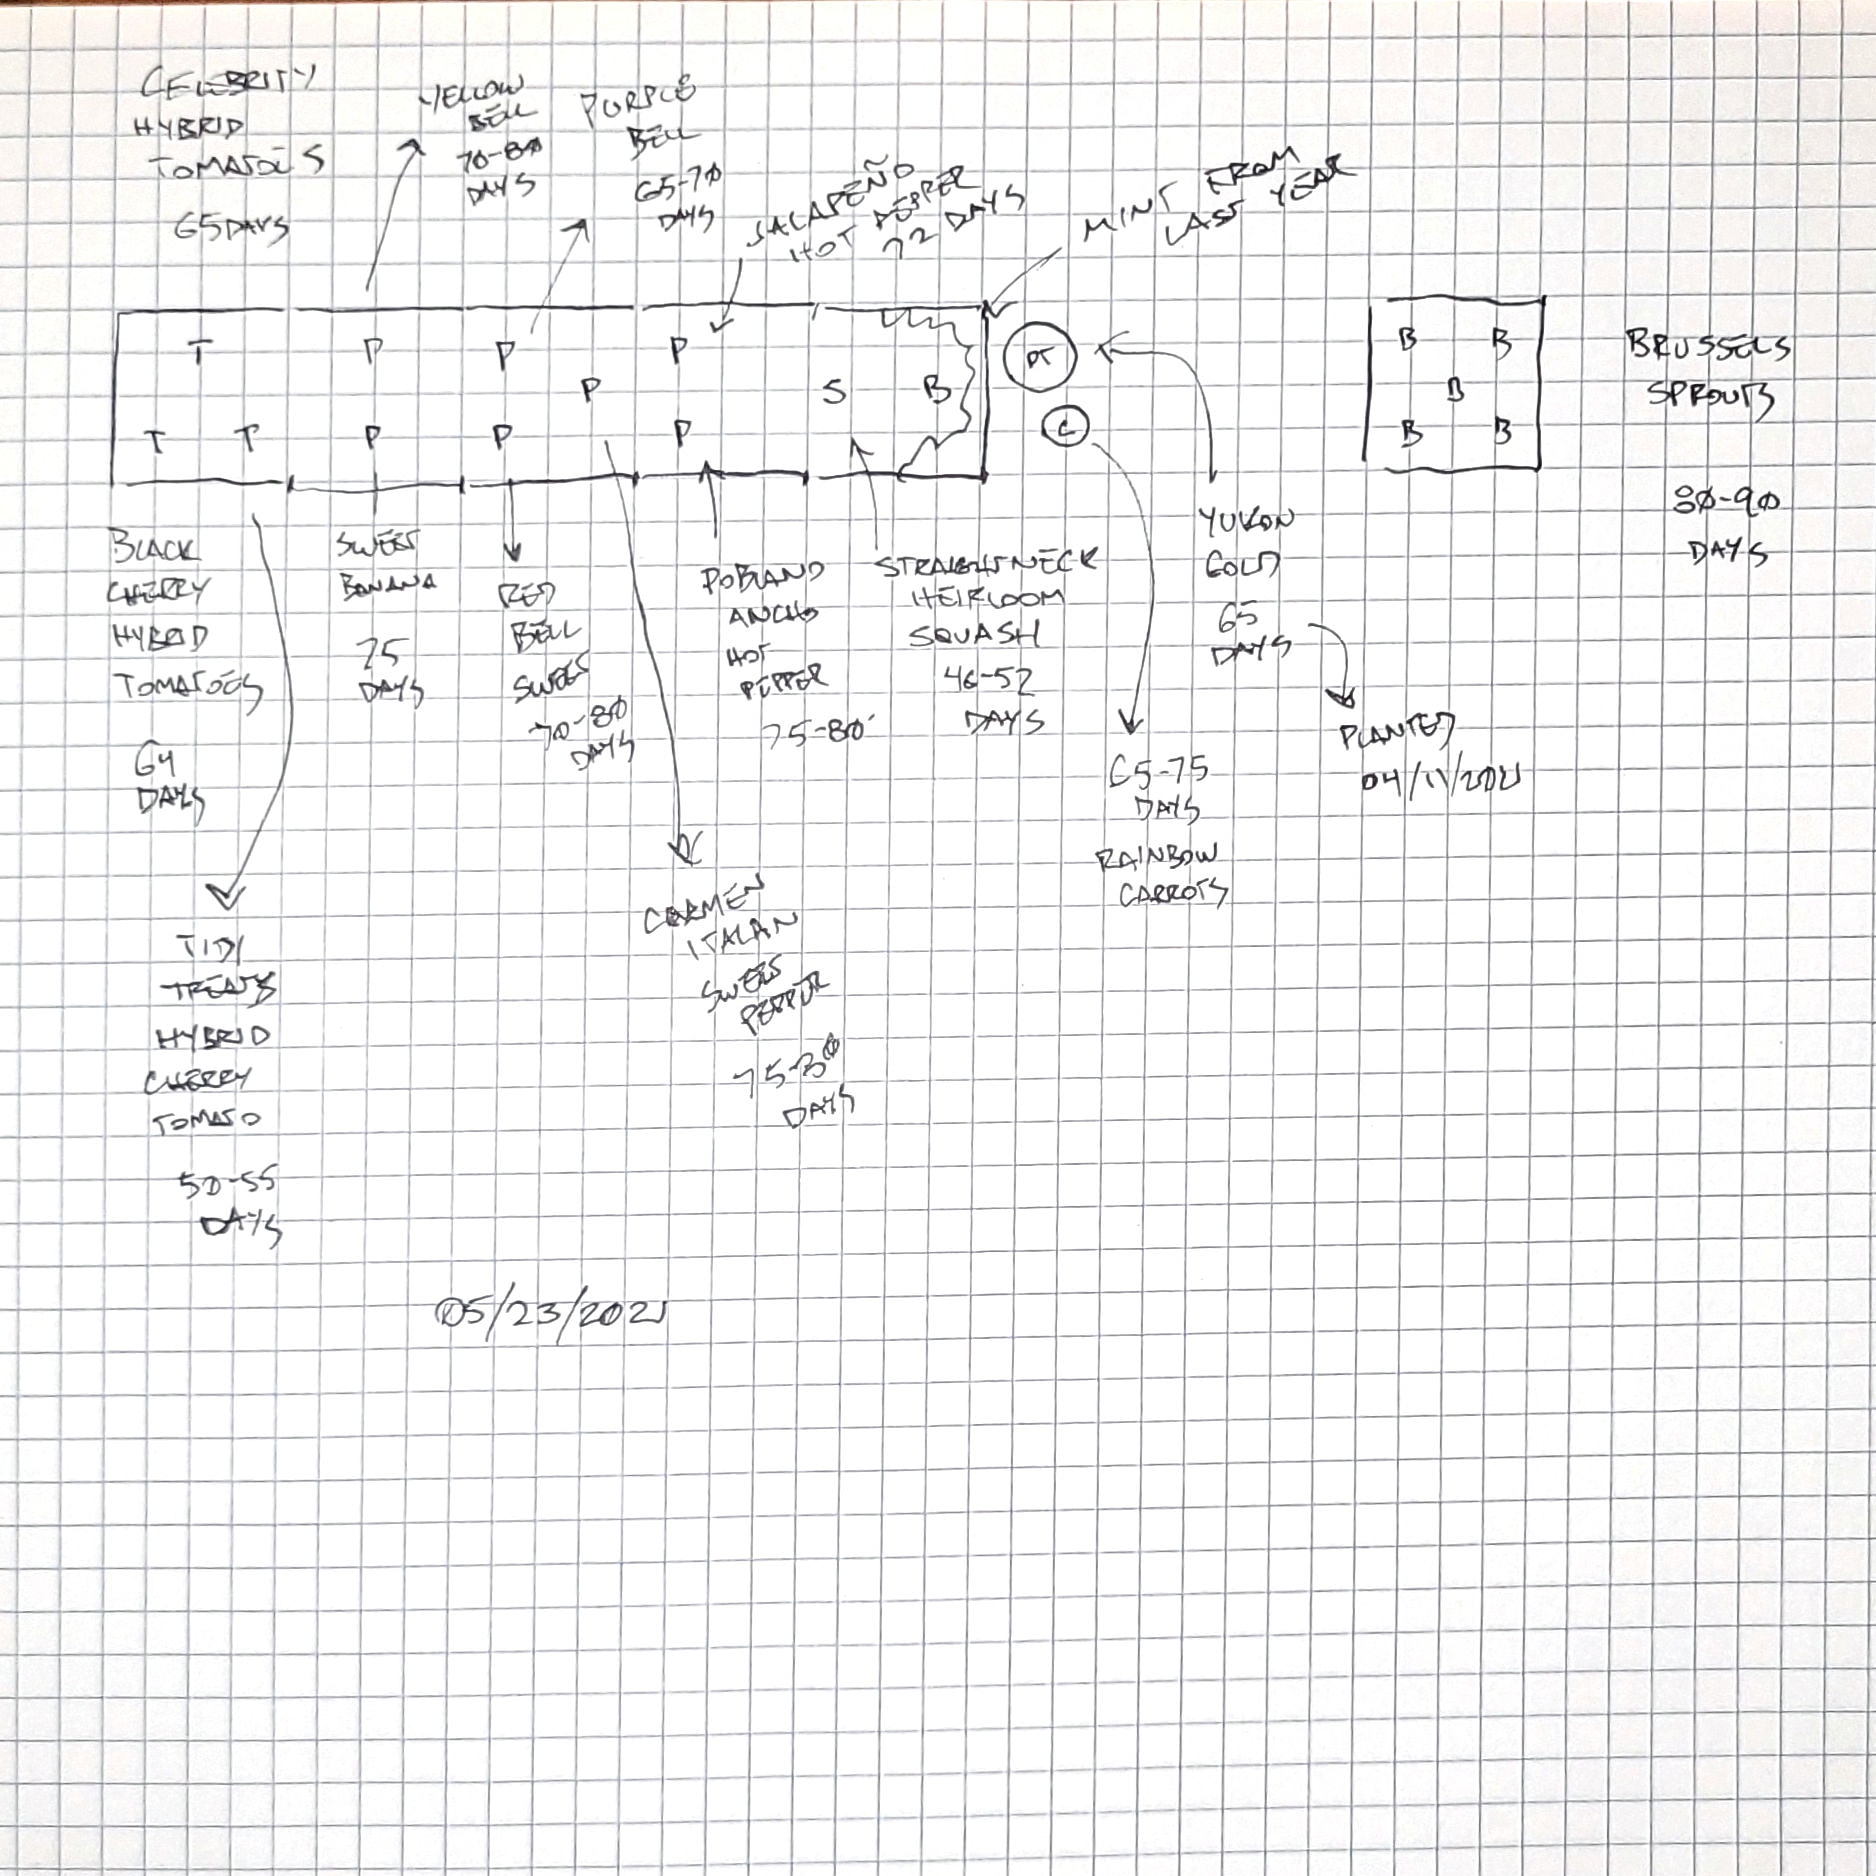
I also made a map, and decided to make a chart of the suggested harvest dates on the tags just to see how accurate they are. I have been gardening since I can remember, and don’t know if I ever paid attention to that. We just picked stuff whenever it appeared & ripened.

Garden Map & Harvest Dates 2021

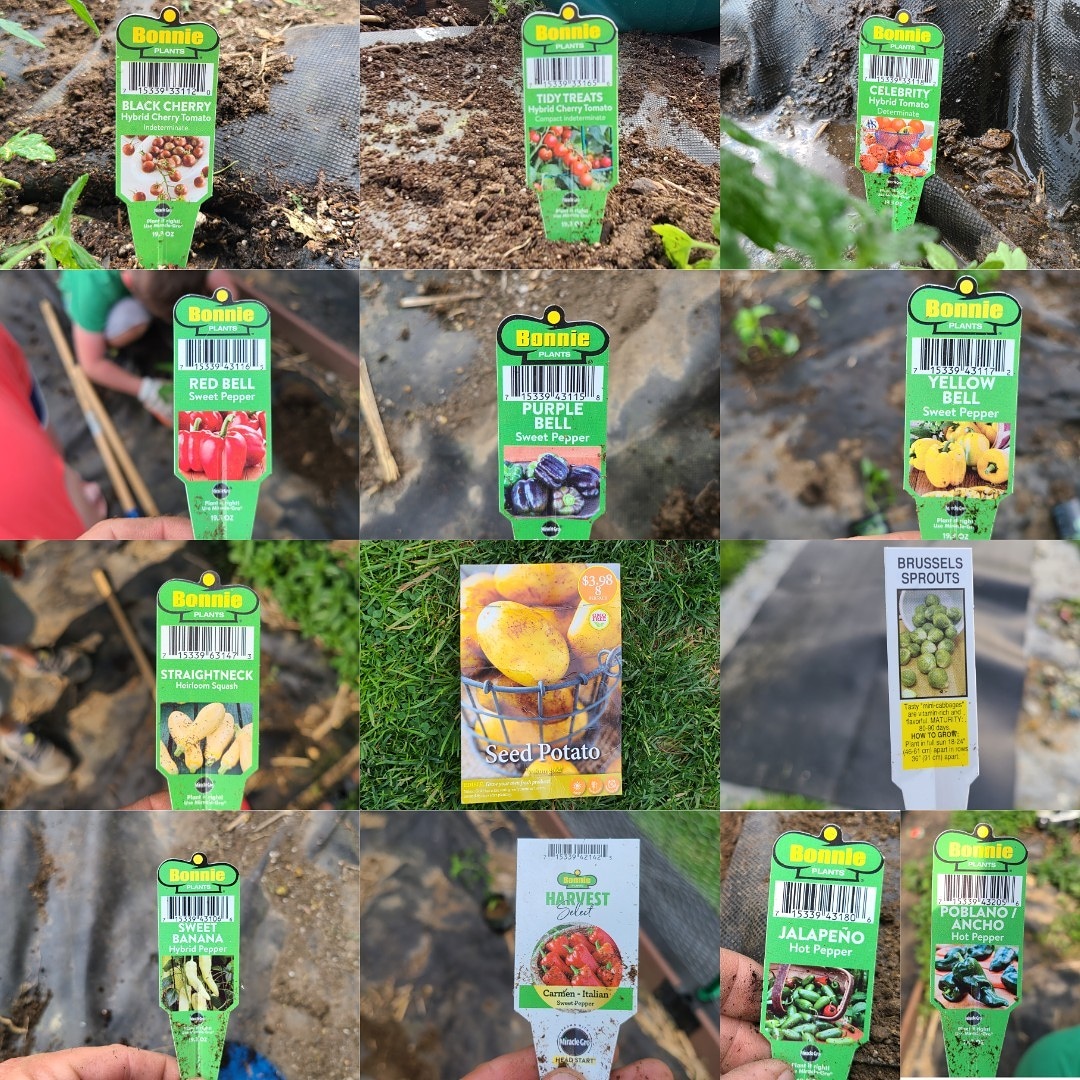
We made sure to get all the tags & try to document it all. The kids are loving math & science, so why not incorporate it into the garden? We can see if the harvest dates noted on the tags are anywhere near when the plants are actually ready.

I’m excited to see how it turns out! And, yeah, we got some more jalapeño since they liked it last year… and this time we’re trying some poblano too!

Whoa, Instagram is a trip down memory lane with these kids and gardening!

Kids, Gardening, & Jalapeños. 👨‍👩‍👧‍👦🌱🌶️


The kids like to garden. They helped plant once again this year, and have been great at watering, upkeep, & harvesting. They really did most of the planting work this year, and are learning about how to keep weeds out and when to pick ripe peppers. (They’re already pretty good at tomatoes.)

Molly & Ian try a jalapeño from the garden! 🌶️

This year, by accident, I picked up a jalapeño plant when shopping at Home Depot. I meant to get 2 each of yellow bell peppers, orange bell peppers, and red bell peppers. I came home with a jalapeno and only one yellow pepper. We also planted some sweet banana peppers.

When I brought it home, Ian was determined to plant it & try some. He was true to his word! Molly & Ian did both try it! I put the video up on YouTube and IGTV.

Decide for yourself if you think they liked it:

I haven’t ever grown hot peppers despite all my years growing tomato, pepper, & a slew of other stuff.

I asked on various social media platforms on how to tell if your jalapeno is ripe and I got a handful of differentiating opinions. I got…

  • When they turn red. (Was told they turn black before they are red.)
  • When they start to get little brown lines/wrinkles.
  • At around 3″ long.
  • At around 6″ to 8″ long.
  • Look at the photo on the plant tag.
  • bury match heads to make them hotter.

So, how do you tell when they’re ripe?


Share your hot pepper ripeness tips & any other tricks below on the comments.

Have an recipes to share too?  I would like to hear your thoughts on gardening, jalapeno peppers, or the video below!

This has been a fun gardening journey.  It is exciting to see them learn about composting, growing food, and then trying it & even cooking with it.  We have had plenty of beautiful snap beans, sweet banana peppers, & a few varieties of cherry tomatoes so far.

Watch “🍀 Swingset Shenanigans – Sat. 2017/08/06 🎪” on YouTube


I think I made this a draft, & forgot to post it…  I got some video of the kids having a blast on the Swingset, and played around with the YouTube video editor before it disappears.

Stuff and things.


I haven’t blogged very consistently lately.  When I’m not blogging, I’m usually doing something with the kids. Like this stuff;

Pulling up carpet tack strips:

Building a swingset:

Getting a pretend haircut:

So, we built a swing set…


It was a fun family project.  We told the kids that birthdays & Easter would be light as we were putting a lot into the swingset.  I’m not sure they understood or cared.  Our moms helped with the purchase, too.  Bethany & I looked online at 6,487,932 swing sets, and narrowed it down to 15 or so in our price range.  I made a spreadsheet to compare them, because OCD or something.  Looking at the roadside swing sets at those places that also sell sheds and rocking chairs, we got a similar product for about ⅓ or ¼ of the price, albeit with no installation.

Installation is expensive, and now we know why.  Ha ha.  Everyone who knew we were getting one gave warning, so we weren’t surprised, but it was an interesting task.

It came in 3 boxes from Walmart.com, and we did in-store pickup because I measured & it all fit nicely in the family vehicle.

It took two weekend days with one week night in between to get it done, but the first weekend day was slowed by the kids “helping,” a move-the-tools-in-because-it-looks-like-rain delay, and maybe even a “let’s undo that part because I put it on backwards” moment.  The week night was hindered by the fact that as soon as I attached the ladder & sliding board, the kids needed to test it out.

Bethany & I enjoyed the kids helping.  We do the Home Depot Kids Workshops so both kids are comfortable with a hammer & a screwdriver, and we have done some other stuff at home like carpet removal and hanging curtain rods where they have actually helped.


My mom even got video of the little man showing off his ratchet skills;

We have been at the house for a few years now, but the project this year is another step to getting the back yard to where we want it, and next year we’ll work on the front.  Having some trees removed recently & moving our garden really opened up some space in the back yard.  I’d like to put in a fire ring, and a toy car race-track play area.  I actually proposed removing the Bean House to make room for the latter, but I was vetoed by a 2yo boy saying “Unh-uh, Daddy.  Hoooome.  Hooome.  Daddy, unh-uh.”  I really hope the beans take off this year.  I have some sprouts popping up already.  I have some squash around it too. I don’t think the soil is all that great there though.

I even recently built this Pinterest inspired potting bench…

Back to the swing set, we even got a few extra add-ons from Amazon, like the steering wheel, telescope, telephone, and some handles.  I think I want to replace the kitchen area tarp walls with some chalkboard-painted wood… and eventually when the canopy fades or dry-rots, I’d like to replace it with some type of solid roof.


At any rate, I encourage you to tackle a project as a family.  I encourage you to get kids outdoors.  I encourage you to not be afraid to give young kids some tools with a bit of guidance and a lot of supervision.  I encourage you to get them into building, gardening, cooking, and the business of imagination.  I encourage you to try projects yourself, and don’t be afraid to involve the whole family.  It’s amazing how much you can learn through Google, YouTube, and a maybe a few tries.

I think the kids like it…

So, in the spring I want to build an outdoor Matchbox car race track… 🚗


How cool is this?

Since the bean house was a bit of a bust, maybe this will be a hit.  It looks like it can get as complicated or remain as simple as you’d like.  I have pinned a bunch of ideas.  I’d like to include an area for construction vehicles… maybe tiny pebbles, not sand.  I hate sand.  I like the use of the tire in the one… and the dirt road, and tunnels.


I hope to snag a bunch of ideas online, specifically Pinterest I guess. Looks super fun for both kids, and me!

Have you done anything like this?

Teach your kids not to be @$$holes about food allergies.


You need to read this:

Now.

Dig it?

On the “Super-Cool Food Allergy News” front, FARE has said they will not accept donations from Mylan until this Epi-Pen price-gouging shenanigans is resolved.  That makes me feel a lot better about asking for your donations for the upcoming Food Allergy walk in Pittsburgh.  It’s a little less messy.

As the linked article proves, we still need awareness.  We still need education.  We still need advocacy.  We still need research.  We still need a cure.  That is what all of your donations go to.