Thanksgiving Dinner! – The Recipes.


I love to put together a holiday meal, especially thanksgiving. I have it down pretty good to corral the chaos.

First prepping the turkey & stuffing…

I do the bird in the electric roaster, stuffed, for 15-ish minutes per lb. @ 325° Farenheit. I roasted in the preheated pan on full for about 45 minutes at the start before turning it down. I inject the turkey in a few sports with a mixture of melted beer, butter, & spices. I usually rub some softened butter on top and toss on lots of seasoning there too. I usually pour a bottle of beer and a box of turkey broth in the bottom, & include some carrots, celery, & an onion.

Don’t worry about samonella with a stuffed bird. Take it to 165°. Always use a food thermometer. Some of the dark meat of the turkey will be overcooked but it will still be juicy & delicious. I haven’t killed anyone with my turkey yet.

The extra stuffing can be made into stuffing balls, but I put it in the crock pot. You just have to stir it, & maybe add extra turkey or chicken broth if needed or it will stick to the sides a lil’ burnt.

Do the math, & time it so you’re pulling the turkey out about a half an hour before you want to serve it.

Then I make the sides. Check out my recipes!

I cut up the butternut squash first, & put it in the fridge for when I needed it.

I peeled & quartered the potatoes, let them sit in cold water (& turkey broth).

Cut up & prep the brussels sprouts & carrots, you want to pop them in about 45 min before you plan to eat.

Prep the squash & put it in right after the brussels sprouts.

Turn on the potatoes, by the time they cook & you do your thing… it the other stuff should be ready to go.

Others brought even more sides… cranberry sauce, green bean casserole, sweet potatoes, deviled eggs, & rolls!

If I make green bean casserole, I pretty much use the Campbell’s recipe or French’s Fried Onions recipe… sometimes with an added can of mushrooms, fresh green beans, & maybe even some bacon pieces or ham.

If I cook with beer it’s either Yuengling Traditional Lager or Straub Amber.

For the gravy, I just use pan drippings broth from the turkey, and eyeball together a slurry of corn starch, add it, & some more spices if needed.

Someday I am going to brine a turkey with a buttermilk brine & cook it on the smoker, but… not for Thanksgiving. Well, not the first time anyway.

I like to keep the oven open for sides, & any brought sides or pies that may need warmed up.

Thanksgiving Sides!  Brussels Sprouts & Rainbow Carrots, Butternut Squash, Mashed Yukon Gold Potatoes, & Stuffing!
Thanksgiving Sides! Brussels Sprouts & Rainbow Carrots, Butternut Squash, Mashed Yukon Gold Potatoes, & Stuffing!

What are your Thanksgiving or other holiday meal prep tips, go-to’s, methods, or favorite recipes?

🦃 Don’t forget these free Thanksgiving Mazes! 🦃

Roasted Brussels Sprouts w/ Rainbow Carrots


Another one of my holiday go-to’s, this one takes a bit of labor but it’s worth it.

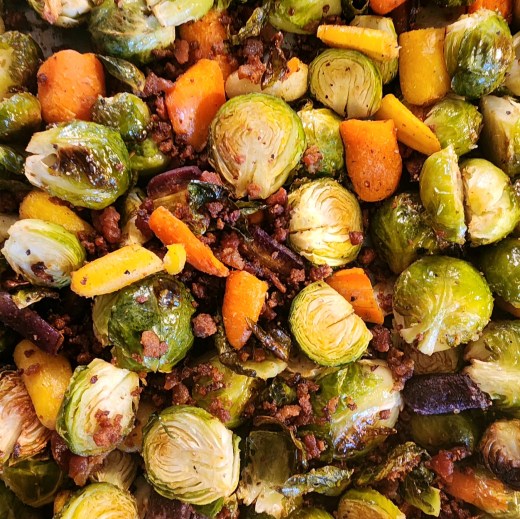
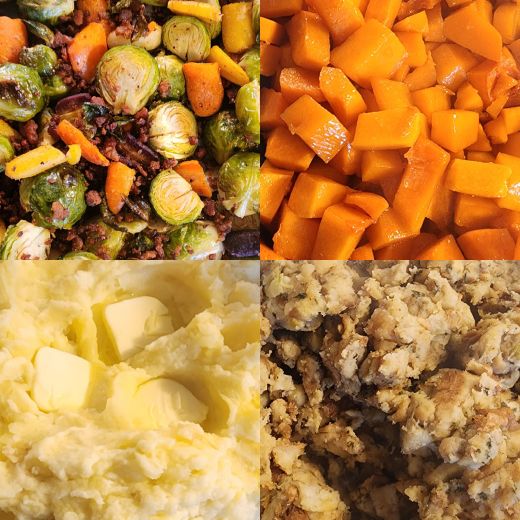
Roasted Brussels Sprouts with Rainbow Carrots & Bacon pieces.
Brussels Sprouts! With some goodies…

Getchya mise en place:

  • One 32 oz. “family size” bag of Brussels Sprouts (or 2 lb. of bulk fresh)
  • One 16 oz. bag of baby cut rainbow carrots
  • One 2.8 oz bag of bacon pieces
  • Extra Virgin Olive Oil
  • Salt, pepper, garlic powder, whatever spices you want.

Do it:

  1. Pre-heat the oven to 400° Fahrenheit.
  2. I quarter the baby carrots – one cut long ways, one cut through the middle.
  3. I cut the bottom off of the sprouts, remove the outer leaves if they’re not great looking, halve them, and if they’re large, score the middle. (Look close at the photo.)
  4. Mix the sprouts, carrots, & bacon pieces in a bowl, add the spices, eyeball in some EVOO & toss to coat it all evenly.
  5. Spread evenly on a baking sheet or in a glass dish.
  6. Slap them in that oven for 40-ish minutes.

Tips n’ tricks:

  • Of course, use whatever spices fit your fancy.
  • If you can’t find rainbow carrots, regular ones or parsnips or both are an absolutely awesome addition also.
  • Roasting caramelizes the sometimes bitter brussels sprouts. You may find that you prefer them “more” done or “less” done.
  • Scoring the middle helps them roast fully or more evenly.
  • You can skip the bowl if you can stir it all up and not make a mess like I do.

So, what do you think? Do you like Brussels Sprouts? Do you prepare them a similar or wholly different way?

We finally hung the sign on our #BeanHouse. 🌱


Did you read about our #BeanHouse?

I was able to get some matte clear-coat spray this week and hit the sign a few times, although this stuff seemed to soak up the paint like a sponge.  We just used some particleboard from an old dresser drawer.  It was the perfect size.  I did the marker & colored the beans, the rest was all Molly.

Molly also got a tomato plant  from her Grandma BB, so we planted it right out front.  We tried the fork trick there too to deter bunnies, but if I remember right they’re not huge fans of tomatoes.  You never know what else is out & around either.

We also put out some organic bloodmeal to provide nutrients and hopefully deter critters.   Molly reminded me to put down grass clippings because they hold moisture.

I was thinking about putting out some cinnamon to keep the rabbits away too.  I just saw that coffee grounds keep away snails.  Do you have any other tips & tricks that seem to have worked for you in the past?  We did use garlic clips last year.  They seemed to work, but we did have a few incidents of snacking on our peppers.

No beans sprouting yet, but our Spanish onions just popped from seeds we planted a while ago.

Outdoor Gardening Fun With a #BeanHouse. 🌱


So, I dig gardening. (Get it?)  I have passed that on (so far) to my oldest child, and the little one really likes playing in the dirt.  I also enjoy doing things with the kids that are not only fun, but that allow me to sneak in some learning.

Today we set up a Bean House.  What’s a bean house?  I don’t know. That’s what my daughter wanted to call it & it’s really the most appropriate title.  We got the idea from a friend’s Facebook wall with instructions for a bean den and a willow den.

Basically, we built a play house that will act as a trellis for a (hopefully) vining bean plant.  I started with an area that had already been cleared thanks to a pile of brush that was recently removed.  Speaking of that brush that I have recently cleared form our jungle of a back yard; I grabbed 4 rather large branches with a “Y” shape, cut them to roughly the same length with the chainsaw, and sharpened the bottoms.  I dug some holes with a small gardening shovel and drove the posts in as far as I could, mounding up some dirt around each pole.  I used some gardening wire to secure four branches across the top for a nice little cube-ish frame.

Then, I let the munchkins “help” while I secured several smaller sticks across the top, down along the sides, and across the sides.  At one point we ran low on sticks, so I used some old wooden and bamboo tomato stakes.  The wooden stakes seemed to really help make the rest of the structure stable because I could really pound them into the ground well.  To secure everything, I used some newly purchased garden wire, and whatever twine and garden wire that we had leftover from previous years’ gardening adventures.

The top is a thatched mess of “wonky” branches that are woven together to provide slightly more shade than the sides, but will still be open for the growing vines.  My shelter would probably make Survivorman Les Stroud hang his head in shame, but it’s better than most of the shelters on Naked and Afraid.

The wife and little guy helped water the mounds so I could pack them down, and then I mounded dirt all around every post & they helped do the same.  Then we mulched the mound with grass clippings & packed it down again.

Finally I dug some holes for the pre-soaked Kentucky Wonder green bean seeds (beans?) around the base of the entire structure, and the whole family helped put in the seed-starter potting soil mix, the seeds, and some more dirt & mulch in place.  We placed some plastic forks facing outward all around the seeds at the base of the thing to hopefully help ward off the local overpopulation of rabbits.  I may try some additional deterrent like bloodmeal.

Later indoors, we found some other stuff and made a sign to hang once I get a coat or two of clear coat on it.

While we put it up, we talked about enjoying outside, building things, growing things, recycling and up-cycling, sunshine, water, and everything.  We talked about how grass clippings act like a mulch that holds moisture for the plants.  We talked about how the fertilizer and Miracle-Gro in the water acts like vitamins for the plants… vitamins like the one’s we’ll get from eating the beans.  I’m sure we’ll have discussions in the future about patience, including our little brother, and not knocking the bean house over.

My wife and I have always tried to talk to the kids with the same respect we’d give other adults.  We don’t use small words.  We explain things as best we can, encourage and answer questions.  I’m continually amazed at the observations that our daughter makes in conversation, and through our son’s actions that show an understanding of exactly what is going on.

If you’re reading this and are a parent, I ask you to narrate to your kids what you’re doing & why when you do an activity together.  You may think they’re too little to get it, but they’re constantly absorbing what you’re doing.

This is a great way to get into all kinds of stuff like gardening, up-cycling/recycling, food not lawns, urban farming, and striving to pass on the importance of such things as knowing how to grow food to your kids.  I’m excited to plant some tomatoes, peppers, and try a few new things this year.  I love going outside and seeing vegetable plants in the summer.  I love the smell of the dirt and growing plants.  I hope to pass this on and that the kids love it too.

All-in, I paid around $10 for the seeds, wire, & fertilizer.  Everything else we had here on hand or could have probably found easily for free.

Please, enjoy some photos and share some in the comments if you build your own!